Provision Master Pages and the other files in SharePoint Office 365 using Patterns and Practice C# CSOM

Sathish Nadarajan
 
Solution Architect
May 11, 2017
 
Rate this article
 
Views
3131

Some time back, we saw how to provision the site columns and content types in an OLD article. But, along with that, we can upload the Master Pages, CSS, JS files to the SharePoint Site as part of provisioning. In this, the same piece of code, with the updated Provisioning XML is shown below.

 using Microsoft.SharePoint.Client;
 using OfficeDevPnP.Core.Framework.Provisioning.Connectors;
 using OfficeDevPnP.Core.Framework.Provisioning.Providers.Xml;
 
 namespace Office365.Console
 {
     class Program
     {
         static void Main(string[] args)
         {
             ProvisionMasterPagesAndJSFiles();
         }
 
         public static void ProvisionMasterPagesAndJSFiles()
         {
             OfficeDevPnP.Core.AuthenticationManager authMgr = new OfficeDevPnP.Core.AuthenticationManager();
 
             string siteUrl = "https://*******.sharepoint.com/sites/communitysite";
             string userName = "Sathish@*********.onmicrosoft.com";
             string password = "************";
 
             string ResourcesDirectory = @"C:SATHISHPRACTICE SOURCE CODESOffice365.ConsoleOffice365.ConsoleResources";
             string ResourcesFile = "ProvisioningTemplate.xml";
 
             using (var clientContext = authMgr.GetSharePointOnlineAuthenticatedContextTenant(siteUrl, userName, password))
             {
                 Web web = clientContext.Web;
                 clientContext.Load(web);
                 clientContext.ExecuteQueryRetry();
 
                 var provisioningProvider = new XMLFileSystemTemplateProvider(ResourcesDirectory, string.Empty);
                 var provisioningTemplate = provisioningProvider.GetTemplate(ResourcesFile);
                 provisioningTemplate.Connector.Parameters[FileConnectorBase.CONNECTIONSTRING] = ResourcesDirectory;
 
                 clientContext.Web.ApplyProvisioningTemplate(provisioningTemplate);
                 clientContext.ExecuteQuery();
             }
         }
     }
 }
 

And the Provisioning Template is

 <?xml version="1.0"?>
 <pnp:ProvisioningTemplate ID="Demo.TeamSite" Version="1" xmlns:pnp="http://schemas.dev.office.com/PnP/2015/12/ProvisioningSchema">
 
    <pnp:Files>
 
     <pnp:File Src="MasterPagesMy.seattle.master" Folder="_catalogs/MasterPage" Overwrite="true" />
      <pnp:File Src="JSFilesJavaScript1.JS" Folder="SiteAssetsJS" Overwrite="true" />
   </pnp:Files>
 
 </pnp:ProvisioningTemplate>
 

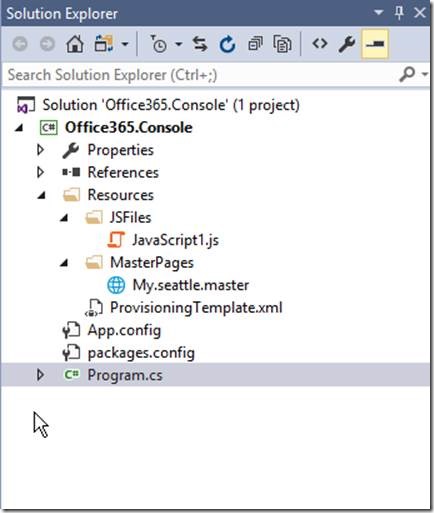
The Solution will be looks like

clip_image002

Happy Coding,

Sathish Nadarajan.
Author Info

Sathish Nadarajan
 
Solution Architect
 
Rate this article
 
Sathish is a Microsoft MVP for SharePoint (Office Servers and Services) having 15+ years of experience in Microsoft Technologies. He holds a Masters Degree in Computer Aided Design and Business ...read more
 

How to apply Master Pages Programmatically by Client Side Object Model – CSOM in SharePoint Office 365

Sathish Nadarajan
 
Solution Architect
September 10, 2016
 
Rate this article
 
Views
7043

A small piece of code snippet to update the master pages of the Site in SharePoint Office 365 – Thought of sharing with the community.

The code is very straight forward and it can be reused as it is.

 using System;
 using System.Collections.Generic;
 using System.Linq;
 using System.Text;
 using System.Threading.Tasks;
 
 using Microsoft.SharePoint.Client;
 using System.Security;
 using Microsoft.Online.SharePoint.TenantAdministration;
 using OfficeDevPnP.Core;
 using Microsoft.SharePoint.Client.Publishing;
 
 namespace Console.Office365
 {
     class Program
     {
         static void Main(string[] args)
         {
             ApplyMasterPage();
         }
 
 
         public static void ApplyMasterPage()
         {
             OfficeDevPnP.Core.AuthenticationManager authMgr = new OfficeDevPnP.Core.AuthenticationManager();
 
             string siteUrl = "https://********.sharepoint.com/sites/PublishingSite/";
             string userName = "sathish@******.onmicrosoft.com";
             string password = "*******";
 
             using (var ctx = authMgr.GetSharePointOnlineAuthenticatedContextTenant(siteUrl, userName, password))
             {
                 Web web = ctx.Web;
 
                 ctx.Load(web);
                 ctx.ExecuteQueryRetry();
 
                 web.MasterUrl = web.ServerRelativeUrl + "/_catalogs/masterpage/oslo.master";
                 web.CustomMasterUrl = web.ServerRelativeUrl + "/_catalogs/masterpage/oslo.master";
 
                 web.Update();
 
                 ctx.ExecuteQueryRetry();
             }
         }
     }
     
 }
 

Happy Coding,

Sathish Nadarajan.
Author Info

Sathish Nadarajan
 
Solution Architect
 
Rate this article
 
Sathish is a Microsoft MVP for SharePoint (Office Servers and Services) having 15+ years of experience in Microsoft Technologies. He holds a Masters Degree in Computer Aided Design and Business ...read more
 

The New SharePoint Home Page Web Experience

Sriram Varadarajan
 
Solution Architect
July 17, 2016
 
Rate this article
 
Views
6061

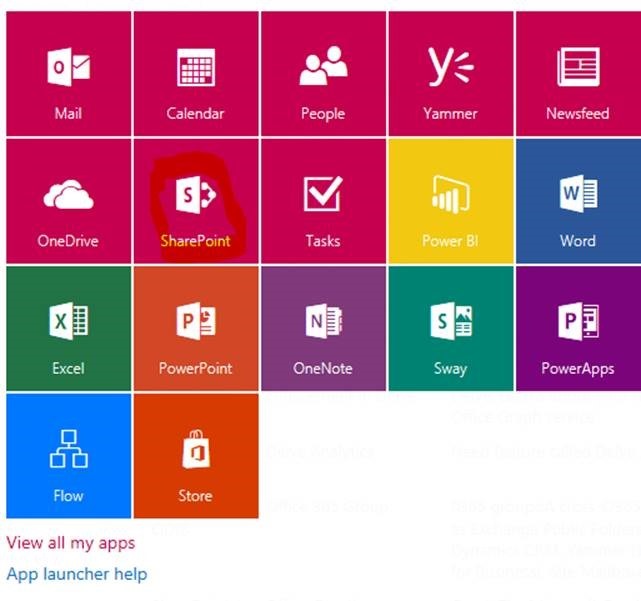
The new SharePoint home page web experience enables us to easily get to, find and discover important sites and portals throughout your intranet – online, on-premises and everything in-between. Today, many Office 365 users use the "Sites" page – the 4th most clicked tile in the Office 365 app launcher. MS is working hard to modernize this experience and transforming it into a true home for SharePoint. What was the ‘Sites’ page is now the ‘SharePoint home’ and the “Sites” tile becomes the “SharePoint” tile – same logo, redesigned for a modern, responsive user experience. Clicking into the SharePoint Home displays the recent sites and portals you are most active in and following, recommended sites per the Office Graph, plus company-wide sites promoted by your company. From the SharePoint home, you, too, can create new sites – simple and fast.

Here comes our next question, what is Office Graph? Before we get to know about it we should also know something called MICROSOFT Graph.. The terminology looks very similar isn’t… MS is not that good at naming convention as we all know Smile

clip_image002


In a typical layman term;

Microsoft Graph: Power of Microsoft Graph, a unified API endpoint, for accessing data, intelligence, and insights coming from the Microsoft cloud.

Office Graph: The Office Graph computes insights across Office 365 and makes these insights available through the Microsoft Graph, the single endpoint that you can use to access a number of Microsoft’s cloud technologies.

As we all know both MS graph and office graph is still in its early phase and we might see some issue in the way it’s functioning. Let me take you all through the MS graph stuff in a separate article, here I would like to talk more on office graph part. As mentioned earlier, clicking on the SharePoint link lists all the site which I’m following, sometimes the data that shows there is kind of different that the actual. In my case, I was able to see very limited site than I actually follow.

Here are steps which you can try to make sure that is this showing the actual site which I’m following:

1. https://<tenant>.sharepoint.com/_layouts/15/sharepoint.aspx?v=following.

a. Check the count if it’s different go to step 2

2. Try unfollowing and following the site (Which I know it’s tedious) but you can give it a try.

3. Else the last option;

This script below displays the items that are being followed in SharePoint online, which in turn we can use for comparison.

 <html>
 <head>
     <script type="text/javascript"  
 src="https://ajax.googleapis.com/ajax/libs/jquery/1.8.3/jquery.min.js"></script>
     <script type="text/javascript">
             var followingManagerEndpoint;
             var followedCount;
             var followingEndpoint;
             var URL;
             var website;
             var clientContext;
 
             SP.SOD.executeFunc('sp.js', 'SP.ClientContext', loadWebsite);
             function loadWebsite() {
                clientContext = SP.ClientContext.get_current();
                website = clientContext.get_web();
                clientContext.load(website);
                clientContext.executeQueryAsync(onRequestSucceeded, onRequestFailed);
             }
 
             function onRequestSucceeded() {
               URL = website.get_url();
               followingManagerEndpoint = decodeURIComponent(URL) + "/_api/social.following";
               getMyFollowedContent();
            }
 
            function onRequestFailed(sender, args) {
              alert('Error: ' + args.get_message());
            }
 
            // Get the content that the current user is following.
            // The "types=14" parameter specifies all content types
            // (documents = 2 + sites = 4 + tags = 8).
           function getMyFollowedContent() {
             $.ajax( {
                  url: followingManagerEndpoint + "/my/followed(types=14)",
                  headers: {
                      "accept": "application/json;odata=verbose"
                  },
                  success: followedContentRetrieved,
                  error: requestFailed
            });
         }
 
         // Parse the JSON data and iterate through the collection.
         function followedContentRetrieved(data) {
             var stringData = JSON.stringify(data);
             var jsonObject = JSON.parse(stringData);
             var types = {
               1: "document",
               2: "site",
               3: "tag"
            };
 
            var followedActors = jsonObject.d.Followed.results;
            var followedList = "You're following items:";
 
            for (var i = 0; i < followedActors.length; i++) {
               var actor = followedActors[i];
               followedList += "<p>" + (i + 1) + ". The " + types[actor.ActorType] + ": "" +  
 actor.Name + ""</p>" + "<p>Site URL " + ": "" +
               actor.Uri + ""</p>";
            }
            $("#Follow").html(followedList);
         }
 
         function requestFailed(xhr, ajaxOptions, thrownError) {
           alert('Error:n' + xhr.status + 'n' + thrownError + 'n' + xhr.responseText);
         }
 
     </script>
 </head>
 <body>
     <div id="Follow"></div>
 </body>
 </html>

Conclusion:

Though we couldn’t fix it but on a whole we at least have a mechanism to compare Smile

Category : Office 365, SharePoint

Author Info

Sriram Varadarajan
 
Solution Architect
 
Rate this article
 
Sriram is a Technology Evangelist with 15+ years experience in Microsoft Technologies. He is an enterprise architect working for large pharmaceutical organization which has presence globally with largest Microsoft implementation ...read more
 

How to Set the Master Page in SharePoint 2013 using PowerShell

Sathish Nadarajan
 
Solution Architect
December 5, 2015
 
Rate this article
 
Views
12977

A small code snippet to set the Master Page in SharePoint 2013 using PowerShell. The Script is straight forward.

 ##================================================================================================
 ## Description	: To do the below two items.
     #1. Change the Master Page to the Custom Master Page
 ## Author		: Sathish Nadarajan
 ## Date			: 17-Nov-2015
 ##================================================================================================
 
 ##============================================ Setup Input Paths ===========================================================
 
 cls
  
 $Host.UI.RawUI.WindowTitle = "-- Change the Master Page to the Custom Master Page --"
 
 $StartDate = Get-Date
 Write-Host -ForegroundColor White "------------------------------------"
 Write-Host -ForegroundColor White "| Change the Master Page to the Custom Master Page |"
 Write-Host -ForegroundColor White "| Started on: $StartDate |"
 Write-Host -ForegroundColor White "------------------------------------"
 
 $LogTime = Get-Date -Format yyyy-MM-dd_hh-mm
 $LogFile = ".ChangeMasterPage-$LogTime.rtf"
 
 #start-transcript $logfile
 
 $scriptBase = split-path $SCRIPT:MyInvocation.MyCommand.Path -parent
 Set-Location $scriptBase
 
 $ErrorActionPreference = "Stop"
 
 function AddPowerShellSnapin()
 {
     try
     {
         Write-Host "Adding PowerShell Snap-in" -ForegroundColor Green
         # Try to get the PowerShell Snappin.  If not, then adding the PowerShell snappin on the Catch Block
         Get-PSSnapin "Microsoft.SharePoint.PowerShell" 
     }
     catch
     {
         if($Error[0].Exception.Message.Contains("No Windows PowerShell snap-ins matching the pattern 'Microsoft.SharePoint.PowerShell' were found"))
         {
             Add-PSSnapin "Microsoft.SharePoint.PowerShell"
         }
     }
     Write-Host "Finished Adding PowerShell Snap-in" -ForegroundColor Green
 }
 
 function UpdateMasterPage([string]$webURL)
 {
     $web = Get-SPWeb $webURL
 #Change the masterpage
     $web.CustomMasterUrl = "/services/GVI/_catalogs/masterpage/MyMaster.master"
 
 #Change the System Master Page
     $web.MasterUrl = "/services/GVI/_catalogs/masterpage/ MyMaster-System.master"
     $web.Update()
 }
 
 try
 {
     [void][System.Reflection.Assembly]::LoadWithPartialName("Microsoft.Sharepoint")
     [void][System.Reflection.Assembly]::LoadWithPartialName("Microsoft.Sharepoint.Administration")
         
     $ConfigXmlPath = $scriptBase + "ConfigXMLConfiguration.xml"
     Write-Host "Read the Config Values" -ForegroundColor Green 
     [Xml]$Config = Get-Content $ConfigXmlPath  
     
     AddPowerShellSnapin
     
     UpdateMasterPage $Config.Configuration.PublishingSite.URL  
      
 }
 catch
 {
     Write-Host "Custom Exception Happened on Main : " + $Error[0].Exception.Message -ForegroundColor Red  
 }
 

And the Config XML Will be like,

 <Configuration EnvironmentName="Dev/QA/UAT/PROD">
   <PublishingSite URL="http://MySiteCollectionURL" />
      
 </Configuration>


Happy Coding,

Sathish Nadarajan.
Author Info

Sathish Nadarajan
 
Solution Architect
 
Rate this article
 
Sathish is a Microsoft MVP for SharePoint (Office Servers and Services) having 15+ years of experience in Microsoft Technologies. He holds a Masters Degree in Computer Aided Design and Business ...read more
 

How to Upload the Master Pages into SharePoint 2013 Using PowerShell

Sathish Nadarajan
 
Solution Architect
October 15, 2015
 
Rate this article
 
Views
9422

As I said in the earlier article, the script to upload the JS is as follows. I hope it does not require much explanations.

 ##================================================================================================
 ## Description	: To do the below two items.
     #1. Upload the MasterPage into GVI Site Collection
 ## Author		: Sathish Nadarajan
 ## Date			: 08-Oct-2015
 ##================================================================================================
 
 ##============================================ Setup Input Paths ===========================================================
 
 cls
  
 $Host.UI.RawUI.WindowTitle = "-- Upload the MasterPage into GVI Site Collection --"
 
 $StartDate = Get-Date
 Write-Host -ForegroundColor White "------------------------------------"
 Write-Host -ForegroundColor White "| Upload the MasterPage into GVI Site Collection |"
 Write-Host -ForegroundColor White "| Started on: $StartDate |"
 Write-Host -ForegroundColor White "------------------------------------"
 
 $LogTime = Get-Date -Format yyyy-MM-dd_hh-mm
 $LogFile = ".UploadCSS-$LogTime.rtf"
 
 #start-transcript $logfile
 
 $scriptBase = split-path $SCRIPT:MyInvocation.MyCommand.Path -parent
 Set-Location $scriptBase
 
 $ErrorActionPreference = "Stop"
 
 function AddPowerShellSnapin()
 {
     try
     {
         Write-Host "Adding PowerShell Snap-in" -ForegroundColor Green
         # Try to get the PowerShell Snappin.  If not, then adding the PowerShell snappin on the Catch Block
         Get-PSSnapin "Microsoft.SharePoint.PowerShell" 
     }
     catch
     {
         if($Error[0].Exception.Message.Contains("No Windows PowerShell snap-ins matching the pattern 'Microsoft.SharePoint.PowerShell' were found"))
         {
             Add-PSSnapin "Microsoft.SharePoint.PowerShell"
         }
     }
     Write-Host "Finished Adding PowerShell Snap-in" -ForegroundColor Green
 }
 
 #http://spdev5.dev.cbre.eu/services/GVI/Style%20Library/cbre/GVI.css
 
 function UploadDisplayTemplates([string]$siteUrl)
 {
     $spsite = Get-SPSite $siteUrl
     $web = $spsite.RootWeb
     $contentWebPartsDisplayTemplatesFolder = ($web).GetFolder("Master Page Gallery")
     $displayTemplatesDirectory = $scriptBase + "MasterPages"
     $web.AllowUnsafeUpdates=$true;
 
     #For upload all files in document library from file system
     foreach ($file in Get-ChildItem $displayTemplatesDirectory)
     {
          try
          {
                  $stream = [IO.File]::OpenRead($file.fullname)
                  $destUrl = $web.Url + "/_catalogs/masterpage/" + $file.Name;
                  $displayTemplateFile = $web.GetFile($destUrl)
                   
                  if($displayTemplateFile.CheckOutStatus -ne "None")
                  {
                      $contentWebPartsDisplayTemplatesFolder.files.Add($destUrl,$stream,$true)
                      $stream.close() 
                           
                      $displayTemplateFile.CheckIn("CheckIn by PowerShell");                         
                      $displayTemplateFile.Publish("Publish by PowerShell");                         
                       
                      $displayTemplateFile.Update();        
                      $web.Update();
                      
                      Write-Host $file.Name " Master Pages uploaded on $web site" -ForegroundColor Green  
                       
                  }
                  else
                  {
                      $displayTemplateFile.CheckOut();
                      try
                      {
                         $contentWebPartsDisplayTemplatesFolder.Files.Add($destUrl,$stream,$true)
                      }
                      catch
                      {
                         Write-Host $_
                      }
                      $stream.close()                             
                      $displayTemplateFile.CheckIn("CheckIn by PowerShell");                         
                      $displayTemplateFile.Publish("Publish by PowerShell");                         
                       
                      $displayTemplateFile.Update();        
                      $web.Update();
                      
                       
                      Write-Host $file.Name " Master Pages uploaded on $web site" -ForegroundColor Green  
                       
                  }
          }
          catch
          {
              Write-Host $_  
          }    
      }
   
   $web.AllowUnsafeUpdates  = $false;
 
  $web.dispose();
  $spsite.dispose();
 }
 
 try
 {
     [void][System.Reflection.Assembly]::LoadWithPartialName("Microsoft.Sharepoint")
     [void][System.Reflection.Assembly]::LoadWithPartialName("Microsoft.Sharepoint.Administration")
     AddPowerShellSnapin
     UploadDisplayTemplates "http://spdev5.dev.cbre.eu/services/GVI" # SiteCollection URL
 }
 catch
 {
     Write-Host "Custom Exception Happened on Main : " + $Error[0].Exception.Message -ForegroundColor Red  
 }
 

This PowerShell script will Add the File for the first time, and from, the second time onwards, it will check out and check in the files. Hence, we will not lose our versioning as well.

Happy Coding,

Sathish Nadarajan.

Author Info

Sathish Nadarajan
 
Solution Architect
 
Rate this article
 
Sathish is a Microsoft MVP for SharePoint (Office Servers and Services) having 15+ years of experience in Microsoft Technologies. He holds a Masters Degree in Computer Aided Design and Business ...read more
 

How to Upload MasterPages, Display Templates into SharePoint 2013 using PowerShell

Sathish Nadarajan
 
Solution Architect
February 11, 2015
 
Rate this article
 
Views
16895

In many situations, we would have faced with this kind of requirement. i.e., Upload the Display Templates frequently without deploying the WSPs during our development phase. In those scenarios, this article will be very much helpful.

During our development phase, we require to upload the display templates many times. In that case, deploying the WSPs will be very much time consuming. Hence, we can create a PowerShell Script Handy and modify the display template, run this script, this will upload the display templates to appropriate folder. Refresh the search webparts. Really simple right.. Let us see the script.

 $webAppUrl = "http://c4968397007/" # Web Application URL


 [void][System.Reflection.Assembly]::LoadWithPartialName("Microsoft.Sharepoint")
 [void][System.Reflection.Assembly]::LoadWithPartialName("Microsoft.Sharepoint.Administration")
 
 $checkInComment="Check In by PowerShell"
 $publishComment="published by PowerShell"
 $approveComment="Approved by PowerShell"
 
 $logfile = "UploadMasterPage_$(get-date -f yyyyMMdd_hhmmss).log"
 $spsite = new-object Microsoft.Sharepoint.SPSite($webAppUrl);
 $web = $spsite.RootWeb;
  
 $masterPageList = ($web).GetFolder("Content Web Parts")
 
 # Get file system path
 $filesfolde = Split-Path $script:MyInvocation.MyCommand.Path
 $masterPageLocalDir = $filesfolde + "Docs"
 
 #For upload all files in document library from file system
 foreach ($file in Get-ChildItem $masterPageLocalDir)
 	{
 	    $web.AllowUnsafeUpdates=$true;
         try
         {
 	        if ([Microsoft.SharePoint.Publishing.PublishingSite]::IsPublishingSite($spsite)) 
 	        {
 	
 	            $stream = [IO.File]::OpenRead($file.fullname)
                 $destUrl = $web.Url + "/_catalogs/masterpage/Display Templates/Content Web Parts/" + $file.Name;
 		        $masterPageFile=$web.GetFile($destUrl)
 	            
                 if($masterPageFile.CheckOutStatus -ne "None")
 		        {
 				
                     $web.AllowUnsafeUpdates  = $true;
                     $masterPageList.files.Add($destUrl,$stream,$true)
 				    $stream.close()						
                     $masterPageFile.CheckIn($checkInComment);						
                     $masterPageFile.Publish($publishComment);				
                     $masterPageFile.Approve($approveComment);
                     $masterPageFile.Update();         
                     $web.Update();
                     $web.AllowUnsafeUpdates  = $false;
                     $outputText = $file.Name+ " Master Page uploaded on $web site"
                     write-output $outputText
                     write-output $outputText |  out-File $logfile -Append
 		        }
 	            else
 		        {
                     $masterPageFile.CheckOut();
                     try{
                     $masterPageList.Files.Add($destUrl,$stream,$true)
                     }
                     catch
                     {
                     write-Output $_
                     }
                     $stream.close()							  
                     $masterPageFile.CheckIn($checkInComment);						  
                     $masterPageFile.Publish($publishComment);						  
                     $masterPageFile.Approve($approveComment);
                     $masterPageFile.Update();         
                     $web.Update();
                     $web.AllowUnsafeUpdates  = $false;
                     $outputText = $file.Name +  " Master Page uploaded on $web site"
                     write-output $outputText
                     write-output $outputText |  out-File $logfile -Append
 		        }
 	        }
 	
 	        else
 	        {
 	
                 $stream = [IO.File]::OpenRead($file.fullname)
                 $destUrl = $web.Url + "/_catalogs/masterpage/Display Templates/Content Web Parts/" +$file.Name
                 $masterPageFile=$web.GetFile($destUrl)
                 if($masterPageFile.CheckOutStatus -ne "None")
                 {
                     $masterPageList.Files.Add($destUrl,$stream,$true)
                     $stream.close()						
                     $masterPageFile.CheckIn($checkInComment);						
                     $masterPageFile.Publish($publishComment);				
                     $masterPageFile.Approve($approveComment);
                     $masterPageFile.Update();         
                     $web.Update();
                     $web.AllowUnsafeUpdates  = $false;
                     $outputText = $file.Name +  "Master Page uploaded on $web site"
                     write-output $outputText
                     write-output $outputText |  out-File $logfile -Append
                 }
                 else
                 {
                     $masterPageFile.CheckOut();
                     $masterPageList.Files.Add($destUrl,$stream,$true)
                     $stream.close()							  
                     $masterPageFile.CheckIn($checkInComment);						  
                     $masterPageFile.Publish($publishComment);						  
                     $masterPageFile.Approve($approveComment);
                     $masterPageFile.Update();         
                     $web.Update();
                     $web.AllowUnsafeUpdates  = $false;
                     $outputText = $file.Name+ "Master Page uploaded on $web site"
                     write-output $outputText
                     write-output $outputText |  out-File $logfile -Append
                 }
 	        }
 	
 	
         }
         catch
         {
             write-Output $_ | out-File $logfile -Append
         }	 
     }
 
 $web.dispose();
 $spsite.dispose();
 

DOWNLOAD HERE

Happy Coding.

Sathish Nadarajan.
Author Info

Sathish Nadarajan
 
Solution Architect
 
Rate this article
 
Sathish is a Microsoft MVP for SharePoint (Office Servers and Services) having 15+ years of experience in Microsoft Technologies. He holds a Masters Degree in Computer Aided Design and Business ...read more
 

How To Roll back changes made in a Custom Master Page by SharePoint Designer to Normal State in SharePoint 2010

Gopi Baskar
 
Technology Specialist
January 20, 2014
 
Rate this article
 
Views
29196

Customizing a SharePoint Master Page is easier with SharePoint Designer when compared to provisioning a customized Master Page via Visual Studio. But if you would like to know how to bring it back to Visual Studio, follow the procedure to roll back the changes performed in a Master Page.

I have developed a custom master page and deployed it in SharePoint 2010 and set as a default master page with Feature. The Custom master page while provisioned in a feature will be stored in %Program Files\Common Files\Microsoft Shared\Web Server Extensions\14\TEMPLATE\FEATURES\<feature name> folder.

Whenever, I created a new site, the feature receiver automatically sets this Master Page as a default master page. By default, SharePoint loads the master page from 14 hive folder until it’s edited through SharePoint Designer.

For some reason, if you have customized the master page in SharePoint Designer, SharePoint stores a modified version of the master page in the content database and it ignores the file deployed in 14 hive. This process is called as Unghosting. This process breaks the reference of the master page file on the 14 hive.

If you would like to perform any changes to your Master Page after you have unghosted , the only option possible is to perform it with SharePoint Designer. If you would like continue the changes to be performed with Feature deployment you have to roll back the changes performed in the master page and reset it to its original state.

Note : Ensure that you have performed all the changes that you have performed with designer is updated in your newly deployed Master Page, else you will lose all the changes that you have performed with SharePoint Designer.

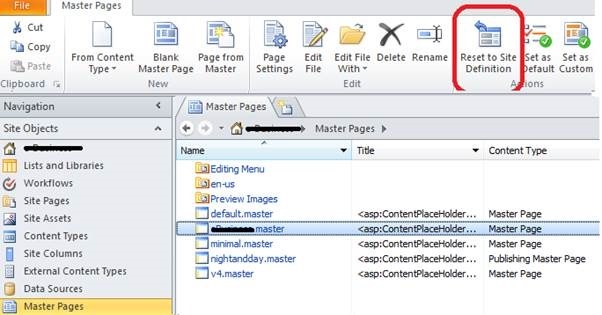
To roll back the changes, select the Master Page that you have customized in the SharePoint Designer. This would enable the “Reset to Site Definition” button in the Ribbon. Click that button. This would create a copy of that Master Page and resets the Master Page to the last deployed version (deployed via Feature.)

clip_image002

After doing this, I have deployed the custom master page feature and it’s working as expected.

Category : SharePoint

Author Info

Gopi Baskar
 
Technology Specialist
 
Rate this article
 
Technology Specialist from Chennai, India ...read more
 

Step by step procedures to create a delegate control in SharePoint 2010

Gopi Baskar
 
Technology Specialist
January 7, 2014
 
Rate this article
 
Views
28957

In this article I am going to explain in step by step on how to create new delegate control in SharePoint 2010. By default every SharePoint Master Page has couple of delegate controls. In this article we can see how to add a new delegate control to MasterPage and inject a custom control to that delegate control.

Before we start to create delegate control let us see what is the use of Delegate Control in SharePoint 2010.

Using the delegate control we can customize the SharePoint site without editing the master page by injecting user controls , scripts , css through this special type of control.

Now, let us start creating our own custom delegate controls.

In this article I will trying to customize the breadcrumb. For that, I have created a Custom User Control and injected into master page as a delegate control.

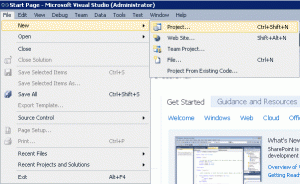
First open the Visual Studio 2010 and click New -> Project see figure 1

clip_image001

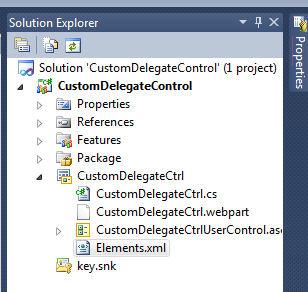
After project is created, see the web part files in figure 2. I have added the custom control wrote the custom code for the breadcrumb based on my requirement.

clip_image002

Then add the following code in the Elements.xml file.

 <?xml version="1.0" encoding="utf-8"?>
 <Elements xmlns="http://schemas.microsoft.com/sharepoint/" >
   <!--<Module Name="CustomDelegateCtrl" List="113" Url="_catalogs/wp">
     <File Path="CustomDelegateCtrlCustomDelegateCtrl.webpart" Url="CustomDelegateCtrl.webpart" Type="GhostableInLibrary" >
       <Property Name="Group" Value="Custom" />
     </File>
   </Module>-->
   <Control
     Id="BreadCrumb"
     Sequence="10"
     ControlSrc="~/CustomDelegateControl/CustomDelegateCtrlUserControl.ascx"/>
 </Elements>
 

Finally, I added the delegate control with my custom control ID in the Master Page. This is a onetime process and any number of custom controls can be injected to the Master Page with is delegate control Id. See the below tag.

 <SharePoint:DelegateControl runat="server" AllowMultipleControls="true" ControlId="BreadCrumb"/>

Now, try to build and activate the feature which will change the breadcrumb functionality in the site.

Download Source Code

Category : SharePoint

Author Info

Gopi Baskar
 
Technology Specialist
 
Rate this article
 
Technology Specialist from Chennai, India ...read more
 

How to Create Master Page Using Design Manager in SharePoint 2013

Santhosh Babu
 
Technology Specialist
December 30, 2013
 
Rate this article
 
Views
35672

Design Manager is one of the new feature introduced in SharePoint 2013. Using Design Manager, the Branding and Customization can be done very easily in SharePoint 2013. Design Manager only available on publishing site template and the other default templates does not have this feature. Design Manager has a lot of features.  In this post I tried to give a broad idea about Design Manager by converting HTML file to Master page.

Before diving into design manager, First we need to create wireframe in HTML. The wireframe needs to contain HTML, CSS, images and other support files.

I have provided the sample files.

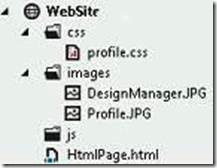
The following is a sample HTML wireframe source and structure.

Structure

clip_image002

Source

1) HTMLPage

 <html>
 <head>
     <title>My Blogs</title>
     <link href="css/profile.css" rel="stylesheet" />
 </head>
 <body>
 
     <div class="page_layout">
         <div class="profilepicture">
 <img class="imgsize" src="images/Profile.JPG" />
         </div>
         <div class="blogtitle">
             Create Master Page using design manager in SharePoint 2013
         </div>
         <div class="pervioustitle">
             <ul class="bloglist">
                 <li>Previous Blog one</li>
                 <li>Previous Blog two</li>
                 <li>Previous Blog three</li>
                 <li>Previous Blog four</li>
             </ul>
         </div>
         <div class="blogcontent">
             sample bolg content sample bolg content sample bolg content sample bolg content sample bolg content sample bolg content sample bolg content sample bolg content sample bolg content sample bolg content sample bolg content sample bolg content sample bolg content sample bolg content sample bolg content sample bolg content sample bolg content sample bolg content sample bolg content sample bolg content sample bolg content sample bolg content                         
             <img src="images/DesignManager.JPG" />
         </div>
     </div>
 
 </body>
 </html>
 

2) CSS

 body {
     font-family: Calibri;
     width: 98%;
 }
 
 div {
     word-wrap: break-word;
 }
 
 .page_layout {
     padding: 10px 0px 0px 0px;
 }
 
 .profilepicture {
     float: left;
     width: 20%;
     height: 200px;
     position: fixed;
 }
 .imgsize {
     width:100%;
     height:100%
 }
 .blogtitle {
     width: 78%;
     float: right;
     font-size: x-large;
     font-weight: bold;
     color: #0000FF;    
     text-decoration:underline;    
 }
 
 .pervioustitle {
     width: 20%;
     padding: 200px 10px 0px 0px;
     float: left;
     position: fixed;
 }
 
 ul.bloglist {
     list-style-type: circle;
     font-size: medium;
     font-weight: bold;
     font-style: italic;
     color: #000066;
 }
 
 .blogcontent {
     float: right;
     width: 78%;
     padding: 20px 5px 0px 5px;
     top: 20px;
 }
 

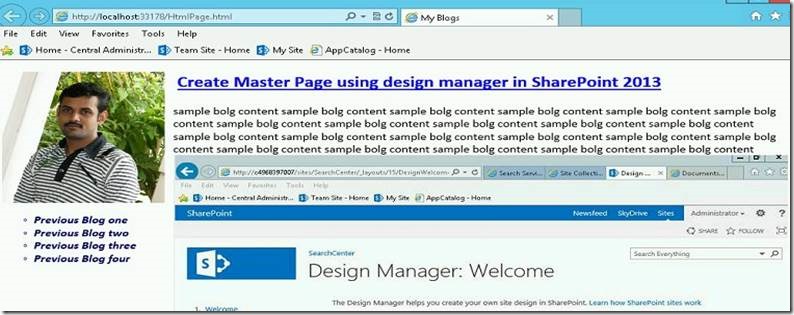
HTML Page View


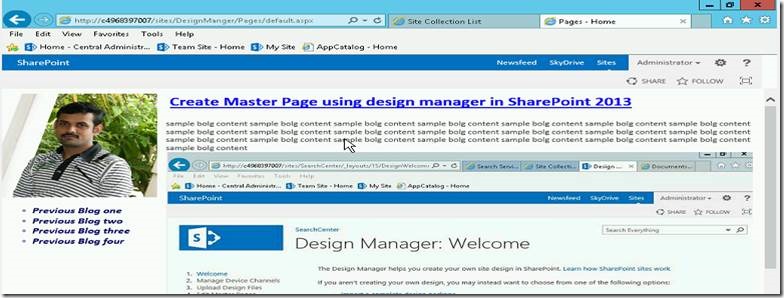
clip_image004


The following is a step by step procedure for creating master page using design manager.

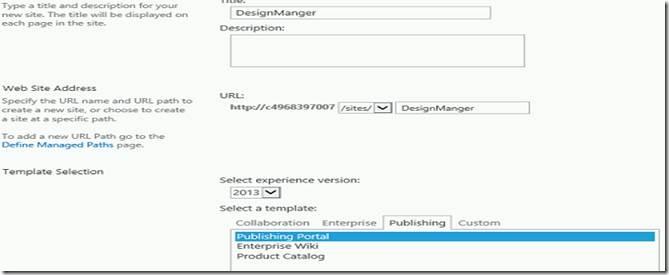
Step 1:

Create new publish portal site collection

clip_image006

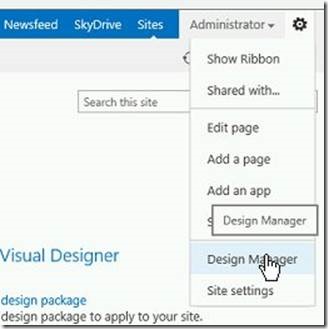
Step 2:

Open the site then click design manager link from right top corner "Settings" menu.

clip_image008

Step 3:

Click the upload design files for “Map the following location as a network drive so you can work easily with your design files: “

clip_image010


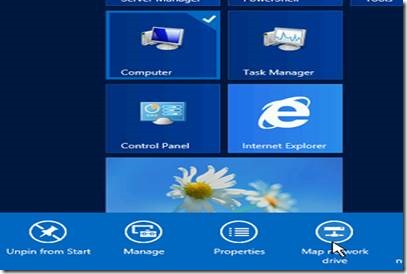
Click the URL and it will provide the network path then map the network drive

clip_image012

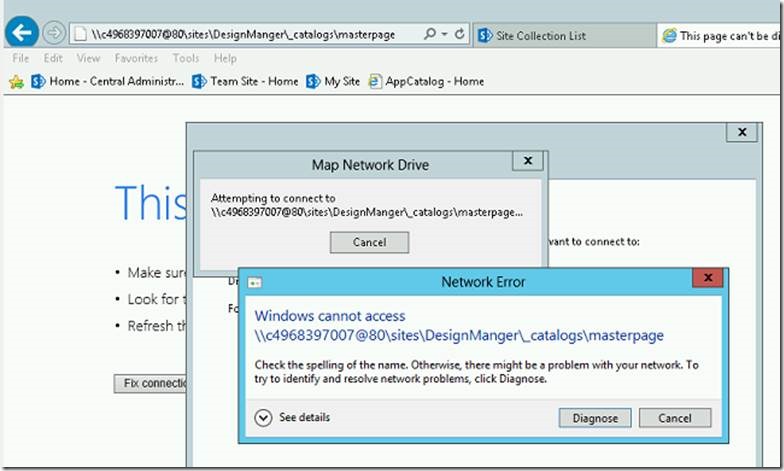
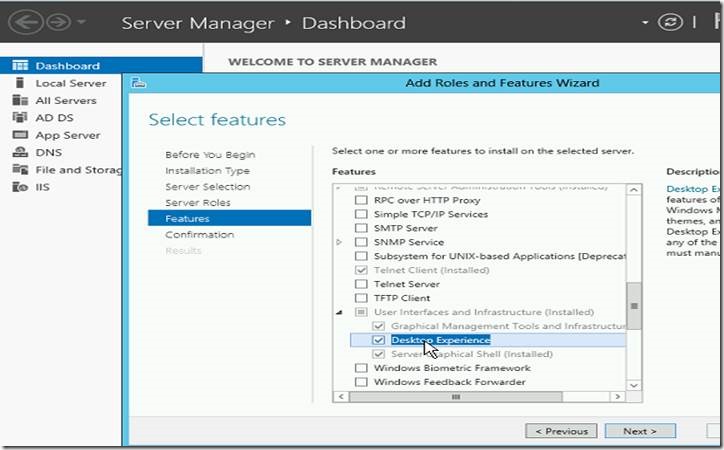
If you face the following error.clip_image014

Then add the “Desktop Experience” feature to your server using Server Manager.


clip_image016


Once the feature activated then maps the network drive.


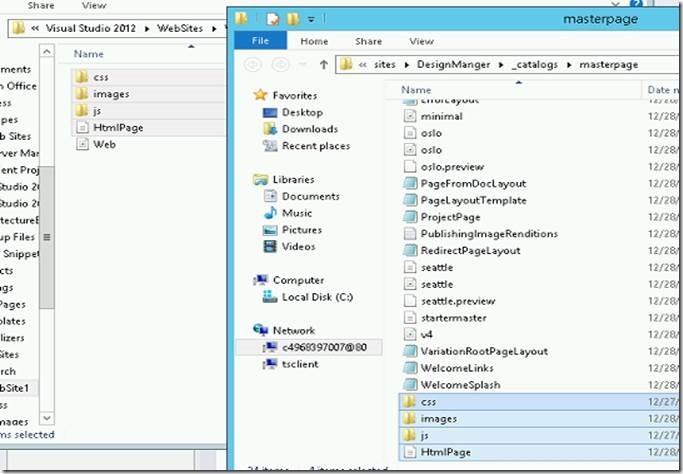
Step 4:

Open the source drive (HTML Wireframe path) and copy all the supported files then paste to destination drive (mapped path).

clip_image018


Step 5:

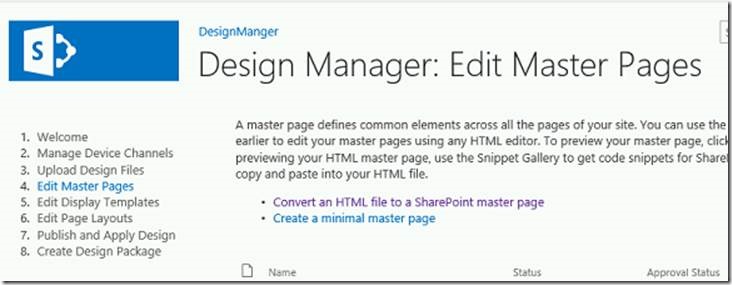
Again open the design manger then click Edit Master Pages and click “Convert HTML file to SharePoint Master Page”

clip_image020


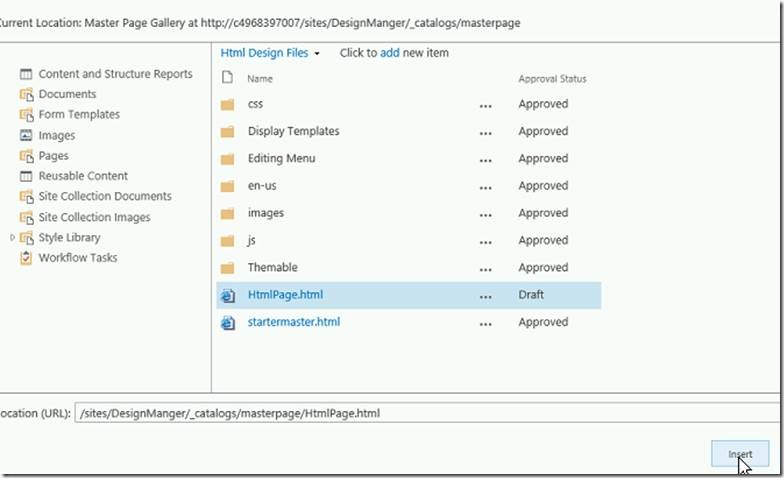
Step 6:

It will open a pop up window then select the htmlpage (which you have uploaded) then click insert

clip_image022

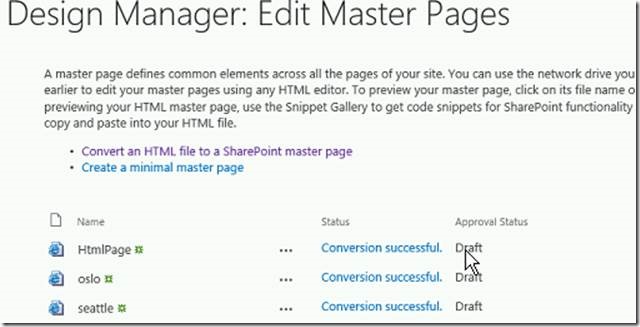
Automatically converted from HTML to SharePoint Master Page. The approval status is DRAFT.


clip_image024


Step 7:

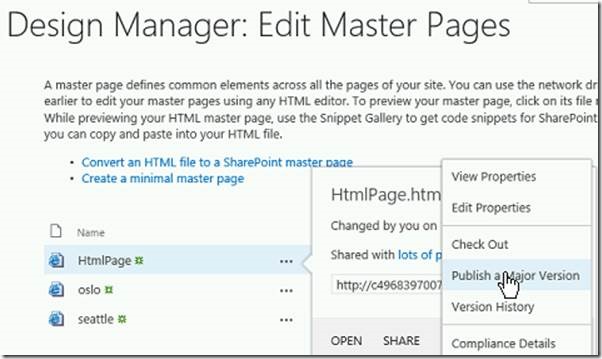
Once the conversion is completed click the Htmlpage.html check the preview and see the master page then back to the design manager and publish the page.


clip_image026


clip_image028


Step 8:

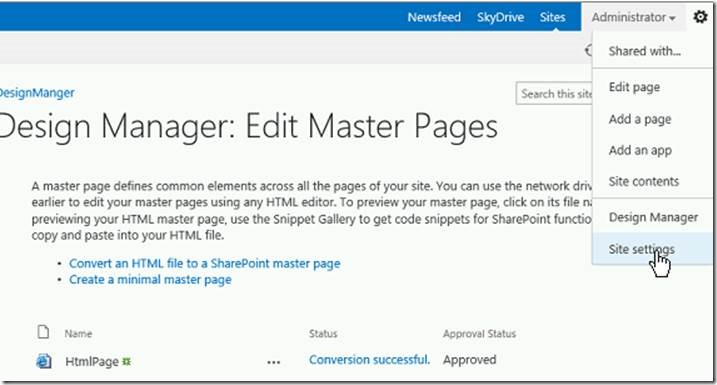
After publishing the page click setting menu and select “Site setting” link

clip_image030


Step 9:


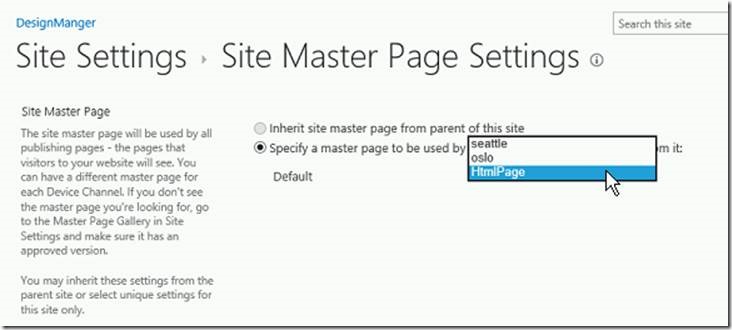
Click Master Page link and select the HTMLPage in site master page category drop down menu then click ok button.


clip_image032


clip_image034


Step 10:

Click the home page the Htmlpage converted to SharePoint Master Page with default menus.

clip_image036


In next article, let us see the code snippet and create design manager master page package.


Happy Coding.

SanthoshBabu ManickaMohan

Category : SharePoint

Author Info

Santhosh Babu
 
Technology Specialist
 
Rate this article
 
Working as a Technology Specialist in SharePoint ~ Cognizant ...read more
 

OTB Delegate controls and Content Placeholders in SharePoint 2013 Publishing Master Page

Sivarajan Raju
 
SharePoint Consultant
January 20, 2013
 
Rate this article
 
Views
29153

This post on Delegate controls and Content Placeholders in SharePoint 2013 Publishing Master Page is an out come of one of my current task on a complex publishing web portal for both Internet and Intranet users using SharePoint 2013. Client’s requirements are to support all major browsers and smart phones. So I decided to explore the default publishing Seattle master page.

Here I have listed out my understanding .

· Cleanup the Master Page

· Identify the Delegate controls

· Identify the Master page regions

· Override the Delegate controls based on the customer requirements

· Reposition/hide the controls based on requirements

Cleanup the default Master Page

Before identifying the master page controls, I formatted the html markup tags using SharePoint Designer and provide the proper inline comments line by line. So that someone can easily understand the markup. You can find the formatted master page here.

cm1

Next I started listing out the Delegate Controls.


Delegate Controls

You can find here the complete list of delegate controls .We can easily override these controls with our custom implementations. In subsequent posts we can see how to override these Delegate Controls one by one.

Delegate ControlScreen ShotDescriptions
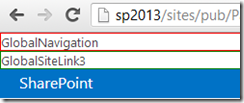
GlobalNavigationcm2To add the custom links globally.
GlobalSiteLink3cm3To enable Farm level global links and not specific for web application or site collection level
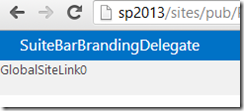
SuiteBarBrandingDelegatecm4To override the default “SharePoint” text at left corner
SuiteLinksDelegatecm5To add more links like “Newsfeed”, “SkyDrive”
GlobalSiteLink0cm6SharePoint uses this one to publish the variations menu. Please carefully override this Delegate control if needed
PromotedActionscm7To add more links between Share and Follow icon
   
PublishingConsolecm8While editing the page, Server Ribbon will be loaded using this Delegate Control and we extend this using Custom Action
SmallSearchInputBoxcm9This delegate control will be using to override Search box
QuickLaunchDataSourcecm10To load the custom quick launch data source
TreeViewAndDataSourcecm11To load the custom tree view data source
AdditionalPageHeadN/AThis will be available inside the <head> tag and helpful to load the custom css / javascript


Master Page Regions

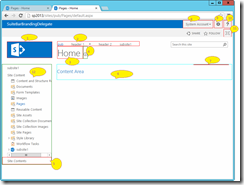
Next I started to identify the master page regions. This will be helpful to apply our custom branding successfully. You can see the major region in the blow screen shot.

cm12 

I have captured below the starting tag of each region and it will be helpful us to reposition the regions based on our requirements.

NoDescriptionHtml Tag
1Site Logo<div id="siteIcon"
2Top navigation menu<SharePoint:AspMenu ID="TopNavigationMenu"
3Page Title<asp:ContentPlaceHolder id="PlaceHolderPageTitleInTitleArea"
4Title’s Description<asp:ContentPlaceHolder id="PlaceHolderPageTitleInTitleArea"
5Site Contents in Quick launch menu<asp:ContentPlaceHolder id="PlaceHolderQuickLaunchBottom"
6Content Area<div id="contentBox"
7Notification message<div id="notificationArea"
8Welcome text<div id="welcomeMenuBox"
9Site Action menu<SharePoint:SiteActions
10Help menu<span id="ms-help"
11Full screen mode<span id="fullscreenmodebox"
12Left navigation bar<asp:ContentPlaceHolder id="PlaceHolderLeftNavBar"

Summary

In my next article, we will see how to apply custom color and fonts by overriding OTB CSS classes.

Category : SharePoint

Author Info

Sivarajan Raju
 
SharePoint Consultant
 
Rate this article
 
Sivarajan 8 Plus years of experience in providing end-to-end solutions in the area of Web Technologies using Microsoft SharePoint 2010/2007, .NET Implemented several large-scale SharePoint portal solutions. Vast experience in ...read more
 

Leave a comment