CSOM – PowerShell Script – Import Nintex Workflows in SharePoint

Sathish Nadarajan
 
Solution Architect
February 10, 2021
 
Rate this article
 
Views
1006

In this article, let us see how to Import Nintex Workflows in SharePoint using CSOM PowerShell Script.
The code is self-explanatory.

01.ImprotNintexForms

function Import-NintexWorkflow {
<# .SYNOPSIS Imports a Nintex workflow .nwf file to a list. .DESCRIPTION Imports a Nintex workflow .nwf file to a list. #>
[CmdletBinding()]
param(
[string]$WebUrl = $(throw "Required parameter -WebUrl missing"),
[string]$listName = $(throw "Required parameter -ListName missing"),
[string[]]$workflowNames = $(throw "Required parameter -workflowNames missing"),
[string]$WorkflowFolderPath = $(throw "Required parameter -WorkflowFolderPath missing"),
[bool]$OverwriteExistingVersion = $false
)
begin {
if(!(Get-PnPConnection)) {
throw "There is no PnPConnection"
}
Write-Host "---- Importing Nintex workflow to '$($listName)' ----" -ForegroundColor Yellow
}
process {
$List = Get-PnPList -Identity $listName
$ListID = $List.Id.ToString()
$ListName = $List.Title
$webServiceUrl = "$WebUrl/_vti_bin/NintexWorkflow/Workflow.asmx"
$webServiceProxy = New-WebServiceProxy -Uri $webServiceUrl -UseDefaultCredential
$webServiceProxy.URL = $webServiceUrl

for ($i=0;$i -lt $workflowNames.Length; $i++) {
$WorkflowName = $workflowNames[$i] + "_6"
$WorkflowFilePath = $WorkflowFolderPath + "" + $workflowNames[$i] + ".nwf"

$nwfContent = Get-Content "$WorkflowFilePath"
$utf8 = New-Object System.Text.UTF8Encoding
[byte[]] $byteData = $utf8.GetBytes($nwfContent.ToString())
$hasWorkflowPublished = $webServiceProxy.WorkflowExists($WorkflowName,$ListID,"List")
Write-Host "Workflow exists status: '$hasWorkflowPublished'" -ForegroundColor Cyan
if($hasWorkflowPublished -eq "NameUsedInOtherList" -or $hasWorkflowPublished -eq "NameUsedInThisList") {
#May be delete it
Write-Host "Workflow already exists '$hasWorkflowPublished', if status is 'NameUsedInOtherList' no changes can be made. Please delete it." -ForegroundColor Cyan
}
if($hasWorkflowPublished -eq "NameNotUsed" -or ($hasWorkflowPublished -eq "NameUsedInThisList" -and $OverwriteExistingVersion -eq $true)){
$IsPublished = $webServiceProxy.PublishFromNWF($byteData, $ListName, $WorkflowName, $true)
if($IsPublished) {
Write-Host "Nintex Workflow '$WorkflowName' successfully published to list '$ListName'" -ForegroundColor Green
} else {
Write-Host "Nintex Workflow '$WorkflowName' could not be published to list '$ListName'" -ForegroundColor Yellow
}
}
}
}
end { }
}

Run.ps1

#=========================================== Description Start ========================================= #
# Deploy from a List

# Author : Sathish Nadarajan
# Date : 03-Feb-2021
#=========================================== Description End====================================== #

# ============================================ PreRequisites Start ================================= #

#Get-Module -Name *pnp*
#Pre Req - SharePoint PnP PowerShell Version 2.25.1804.1

#=============================================PreRequisites End =============================== #

#============================================= Initial Setup Start =============================== #

cls

$Host.UI.RawUI.WindowTitle = "-- Deploy Assets --"

$StartDate = Get-Date
Write-Host -ForegroundColor White "------------------------------------"
Write-Host -ForegroundColor White "| Deploy Assets |"
Write-Host -ForegroundColor White "| Started on: $StartDate |"
Write-Host -ForegroundColor White "------------------------------------"

#Add-PSSnapin Microsoft.SharePoint.PowerShell

$LogTime = Get-Date -Format yyyy-MM-dd_hh-mm-ss

$scriptBase = split-path $SCRIPT:MyInvocation.MyCommand.Path -parent
Set-Location $scriptBase

# Create Log File Folder3
if(!(TEST-PATH ".Logs-$LogTime")){
NEW-ITEM ".Logs-$LogTime" -type Directory
}

# Assign the Log and Progress Files
$TranscriptFile = ".Logs-$LogTimeDeploy.Transcript.rtf"
try{
stop-transcript|out-null
}
catch [System.InvalidOperationException]{}
start-transcript $TranscriptFile

#============================================= Initial Setup End =============================== #

# ============================================ Setup Input Paths Start ================================= #

#connect to the SharePoint list
$sourceWebUrl = 'http://andytest-sp:555/sites/newsite/'
$sourceListname = "AssetRegisterV2"

$outputFolderPath = ".Logs-$LogTime"

$targetWebUrl = 'http://andytest-sp:555/sites/newsite/'
$targetListname = "AssetRegister_Test"
$workflowNames = @('Send Notification When Child is Promoted as Parent','Send Notification When Asset is deleted')

# ============================================ Setup Input Paths End ================================= #

Import-Module ".4.ImportNintexWorkflows.ps1"

Write-Host "Begin to Execute.." -ForeGroundColor Yellow
"Begin to Execute..." | Out-File -FilePath $TranscriptFile -Append

Connect-PnPOnline -Url $sourceWebUrl -CurrentCredentials -ErrorAction Inquire

Import-NintexWorkflow $targetWebUrl $targetListname $workflowNames $outputFolderPath $true
Disconnect-PnPOnline

Write-Host "Update Completed.. Press Enter to Exit" -ForeGroundColor Green

try{
stop-transcript|out-null
}
catch [System.InvalidOperationException]{}


Happy Coding
Sathish Nadarajan

Author Info

Sathish Nadarajan
 
Solution Architect
 
Rate this article
 
Sathish is a Microsoft MVP for SharePoint (Office Servers and Services) having 15+ years of experience in Microsoft Technologies. He holds a Masters Degree in Computer Aided Design and Business ...read more
 

CSOM – PowerShell Script – Export Nintex Workflows in SharePoint

Sathish Nadarajan
 
Solution Architect
February 9, 2021
 
Rate this article
 
Views
1780

During the time of deployment, we may in a need to export and import the workflows from our DEV environment to the higher environment. In this article, let us see how to Export Nintex Workflows in SharePoint using CSOM PowerShell Script.

The code is self-explanatory.

01.ExportNintexForms


function Export-NintexWorkflow {
<# .SYNOPSIS Export a Nintex workflow .nwf file to a local directory .DESCRIPTION Export a Nintex workflow .nwf file to a local directory #>
[CmdletBinding()]
param(
[string]$WebUrl = $(throw "Required parameter -WebUrl missing"),
[string]$listName = $(throw "Required parameter -ListName missing"),
[string[]]$workflowNames = $(throw "Required parameter -WorkflowNames missing"),
[string]$FilePath = $(throw "Required parameter -FilePath missing")
)
begin {
if(!(Get-PnPConnection)) {
throw "There is no PnPConnection"
}
Write-Host "---- Exporting Nintex workflow for '$($List.Title)' ----" -ForegroundColor Yellow
}
process {
$List = Get-PnPList -Identity $listName
$timeStampString = [DateTime]::Now.ToString("yyyyMMdd-HHmmss")
# Get XML New File path
$xmlFilePath = "$FilePath$($List.Title)-$timeStampString.nwf"

$webServiceUrl = "$WebUrl/_vti_bin/NintexWorkflow/Workflow.asmx"
$webServiceProxy = New-WebServiceProxy -Uri $webServiceUrl -UseDefaultCredential
$webServiceProxy.URL = $webServiceUrl
$ctx=Get-PnPContext

$ctx.load($List.WorkflowAssociations)
$ctx.ExecuteQuery()

#Get all workflows that are associated with the current list
foreach($listassociation in $List.WorkflowAssociations) {
if($workflowNames.Contains($listassociation.Name)){
$WorkflowName = $listassociation.Name
$workflowContent = $webServiceProxy.ExportWorkflow($WorkflowName, $List.Title, "list")
$xmlFilePath = "$FilePath$WorkflowName.nwf"
#Save XML File to Disk
$workflowContent | Out-File $xmlFilePath
Write-Host "Nintex workflow '$WorkflowName' exported successfully to '$xmlFilePath'" -ForegroundColor Green
}
}
}
end { }
}


Run.ps1

#=========================================== Description Start ========================================= #
# Deploy from a List

# Author : Sathish Nadarajan
# Date : 03-Feb-2021
#=========================================== Description End====================================== #

# ============================================ PreRequisites Start ================================= #

#Get-Module -Name *pnp*
#Pre Req - SharePoint PnP PowerShell Version 2.25.1804.1

#=============================================PreRequisites End =============================== #

#============================================= Initial Setup Start =============================== #

cls

$Host.UI.RawUI.WindowTitle = "-- Deploy Assets --"

$StartDate = Get-Date
Write-Host -ForegroundColor White "------------------------------------"
Write-Host -ForegroundColor White "| Deploy Assets |"
Write-Host -ForegroundColor White "| Started on: $StartDate |"
Write-Host -ForegroundColor White "------------------------------------"

#Add-PSSnapin Microsoft.SharePoint.PowerShell

$LogTime = Get-Date -Format yyyy-MM-dd_hh-mm-ss

$scriptBase = split-path $SCRIPT:MyInvocation.MyCommand.Path -parent
Set-Location $scriptBase

# Create Log File Folder3
if(!(TEST-PATH ".Logs-$LogTime")){
NEW-ITEM ".Logs-$LogTime" -type Directory
}

# Assign the Log and Progress Files
$TranscriptFile = ".Logs-$LogTimeDeploy.Transcript.rtf"
try{
stop-transcript|out-null
}
catch [System.InvalidOperationException]{}
start-transcript $TranscriptFile

#============================================= Initial Setup End =============================== #

# ============================================ Setup Input Paths Start ================================= #

#connect to the SharePoint list
$sourceWebUrl = 'http://SourceSiteURL/sites/newsite/'
$sourceListname = "AssetRegisterV2"

$outputFolderPath = ".Logs-$LogTime"

$targetWebUrl = 'http://TargetSiteURL/sites/newsite/'
$targetListname = "AssetRegister_Test"
$workflowNames = @('Send Notification When Child is Promoted as Parent','Send Notification When Asset is deleted')

# ============================================ Setup Input Paths End ================================= #

Import-Module ".3.ExportNintexWorkflows.ps1"

Write-Host "Begin to Execute.." -ForeGroundColor Yellow
"Begin to Execute..." | Out-File -FilePath $TranscriptFile -Append

Connect-PnPOnline -Url $sourceWebUrl -CurrentCredentials -ErrorAction Inquire

Export-NintexWorkflow $sourceWebUrl $sourceListname $workflowNames $outputFolderPath

Disconnect-PnPOnline

Write-Host "Update Completed.. Press Enter to Exit" -ForeGroundColor Green

try{
stop-transcript|out-null
}
catch [System.InvalidOperationException]{}

Happy Coding
Sathish Nadarajan

Author Info

Sathish Nadarajan
 
Solution Architect
 
Rate this article
 
Sathish is a Microsoft MVP for SharePoint (Office Servers and Services) having 15+ years of experience in Microsoft Technologies. He holds a Masters Degree in Computer Aided Design and Business ...read more
 

Nintex Workflow – Workflow Not Starting/Triggering when the Item Created by Another Workflow

Sathish Nadarajan
 
Solution Architect
April 13, 2019
 
Rate this article
 
Views
1758

Again, let us discuss about a rare scenario with the Nintex Workflows.  I was creating a Workflow WF1 which is attached with a List L1.  Whenever a New Item is added in L1, the WF1 will get triggered.  This works fine.  But in WF1, I am creating an entry on the List L2 which has a WF2 associated.  In this case, the WF2 is triggering when I add a Value manually on L2.  But, when the item got created by WF1, the WF2 is NOT Starting.

After searching for some time, Identified the solution that, the Nintex Workflows will not get started when the Item is created by another Workflow.  Strange.  But, again the work around is nothing but on the WF1 itself, after Creating the entry on the L2, we can start the WF2.  This workaround works fine.  The workflow is as shown below.

There is an action called “Start Workflow” is available in Nintex.  We can Use that action to start the workflow on any Item in the Connection.


The simple work around will save few hours of effort.


Happy Coding,

Sathish Nadarajan.

Category : Nintex, Workflows

Author Info

Sathish Nadarajan
 
Solution Architect
 
Rate this article
 
Sathish is a Microsoft MVP for SharePoint (Office Servers and Services) having 15+ years of experience in Microsoft Technologies. He holds a Masters Degree in Computer Aided Design and Business ...read more
 

Nintex Workflow – How to handle the JSON Response from REST API

Sathish Nadarajan
 
Solution Architect
April 10, 2019
 
Rate this article
 
Views
4294

Recently, I met with an interesting scenario that, from a Nintex Workflow, I am making a REST API, which returns a JSON object and the API is capable to return only JSON. I need to process result from my Workflow. When I was searching for a JSON Parser action in the Nintex, Unfortunately, there is no action like that in Nintex. And this has been raised in the Nintex User Voice as well. Hence, they may include this action in the upcoming releases I guess.

But, we must find a work around for that and the workaround is also very simple. We have a Data Type called Collection and Dictionary on the Nintex. By that, we can easily process the JSON. But, we have to use the foreach at least once, to actual processing.

The Set Workflow Variable Action configuration is like below.

Always the APIResonse will be Text and we need to create a Collection Variable and assign the Text to the Collection. Then the collection can be manipulated.

The Sample JSON Object, which I am getting from the API is as follows.

 {
   "Entry": [
     {
       "Employee_ID": "10001",
       "LeaveDetails": [
         {
           "LeaveType": "Casual",
           "Date": "2016-11-05",
           "ApprovedDate": "2018-10-31T22:15:44.112-07:00",
           "Unit": "Days",
           "Units": "1"
         },
         {
           "LeaveType": "Casual",
           "Date": "2016-11-05",
           "ApprovedDate": "2018-10-31T22:15:44.112-07:00",
           "Unit": "Days",
           "Units": "1"
         },
  {
           "LeaveType": "Casual",
           "Date": "2016-11-05",
           "ApprovedDate": "2018-10-31T22:15:44.112-07:00",
           "Unit": "Days",
           "Units": "1"
          
       ],
       "Employee Name": "Sathish Nadarajan"
     }
   ]
 }
 

I have a parent entry called “Entry” which has the childs, EmpID, EmployeeName, LeaveDetails. The Leave Details is again an Array. Hence, that can be treated as a Dictionary. The EmpID, we need to get the “Entry” Collection.

Save that on the Output Variable “ReportEntry” as Collection.

From the “ReportEntry”, Now, let us get the “LeaveDetails” collection.

Now, we can do the ForEach loop and manipulate the details.

The Output Value TimeOffDetail is nothing but a Dictionary Variable. From that dictionary, we can access the appropriate variable like Date, Units etc.,

We can manipulate any tags by giving the appropriate index and tag names as below.

By this way, we can manipulate the JSON objects in the Nintex Workflows.


Happy Coding,

Sathish Nadarajan.

Category : Nintex, RestAPI

Author Info

Sathish Nadarajan
 
Solution Architect
 
Rate this article
 
Sathish is a Microsoft MVP for SharePoint (Office Servers and Services) having 15+ years of experience in Microsoft Technologies. He holds a Masters Degree in Computer Aided Design and Business ...read more
 

Technical Aspects of Nintex Workflow Designer for SharePoint

Ahamed Fazil Buhari
 
Senior Developer
March 5, 2017
 
Rate this article
 
Views
2356

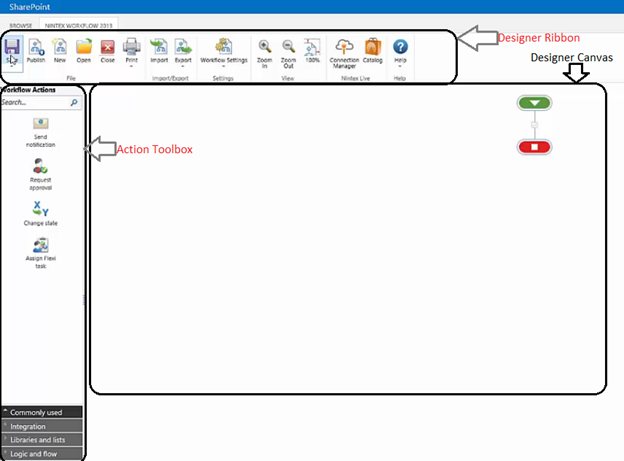
The Nintex Workflow Designer allows all SharePoint users across the organization to easily and quickly design workflows using simple user interfaces with drag & drop and  browser based. The designer has three important interface,

· Designer Ribbon

· Action Toolbox

· Designer Canvas

image


Designer Ribbon

· Save button – Used to Save the Workflow. Each time the workflow will be saved as Minor Version and when the Workflow is ‘Published’ then it will be saved as Major version.

o Save As Snippet – Allows to create common set of Workflow Tasks and while saving it becomes ‘Reusable Workflow’

o Save As Template – This will take the completed workflow and store it in the Site Template Gallery. Next time when a new workflow is created it can be used as a custom template (It will be available at Site Level).

· Publish button – User will make use of this workflow once it’s been Published.

· New button – It will clear the current Design Canvas and begin the new workflow.

· Open button – Helps to open the previously saved workflow into the Workflow Designer.

· Close button – This will close the Workflow Designer window and leads to associated List.

· Print button – It helps to print the user friendly version of the current workflow.

· Import button – This allow to import Nintex workflow file (Nintex Workflows are saved with the extension .nwf) that was exported from Nintex workflow. It is used to copy workflow from one server to another.

· Export button – It will save the workflow and later that can be Imported, also it can be exported to Visual Studio.

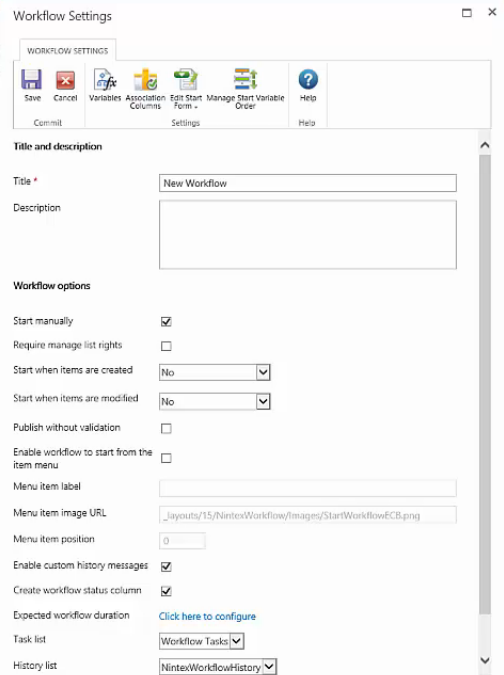
· Workflow Settings – It contains options like,

o Workflow Title & Description.

o Start manually or not.

o Require Manage list rights (The user starting the workflow should require Manage list rights, by default the minimal SharePoint permission required is Contributor)

o Publish without validation.

o Enable Workflow to start from the item menu – This will show the workflow in item context menu and it can be started from there as well.

o Enable custom history messages – It will allow actions which have message to log on completion included in the workflow history view.

o Create workflow status column – It will create a new column with workflow name in the corresponding list or library where the Workflow resides.

o Expected Workflow duration – This will keep track of workflow duration and save it in the database.

o Task list – It uses SharePoint task list by default.

o History list – As the workflow progresses, each step within the workflow are captured in the SharePoint history list.

o Form type – Allows to specify the start form that is used. It can be Default or InfoPath Form or Nintex Form or Custom Form.

image

Action Toolbox

The Actions are divided into groups of category and can be used in the Design Canvas to create workflows. We can also search for the name of the action from Action Search.

Integration and Provisioning category will be available only in the Enterprise edition of the product. Additionally, the names of the action items and category can be edited by the Administrator.

Design Canvas

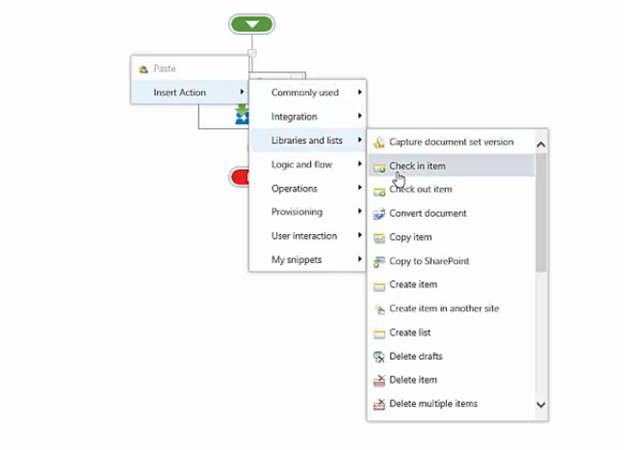
This is where the Actions are placed and the workflows are created. The action can be placed in two ways,

· Drag and drop from Action Toolbox to Design Canvas.

· Right click on the Design Canvas and select Insert Action.

image

To configure the Action, we need to double click on the Action or click on the title bar of the action and select Configure once it is on the Design Canvas.

Happy Coding

Ahamed

Author Info

Ahamed Fazil Buhari
 
Senior Developer
 
Rate this article
 
Ahamed is a Senior Developer and he has very good experience in the field of Microsoft Technologies, especially SharePoint, Azure, M365, SPFx, .NET and client side scripting - JavaScript, TypeScript, ...read more
 

An Overview of Nintex Workflow for SharePoint (Beginner)

Ahamed Fazil Buhari
 
Senior Developer
 
Rate this article
 
Views
4525

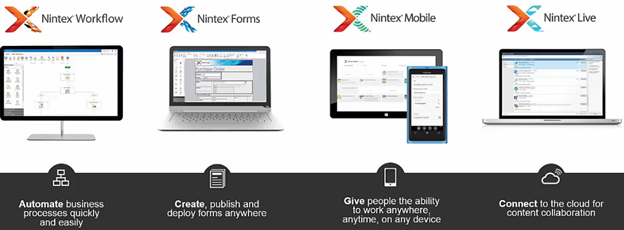
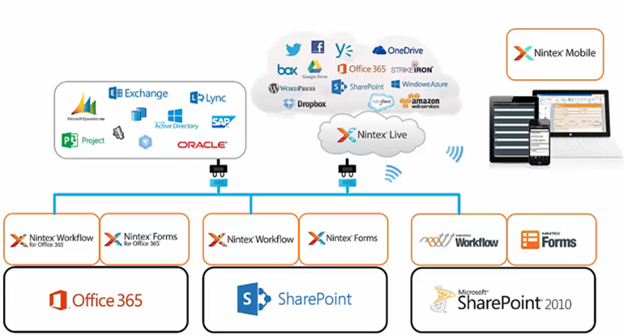
Nintex is one of the best and coolest way to implement Workflow in your SharePoint environment. Well, it is a Workflow Automation Platform released by Nintex. Apart from Nintex Workflow they have other awesome features & products like Nintex Forms, Nintex Mobile, Nintex Live, Hawkeye (To Manage Nintex) and so on. Here, we are going to concentrate only on Nintex Workflow and how we are going to use that in our SharePoint environment.

image

The beauty of Nintex workflow is that there won’t be any code required to implement workflow, all we need to do is some button clicks and everyone can do that. Workflow for everyone includes users, designers, developers, administrators. Because Nintex workflows are easy to draw, design, deploy, update, secure and easy to understand. Nintex workflow does not require any desktop client side application, it is completely browser based. Both Nintex Workflow and SharePoint Workflow use the same Workflow Engine inside SharePoint

Nintex Products

Nintex keenly look for release of Microsoft SharePoint product and their versions. So that we can get Nintex for all the versions of SharePoint. Click here to know more about Installation, Troubleshoot and other useful documentations for all the platforms are available in their official site.

image

Nintex for Office 365

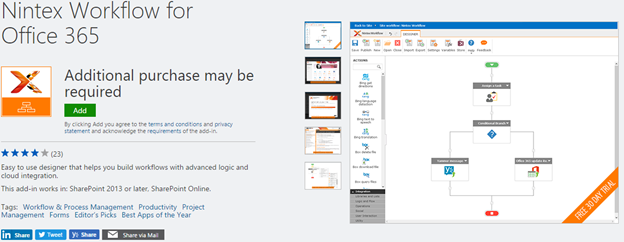
By using Nintex Workflow for Office 365 and Nintex Form for Office 365, we can collaborate and share across all departments, customers and vendors. We can quickly and easily automate the process in cloud. By taking advantage of Cloud App Model, Nintex has unbroken integration with O365.

Nintex for O365 is built and enhanced for the cloud to deliver as O365 App. It is easy to install and manage in your SharePoint Online site. From the following link you can find both the Nintex Workflow for O365 and Nintex Forms for O365 Apps – App link

image

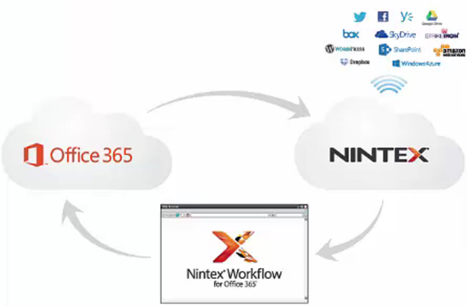
Nintex helps to extend the reach of your workflow to new platforms and cloud services. Social integration allows to reach out your workflow from twitter, facebook, yammer and so on.

image

I believe the above information are useful. Let’s get back to the core concept and overview of Nintex workflow.

Workflow Planning

When we look into this great drag and drop tools, we don’t really think about the process that we want to automate. So here is my little advice and the first thing we need to do is, before automating the process with these tools just think about the process itself.

Whether you can draw the process in a rough sheet or white board or Visio, whichever you think you are comfortable with. Sometime we need to think about the various actors (Manager, Approver, User, IT, Finance etc.) inside of our workflow

image

I hope you enjoyed this article. Thank you for reading and I will provide more useful stuffs related to Nintex Workflows in my upcoming articles.

Author Info

Ahamed Fazil Buhari
 
Senior Developer
 
Rate this article
 
Ahamed is a Senior Developer and he has very good experience in the field of Microsoft Technologies, especially SharePoint, Azure, M365, SPFx, .NET and client side scripting - JavaScript, TypeScript, ...read more
 

Remove Back-to-site Link in the published NINTEX Form in Office 365

Sriram Varadarajan
 
Solution Architect
October 31, 2016
 
Rate this article
 
Views
4018

Adding a Nintex form to Office 365 list creates a navigation link named “Back to Site” which may not be required in all scenarios. In this blog post , we can see how to remove that auto-generated link from a list form.

Let’s assume we have got a list where we want to add a NINTEX FORM. Here is what we’re expected to do:

· Navigate to list

· Click the Ribbon

· Select Nintex Forms

This will take us to the NINTEX tenant as below

clip_image002

Here we will add our FORM and once done we will publish it.

After successful publishing, when you click the NEW ITEM button of our list

clip_image004

This will take us to the NINTEX form which we have just created above.

clip_image006

Here come our actual requirements; our demand is to hide the BACK TO SITE link in the top navigation bar.

As of now we have got 2 options to achieve this:

Option 1:

1. Navigate to the List and click on the List Tab.

2. Then click on the List Settings. 

3. In the Settings page, under General Settings, click on Advanced Settings.

4. In the Advanced Settings page, scroll down to find the Dialogs Option. Select Yes to open the forms in dialog. Once selected, click OK to save the changes.

5. Navigate back to the list and test the functionality with New, Display and Edit Item.

Limitation:

The redirect Url property of the Nintex form works when the form is not opened as Pop Up. If the above List is being called from Another Form as a redirect URL it mightn’t work as of now (this is a known issue and NINTEX is working on it)

Option 2:

1. Navigate to the List and click on the List Tab

2. Then click on the “Nintex Form’.

3. In the Nintex form, click ‘Form Settings’ from top ribbon.

4. Then click ‘Custom CSS’ and add the below line inside the editor window.

5. nf-ribbon-fixed-top {visibility: collapse;}       //To hide the save and cancel ribbon bar

6. nf-ribbon-fixed-chromeTop {visibility: collapse;}  //To hide the ‘Back to Site’ title bar

7. Then click save button.

8. Once saved click publish link from top ribbon.

Limitation:

This may not work if Nintex changes their CSS Class names in the future. Till then we can use this solution Smile

Author Info

Sriram Varadarajan
 
Solution Architect
 
Rate this article
 
Sriram is a Technology Evangelist with 15+ years experience in Microsoft Technologies. He is an enterprise architect working for large pharmaceutical organization which has presence globally with largest Microsoft implementation ...read more
 

Using Nintex Workflow with SharePoint Rest Api

Senthil Kumaresan
 
SharePoint Consultant
September 24, 2015
 
Rate this article
 
Views
20689

Nintex workflows have powerful utilities that help to perform some of the tedious operations like batch updating content or configuration. One such action is the “Web Request”.

I had a scenario where I would need to disable content approval feature from some of the libraries in a set of sites that reside in site collections on different web applications. There are different approaches to do this. First is to write a PowerShell script. But writing a script is pretty easy but executing will take time as I had an environment where the SharePoint Farm is managed by a dedicated server team and I will have to wait to run the script on a change window. Second is to write a .Net Client Side Managed Code program to iterate across all the sites in site collection that reside in different web application which needs extensive coding to.

But there was even easier approach to use Nintex workflows for batch operations which I luckily had in my organization’s SharePoint On-Premises environment. With the introduction of Rest in SharePoint 2013, it is easier now to perform CRUD operations on SharePoint objects using the “Web Request” action in Nintex Workflows.

I had the list of SharePoint Site Url’s in a SharePoint List where I would need my workflow program to iterate through all the sites and remove content approval feature from a library on the site.

There are 2 categories of Http Methods to use in the web request action.

1. Get – Read operation to resources which the user defined in the web request action has rights to.

2. Post – Create, Update and Delete operations on resources which the user defined in the web request action has rights to.

a. For Update operation, A header X-HTTP-Method has to be set with value of MERGE

b. For Delete operation, A header X-HTTP-Method has to be set with value of DELETE

c. All Post operation requires a request digest token to validate post backs to SharePoint.

For my example, since I want to disable content approval for libraries in a set of sites, I would need to perform an update operation using the Post Http Method. I have designed the workflow so that it performs a “for each” loop action to iterate through list of sites and calls the rest service for each site and performs the update operation.

First, to perform a Post method you will need a request digest token.

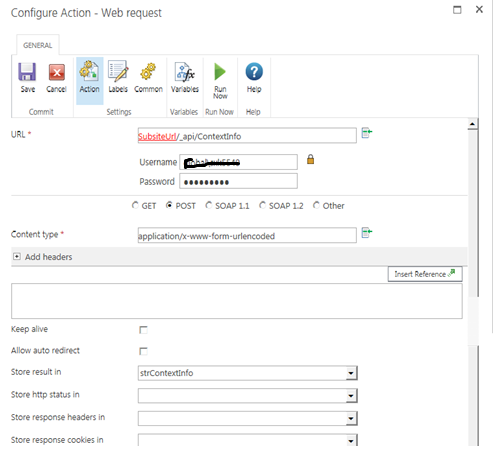
To get a request digest token you will have a perform a post operation to the Rest Url https://<Site Url>/_api/ContextInfo and store the response in a variable

clip_image001

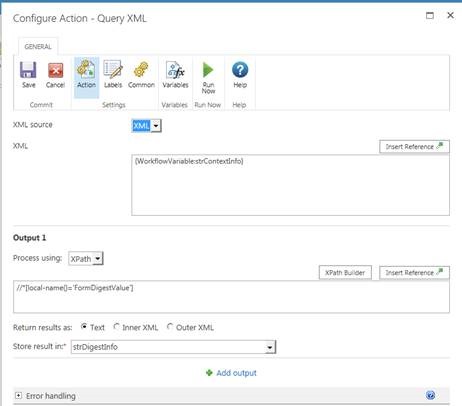
Use Query XML action to query the Digest token value from the Response xml and store it in a variable which is required for the Post operation.

clip_image003

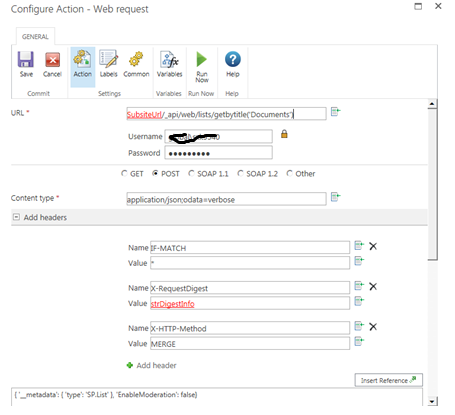
After getting the digest token, I can now call the Post method to perform the update operation on the list properties to disable the content approval on the list using the web request action.

clip_image004

Note, I have modified the content type to “application/json;odata=verbose” since I am sending a Json request in the body of the web request.

Since this is an update operation, I have added 3 headers

1. X-HTTP_Method : MERGE

2. X-RequestDigest : <Digest token got earlier in a variable>

3. IF-MATCH : *

The IF-MATCH: * header is used to overwrite any changes that has already been changed on the server.

The body contains the Json input to perform the merge operation. For all SharePoint Rest API related info check msdn link

So it is pretty simple to perform any Batch CRUD operations using Nintex Workflows, Instead of writing a script.

Author Info

Senthil Kumaresan
 
SharePoint Consultant
 
Rate this article
 
SharePoint Architect – Consulting on SharePoint Infrastructure, IT Governance and Apps Development. ...read more
 

Leave a comment