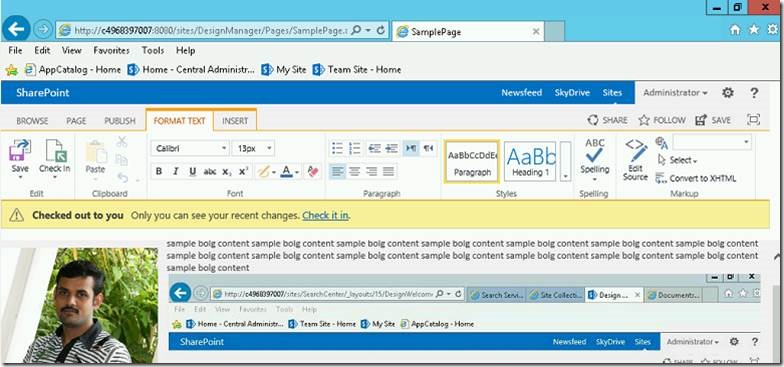
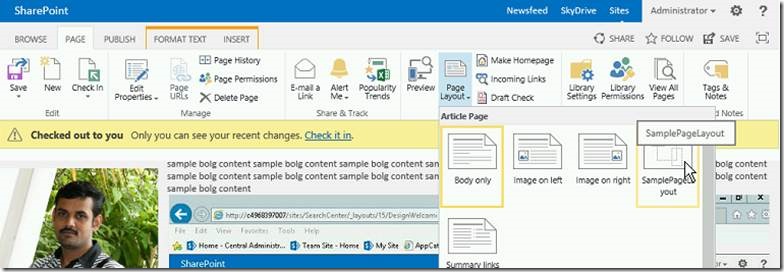
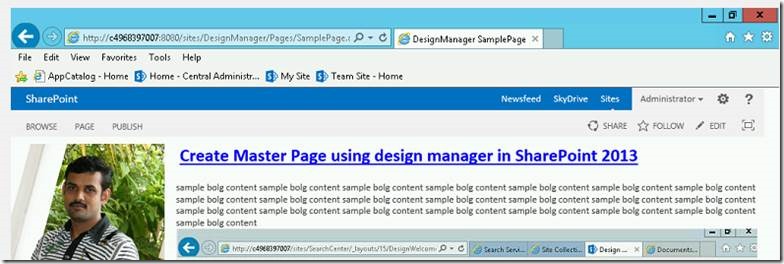
How to Create Page Layout (in Publishing Site) with Content type using Design Manager in SharePoint Office 365

Sathish Nadarajan
 
Solution Architect
September 10, 2016
 
Rate this article
 
Views
7414

In this article, let us see how to Create Page Layout with Content Types in a Publishing Site using Design Manager in SharePoint Office 365.

1. To have the Demo, I created a Publishing Site.

clip_image002

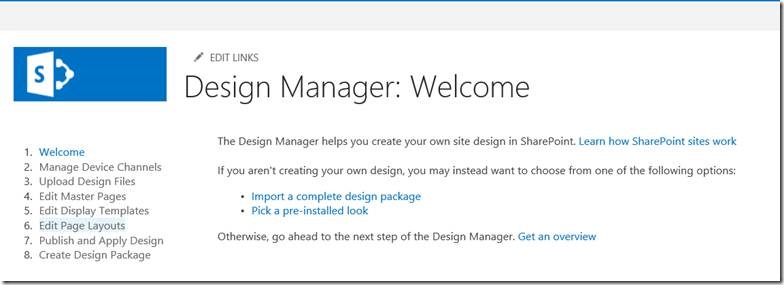
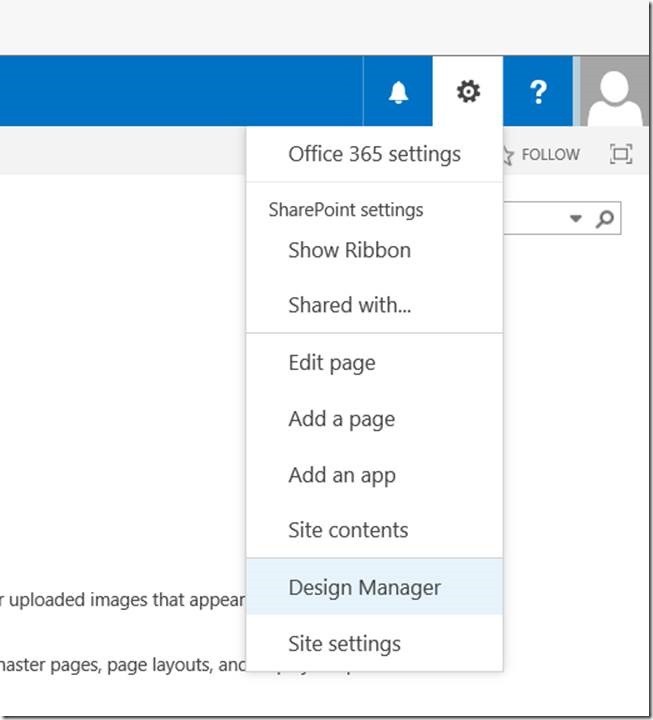
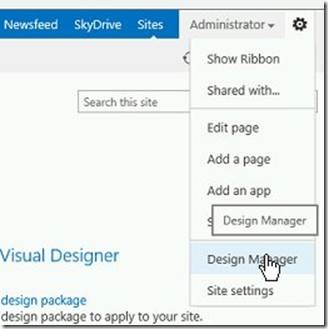
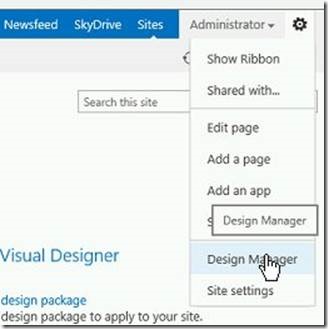
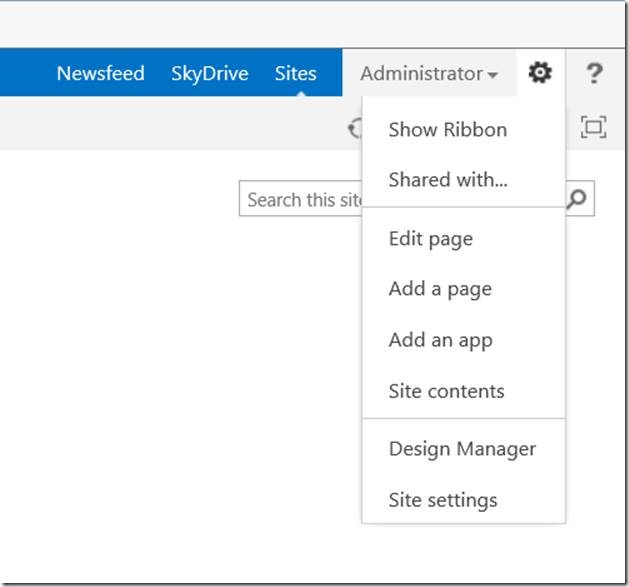
2. On the Top Right Corner, select the Settings and Click on the Design Manager.

clip_image004

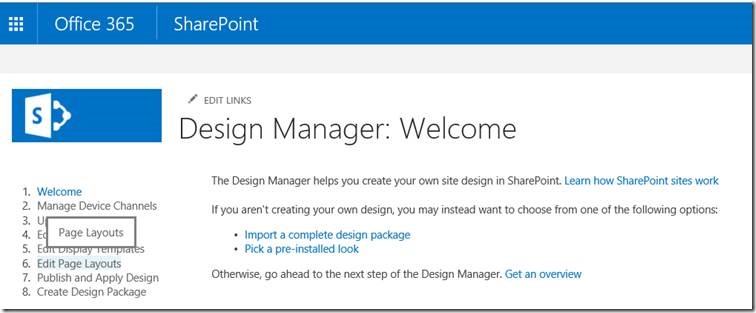
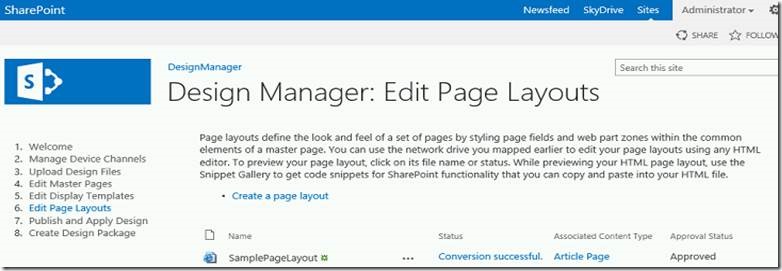
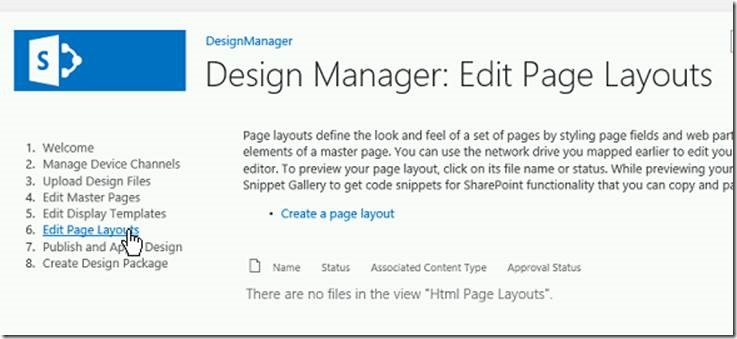
3. Again on the Left Hand side, select the option “Edit Page Layouts”

clip_image006

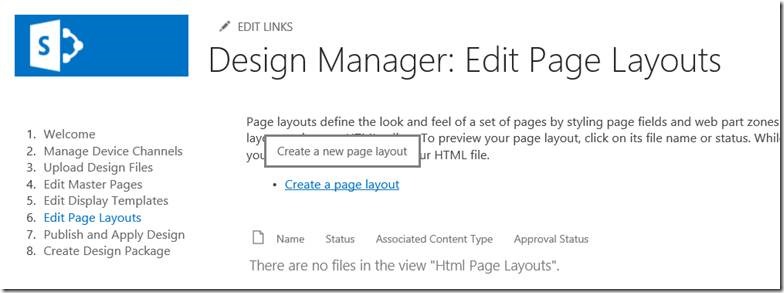
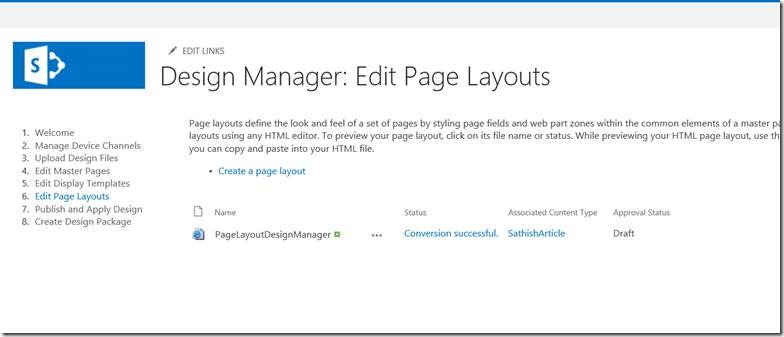
4. On the Edit Page Layouts Screen, select the “Create a Page Layout”

clip_image008

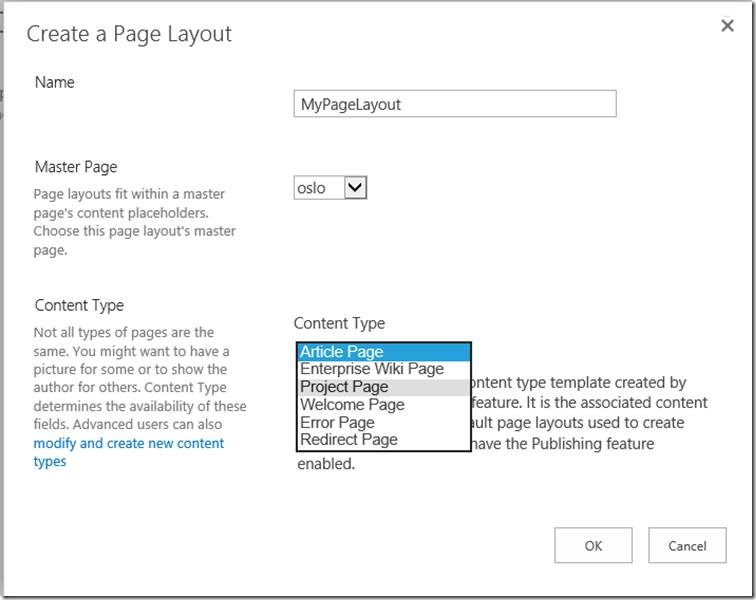
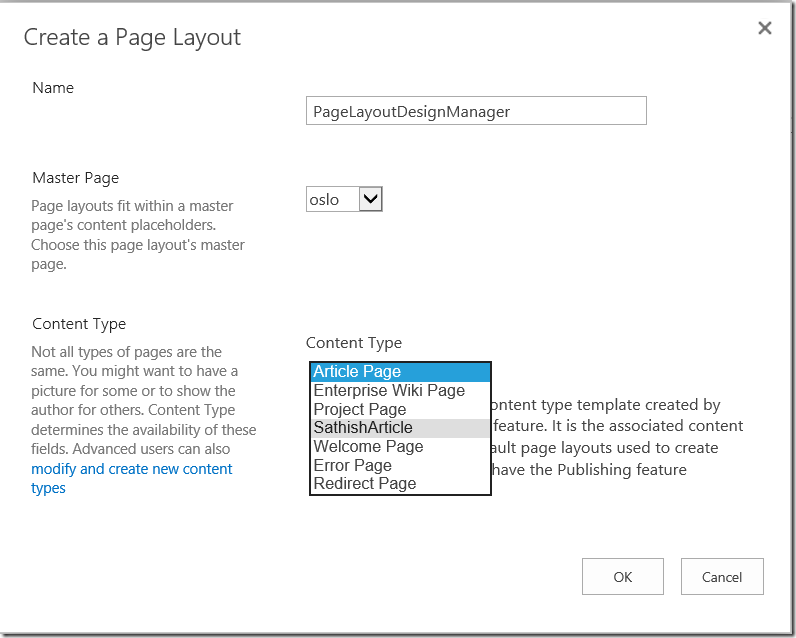
5. On the Create New Page, enter the details.

clip_image010

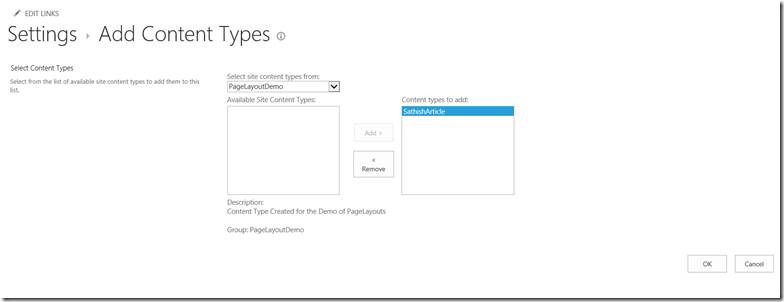
6. On the above screen, if you see, there are some content types listed. Let me create my own content type and that will also be listed on the Drop Down.

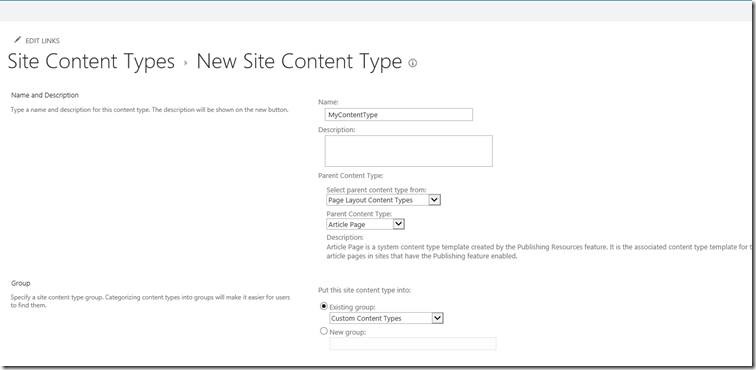
7. Let us create the content type with the details as shown in the figure.

clip_image012

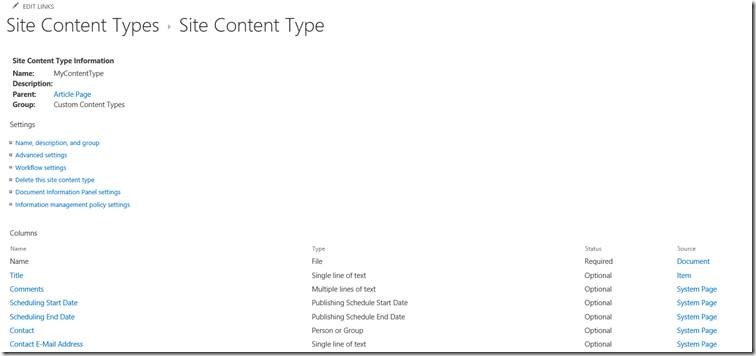
8. The content type got created with the default site columns from the Article Page and if we want to have some custom site columns, we can add. In this case, I have added a site column “MySiteColumn” for our demo purpose.

9. The content type would be like this.

clip_image014

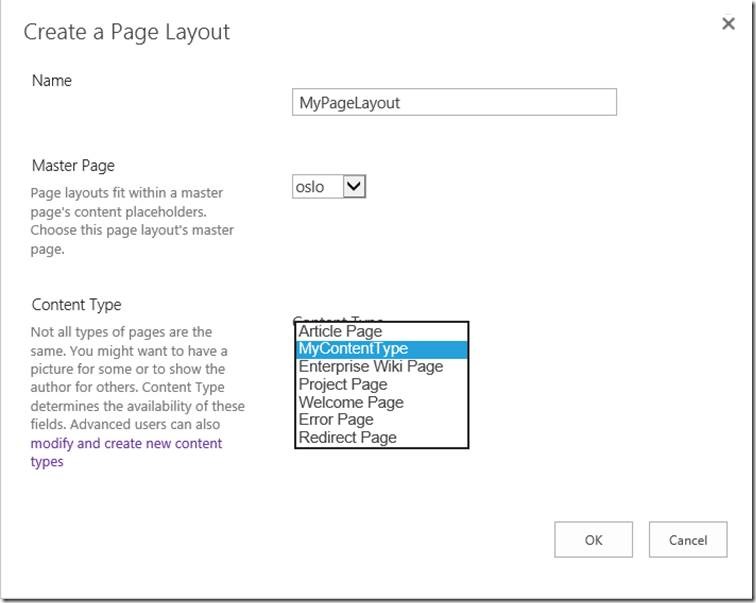
10. Now, come back to the Design Manager, we will be seeing our Content Type Listed over there.

11. Create the Layout as shown in figure.

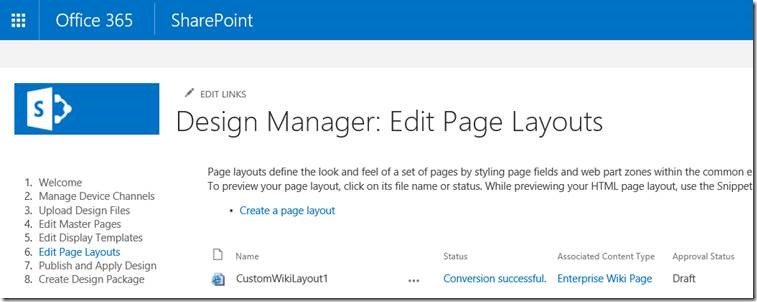
clip_image016

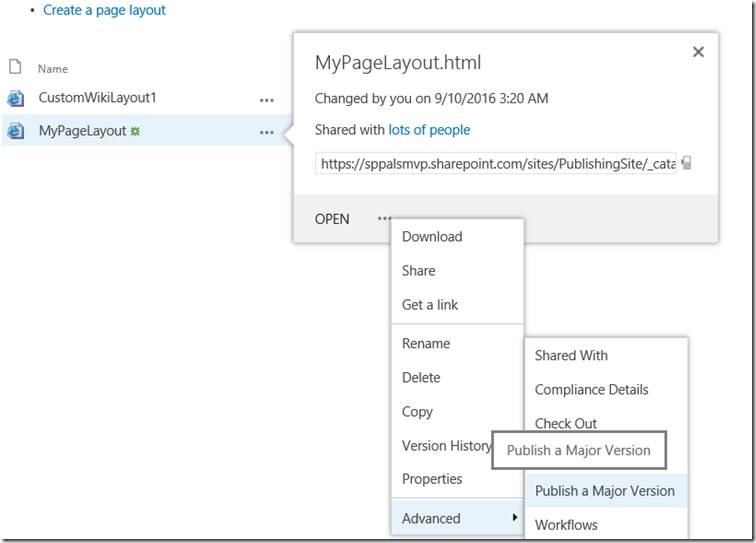
12. Now, publish the Created Layout.

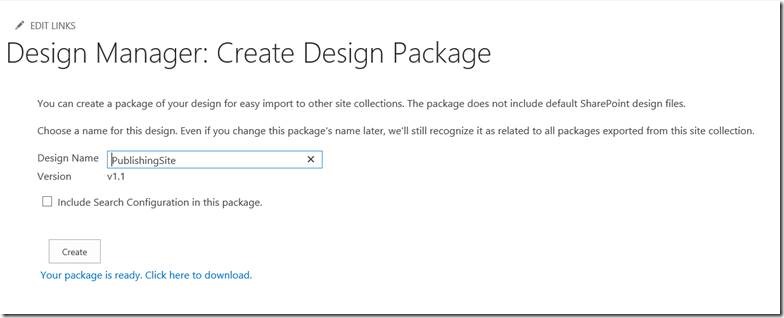
clip_image018

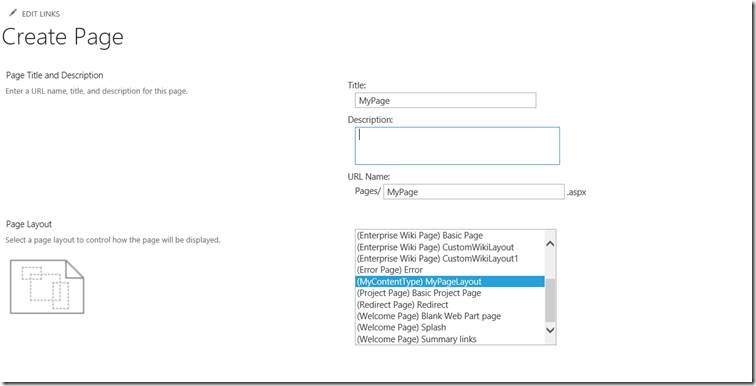
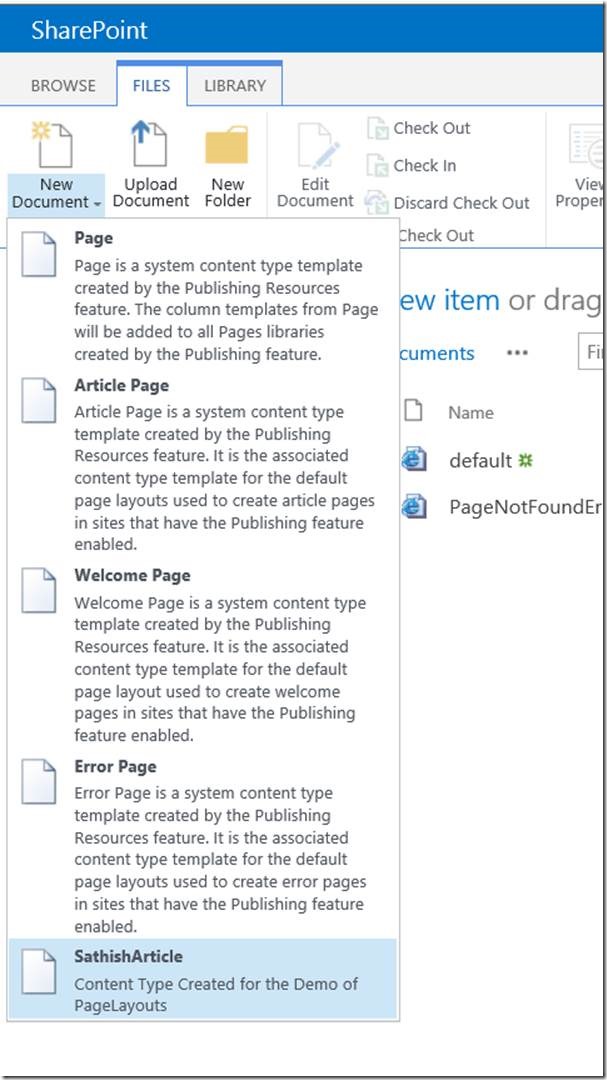
13. Now, when we come back to the Pages Library and create a new page. The Created Layout will be available on the List Box.

clip_image020

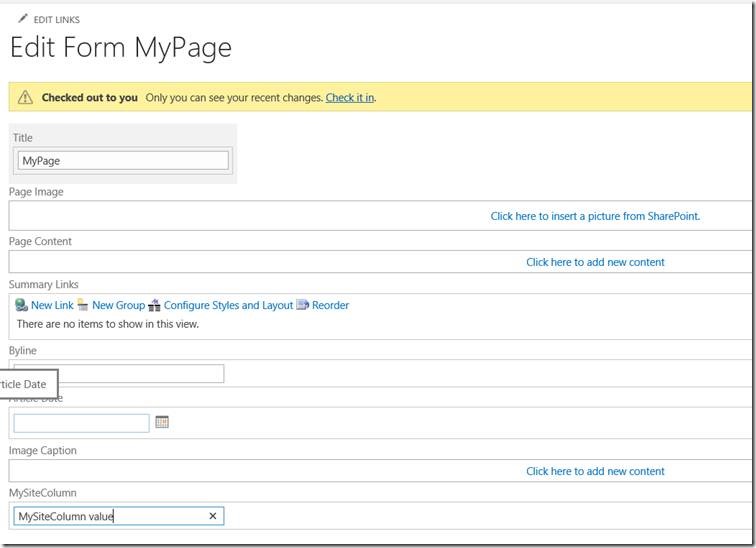
14. When I edit the page, we can see the new Site column at the bottom. We can reorder this site columns as well.

clip_image022

Though it is very simple, there are many things around this page layout. Let us see one by one in the future articles.

Happy Coding,

Sathish Nadarajan.

Author Info

Sathish Nadarajan
 
Solution Architect
 
Rate this article
 
Sathish is a Microsoft MVP for SharePoint (Office Servers and Services) having 15+ years of experience in Microsoft Technologies. He holds a Masters Degree in Computer Aided Design and Business ...read more
 

Editing a Page does not asking for Page Layout or Single URL Option – SharePoint 2013

Sathish Nadarajan
 
Solution Architect
December 14, 2015
 
Rate this article
 
Views
7253

This issue will be faced by almost everyone who has implemented the Cross Site Publishing in SharePoint 2013. Let me again explain the Problem statement once again, so that it will be a bit clear. (I know, the title is not clear J)

Let us assume the following scenario.

1. I have a page layout

2. Have created some pages based on the page layout

3. Using the Term Based Navigation and the terms are pointing to different pages which we created just now.

4. E.g., The Term1 – Navigation Page would be Page1.aspx which is created based on the PageLayout1

5. The Term2 – Navigation Page would be Page2.aspx which is created based on the PageLayout1. (The same layout which the Page1.aspx is using)

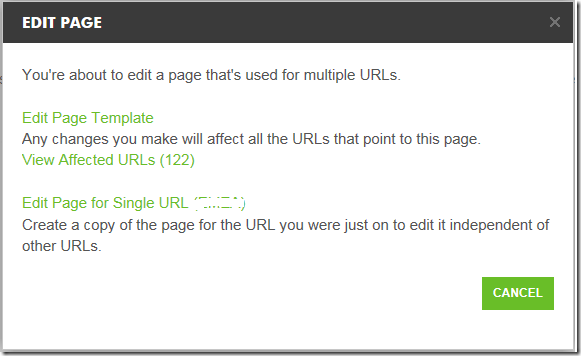
6. Now, when the User comes and Edit the Page1.aspx, SharePoint will be asking for an Option, either you want to edit the Page1.aspx as an individual URL or you want to Edit the PageLayout itself.

image

7. In one of the environment which I was working, this popup was not coming.

8. Then I found that SharePoint is clever enough to display this warning message, if there is one or more terms using the same page and one or more pages has been created based on this layout. If there is only one page created with this Layout, then there is no need of asking this confirmation.

9. Though this looks very simple, I spent some considerable amount of time to understand this and the intelligence of SharePoint. Thought of sharing this to the community as well.

Happy Coding,

Sathish Nadarajan.

Author Info

Sathish Nadarajan
 
Solution Architect
 
Rate this article
 
Sathish is a Microsoft MVP for SharePoint (Office Servers and Services) having 15+ years of experience in Microsoft Technologies. He holds a Masters Degree in Computer Aided Design and Business ...read more
 

How to Set the Page Layout in SharePoint 2013 using PowerShell

Sathish Nadarajan
 
Solution Architect
December 5, 2015
 
Rate this article
 
Views
11747

In this article, let us see how to change the PageLayout of a Publishing page using PowerShell in SharePoint 2013. All the PowerShell Scripts will be very much helpful and handy during the time of preparing the deployment package.

The Script is straight forward and does not require any explanation I guess.

 ##================================================================================================
 ## Description	: To do the below two items.
     #1. Update the PageLayouts of the Existing Pages
 ## Author		: Sathish Nadarajan
 ## Date			: 16-Nov-2015
 ##================================================================================================
 
 ##============================================ Setup Input Paths ===========================================================
 
 cls
  
 $Host.UI.RawUI.WindowTitle = "-- Update the Page Layouts of the Existing Pages --"
 
 $StartDate = Get-Date
 Write-Host -ForegroundColor White "------------------------------------"
 Write-Host -ForegroundColor White "| Update the Page Layouts of the Existing Pages |"
 Write-Host -ForegroundColor White "| Started on: $StartDate |"
 Write-Host -ForegroundColor White "------------------------------------"
 
 $LogTime = Get-Date -Format yyyy-MM-dd_hh-mm
 $LogFile = ".UpdatePageLayout-$LogTime.rtf"
 
 #start-transcript $logfile
 
 $scriptBase = split-path $SCRIPT:MyInvocation.MyCommand.Path -parent
 Set-Location $scriptBase
 
 $ErrorActionPreference = "Stop"
 
 function AddPowerShellSnapin()
 {
     try
     {
         Write-Host "Adding PowerShell Snap-in" -ForegroundColor Green
         # Try to get the PowerShell Snappin.  If not, then adding the PowerShell snappin on the Catch Block
         Get-PSSnapin "Microsoft.SharePoint.PowerShell" 
     }
     catch
     {
         if($Error[0].Exception.Message.Contains("No Windows PowerShell snap-ins matching the pattern 'Microsoft.SharePoint.PowerShell' were found"))
         {
             Add-PSSnapin "Microsoft.SharePoint.PowerShell"
         }
     }
     Write-Host "Finished Adding PowerShell Snap-in" -ForegroundColor Green
 }
 
 
 function UpdatePageLayout([string]$WebURL, [string]$PageLayoutName,[string]$PublishingPageName)
 {
     #Get the web and page
     $Web = Get-SPWeb $WebURL
     
     #Get Publishing Site and Web
     $PublishingSite = New-Object Microsoft.SharePoint.Publishing.PublishingSite($Web.Site)
     $PublishingWeb = [Microsoft.SharePoint.Publishing.PublishingWeb]::GetPublishingWeb($web)
  
     #Get New Page Layout
     $SitePageLayouts = $PublishingSite.GetPageLayouts($false)
     $NewPageLayout = $SitePageLayouts | ? {$_.Name -eq $PageLayoutName}
 
     #Get Pages Library
     $PublishingPage = $PublishingWeb.GetPublishingPage($WebURL + "Pages/" + $PublishingPageName)  
     $PublishingPage.CheckOut()
     $PublishingPage.Layout = $NewPageLayout
     $PublishingPage.ListItem.Update();
     $PublishingPage.CheckIn("Page layout Updated via PowerShell")
     $PublishingPage.ListItem.File.Publish("Published via PowerShell")
     if ($PublishingPage.ListItem.ParentList.EnableModeration)
     {
         $PublishingPage.ListItem.File.Approve("Publishing Page Layout Updated!");
     }
  
     write-host "Updated Page layout on: "$PublishingPage.url -ForegroundColor Green
 }


  try
 {
     [void][System.Reflection.Assembly]::LoadWithPartialName("Microsoft.Sharepoint")
     [void][System.Reflection.Assembly]::LoadWithPartialName("Microsoft.Sharepoint.Administration")
         
     $ConfigXmlPath = $scriptBase + "ConfigXMLPageLayouts.Config.xml"
     Write-Host "Read the Config Values" -ForegroundColor Green 
     [Xml]$Config = Get-Content $ConfigXmlPath  
     
     AddPowerShellSnapin
     
     foreach($Page in $Config.Configuration.Pages.Page)     
     {
         UpdatePageLayout $Config.Configuration.PublishingSite.URL $Page.LayoutName $Page.Name
     }
 }
 catch
 {
     Write-Host "Custom Exception Happened on Main : " + $Error[0].Exception.Message -ForegroundColor Red  
 }
 

And the Config XML is as follows.

 <Configuration EnvironmentName="Dev">
   <PublishingSite URL="http://MySiteCollectionURL/" />
   <Pages>
 	<Page Name="home.aspx" LayoutName=" Home-Layout.aspx"></Page>
 	<Page Name="books.aspx" LayoutName="Topic-Layout.aspx"></Page>
   </Pages>
 </Configuration> 


Happy Coding,

Sathish Nadarajan.

Category : PowerShell, SharePoint

Author Info

Sathish Nadarajan
 
Solution Architect
 
Rate this article
 
Sathish is a Microsoft MVP for SharePoint (Office Servers and Services) having 15+ years of experience in Microsoft Technologies. He holds a Masters Degree in Computer Aided Design and Business ...read more
 

How to Upload the Page Layouts into SharePoint 2013 Using PowerShell

Sathish Nadarajan
 
Solution Architect
October 12, 2015
 
Rate this article
 
Views
10365

Already in this article, we saw how to upload the master page and the display templates into sharepoint by using PowerShell. In the same manner, during our development, there are almost 5 artifacts which needs to be uploaded frequently. We cannot rely on the WSP every time, during our development phase. Hence, we require some sort of scripts to upload/publish the below artifacts frequently.

1. Display Templates

2. Master Pages

3. CSS files

4. Javascript Files

5. Page Layouts

Almost all the files will be uploaded in a similar manner, but the slight different is the path and the folder, where we are uploading them. Based on our requirement, this could be anywhere. Some people will keep their css, js files in style library, some could keep it somewhere else. Hence, I request you guys to modify the Paths accordingly. Let us see them one by one. In this article let us see how to upload the Page Layouts in to SharePoint 2013.

 ##================================================================================================
 ## Description	: To do the below two items.
     #1. Upload the Page Layouts into Site Collection
 ## Author		: Sathish Nadarajan
 ## Date			: 08-Oct-2015
 ##================================================================================================
 
 ##============================================ Setup Input Paths ===========================================================
 
 cls
  
 $Host.UI.RawUI.WindowTitle = "-- Upload the PageLayouts into Site Collection --"
 
 $StartDate = Get-Date
 Write-Host -ForegroundColor White "------------------------------------"
 Write-Host -ForegroundColor White "| Upload the PageLayouts into Site Collection |"
 Write-Host -ForegroundColor White "| Started on: $StartDate |"
 Write-Host -ForegroundColor White "------------------------------------"
 
 $LogTime = Get-Date -Format yyyy-MM-dd_hh-mm
 $LogFile = ".UploadPageLayouts-$LogTime.rtf"
 
 #start-transcript $logfile
 
 $scriptBase = split-path $SCRIPT:MyInvocation.MyCommand.Path -parent
 Set-Location $scriptBase
 
 $ErrorActionPreference = "Stop"
 
 function AddPowerShellSnapin()
 {
     try
     {
         Write-Host "Adding PowerShell Snap-in" -ForegroundColor Green
         # Try to get the PowerShell Snappin.  If not, then adding the PowerShell snappin on the Catch Block
         Get-PSSnapin "Microsoft.SharePoint.PowerShell" 
     }
     catch
     {
         if($Error[0].Exception.Message.Contains("No Windows PowerShell snap-ins matching the pattern 'Microsoft.SharePoint.PowerShell' were found"))
         {
             Add-PSSnapin "Microsoft.SharePoint.PowerShell"
         }
     }
     Write-Host "Finished Adding PowerShell Snap-in" -ForegroundColor Green
 }
  
 
 function UploadPageLayouts([string]$siteUrl)
 {
     $spsite = Get-SPSite $siteUrl
     $web = $spsite.RootWeb
     $contentWebPartsDisplayTemplatesFolder = ($web).GetFolder("Master Page Gallery")
     $displayTemplatesDirectory = $scriptBase + "PageLayouts"
     $web.AllowUnsafeUpdates=$true;
 
     #For upload all files in document library from file system
     foreach ($file in Get-ChildItem $displayTemplatesDirectory)
     {
          try
          {
                  $stream = [IO.File]::OpenRead($file.fullname)
                  $destUrl = $web.Url + "/_catalogs/masterpage/" + $file.Name;
                  $displayTemplateFile = $web.GetFile($destUrl)
                   
                  if($displayTemplateFile.CheckOutStatus -ne "None")
                  {
                      $contentWebPartsDisplayTemplatesFolder.files.Add($destUrl,$stream,$true)
                      $stream.close() 
                           
                      $displayTemplateFile.CheckIn("CheckIn by PowerShell");                         
                      $displayTemplateFile.Publish("Publish by PowerShell");                         
                       
                      $displayTemplateFile.Update();        
                      $web.Update();
                      
                      Write-Host $file.Name " Page Layouts uploaded on $web site" -ForegroundColor Green  
                       
                  }
                  else
                  {
                      $displayTemplateFile.CheckOut();
                      try
                      {
                         $contentWebPartsDisplayTemplatesFolder.Files.Add($destUrl,$stream,$true)
                      }
                      catch
                      {
                         Write-Host $_
                      }
                      $stream.close()                             
                      $displayTemplateFile.CheckIn("CheckIn by PowerShell");                         
                      $displayTemplateFile.Publish("Publish by PowerShell");                         
                       
                      $displayTemplateFile.Update();        
                      $web.Update();
                      
                       
                      Write-Host $file.Name " Page Layouts uploaded on $web site" -ForegroundColor Green  
                       
                  }
          }
          catch
          {
              Write-Host $_  
          }    
      }
   
   $web.AllowUnsafeUpdates  = $false;
 
  $web.dispose();
  $spsite.dispose();
 }
 
 try
 {
     [void][System.Reflection.Assembly]::LoadWithPartialName("Microsoft.Sharepoint")
     [void][System.Reflection.Assembly]::LoadWithPartialName("Microsoft.Sharepoint.Administration")
     AddPowerShellSnapin
     UploadPageLayouts "http://MySiteCollection" # SiteCollection URL
 }
 catch
 {
     Write-Host "Custom Exception Happened on Main : " + $Error[0].Exception.Message -ForegroundColor Red  
 }
 

This PowerShell script will Add the File for the first time, and from, the second time onwards, it will check out and check in the files. Hence, we will not lose our versioning as well.

Let us see the other artifacts in the upcoming articles.


Happy Coding,

Sathish Nadarajan.

Author Info

Sathish Nadarajan
 
Solution Architect
 
Rate this article
 
Sathish is a Microsoft MVP for SharePoint (Office Servers and Services) having 15+ years of experience in Microsoft Technologies. He holds a Masters Degree in Computer Aided Design and Business ...read more
 

How to use a single PageLayout for View and Edit Mode in SharePoint 2013

Sathish Nadarajan
 
Solution Architect
April 1, 2015
 
Rate this article
 
Views
14281

In one of the older Article, we saw how to create a PageLayout using Visual Studio. A small add-on to that article is the one which we are going to see now.

I request the readers to read that article first and then reading this one is a worth. Moreover, here we are not going to discuss elaborately. Just a continuity of the older one as recently I met with this kind of requirement.

Basically a Layout which should be used for both the View and Edit Mode. The user will be editing the PublishingPageContent from this layout. As soon as they save the page, then the PublishingPageContent should be rendered on the same page.

For that, there is nothing much deviation from the older one. But the only thing is EditModePanel.

The aspx file would be something as below.

 <%@ Page Language="C#" Inherits="Microsoft.SharePoint.Publishing.PublishingLayoutPage,Microsoft.SharePoint.Publishing,Version=15.0.0.0,Culture=neutral,PublicKeyToken=71e9bce111e9429c" %>
 
 <%@ Register TagPrefix="SharePointWebControls" Namespace="Microsoft.SharePoint.WebControls" Assembly="Microsoft.SharePoint, Version=15.0.0.0, Culture=neutral, PublicKeyToken=71e9bce111e9429c" %>
 <%@ Register TagPrefix="WebPartPages" Namespace="Microsoft.SharePoint.WebPartPages" Assembly="Microsoft.SharePoint, Version=15.0.0.0, Culture=neutral, PublicKeyToken=71e9bce111e9429c" %>
 <%@ Register TagPrefix="PublishingWebControls" Namespace="Microsoft.SharePoint.Publishing.WebControls" Assembly="Microsoft.SharePoint.Publishing, Version=15.0.0.0, Culture=neutral, PublicKeyToken=71e9bce111e9429c" %>
 <%@ Register TagPrefix="PublishingNavigation" Namespace="Microsoft.SharePoint.Publishing.Navigation" Assembly="Microsoft.SharePoint.Publishing, Version=15.0.0.0, Culture=neutral, PublicKeyToken=71e9bce111e9429c" %>
 <asp:content contentplaceholderid="PlaceHolderAdditionalPageHead" runat="server">
 	<SharePointWebControls:CssRegistration name="<% $SPUrl:~sitecollection/Style Library/~language/Themable/Core Styles/pagelayouts15.css %>" runat="server"/>
 	<PublishingWebControls:EditModePanel runat="server">
 		<!-- Styles for edit mode only-->
 		<SharePointWebControls:CssRegistration name="<% $SPUrl:~sitecollection/Style Library/~language/Themable/Core Styles/editmode15.css %>"
 			After="<% $SPUrl:~sitecollection/Style Library/~language/Themable/Core Styles/pagelayouts15.css %>" runat="server"/>
 	</PublishingWebControls:EditModePanel>
 	<SharePointWebControls:FieldValue id="PageStylesField" FieldName="HeaderStyleDefinitions" runat="server"/>
 </asp:content>
 <asp:Content ContentPlaceHolderId="PlaceHolderPageTitle" runat="server">
 	<SharePointWebControls:FieldValue id="PageTitle" FieldName="Title" runat="server"/>
 </asp:Content>
 <asp:Content ContentPlaceHolderId="PlaceHolderPageTitleInTitleArea" runat="server">
 	<SharePointWebControls:FieldValue FieldName="Title" runat="server"/>
 </asp:Content>
 <asp:Content ContentPlaceHolderId="PlaceHolderTitleBreadcrumb" runat="server"> 
     <SharePointWebControls:ListSiteMapPath runat="server" SiteMapProviders="CurrentNavigationSwitchableProvider" RenderCurrentNodeAsLink="false" PathSeparator="" CssClass="s4-breadcrumb" NodeStyle-CssClass="s4-breadcrumbNode" CurrentNodeStyle-CssClass="s4-breadcrumbCurrentNode" RootNodeStyle-CssClass="s4-breadcrumbRootNode" NodeImageOffsetX=0 NodeImageOffsetY=289 NodeImageWidth=16 NodeImageHeight=16 NodeImageUrl="/_layouts/15/images/fgimg.png?rev=23" HideInteriorRootNodes="true" SkipLinkText="" />
 </asp:Content>
 <asp:Content ContentPlaceHolderId="PlaceHolderMain" runat="server">
 	<div class="article article-body">
 		<PublishingWebControls:EditModePanel runat="server" CssClass="edit-mode-panel title-edit">
 			<SharePointWebControls:TextField runat="server" FieldName="Title"/>
 		</PublishingWebControls:EditModePanel>
 		<div class="article-content">
 			<PublishingWebControls:RichHtmlField FieldName="PublishingPageContent" HasInitialFocus="True" MinimumEditHeight="400px" runat="server"/>
 		</div>
 		
 	</div>   
 	 
 </asp:Content>
 

Happy Coding.

Sathish Nadarajan.

Author Info

Sathish Nadarajan
 
Solution Architect
 
Rate this article
 
Sathish is a Microsoft MVP for SharePoint (Office Servers and Services) having 15+ years of experience in Microsoft Technologies. He holds a Masters Degree in Computer Aided Design and Business ...read more
 

Set PageLayouts and Site Templates Settings in SharePoint 2013 using PowerShell

Sathish Nadarajan
 
Solution Architect
March 28, 2015
 
Rate this article
 
Views
14965

In this article, let us see, how to change the PageLayouts and SiteTemplates settings in SharePoint 2013 using PowerShell.

Before diving into the PowerShell, let us see how to change them using the UI.

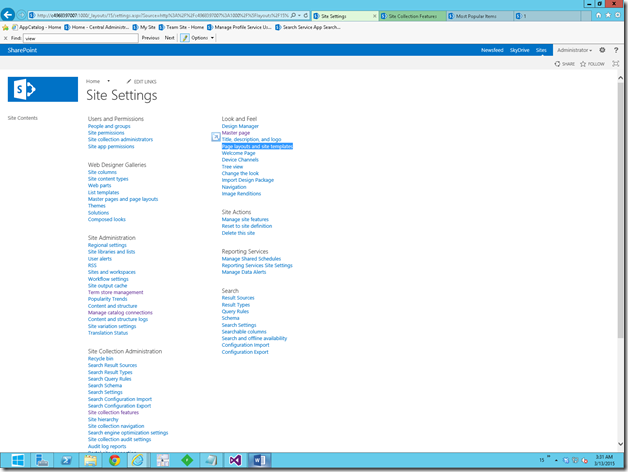
1. Go to the Site Settings

image

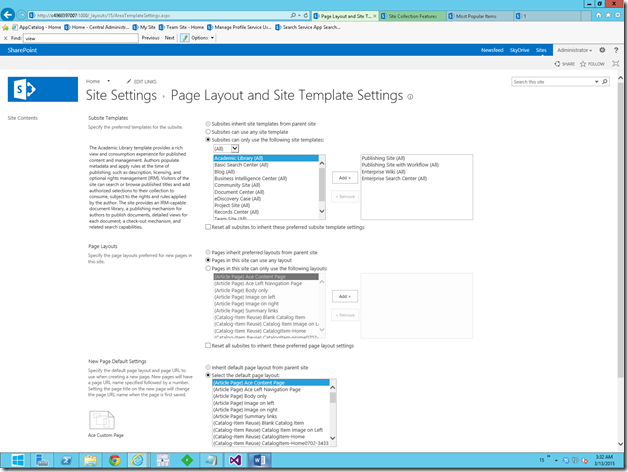
2. Click on the “Page Layouts and Site Templates”

image

3. Here, you can select any of the Radio Buttons based on the requirement.

4. In my case, I want to select

a. Subsites can use any site templates

b. Pages in the site can use any layout

For that, I was about to give a PowerShell Script as a deployment package.

The script is a very much straight forward one.

 $web = Get-SPWeb "http://c4968397007:1000" 
 
 
 if ([Microsoft.SharePoint.Publishing.PublishingWeb]::IsPublishingWeb($web)) 
 {
     $spPub = [Microsoft.SharePoint.Publishing.PublishingWeb]::GetPublishingWeb($web)
     $spPub.AllowAllPageLayouts($false)
     $spPub.Update()
 
 }
 

In the same manner, to update the WebTemplates property use the below.

 $spPub.AllowAllWebTemplates($false)

In case, if we want to have “SubSites can only use the Following Site Templates”, then the code will be like below.

 $templateNamesToKeep = "STS#0","PROJECTSITE#0","BLOG#0" 
 
 Start-SPAssignment -Global 
 $web = Get-SPWeb <URL of site> 
 
 # get the existing web templates from the site that will be filtered down 
 # 1033 is the locale id for English US (en-us), be sure to change to your locale 
 $existingWebTemplates = $web.GetAvailableWebTemplates(1033) 
 $newWebTemplates = New-Object "System.Collections.ObjectModel.Collection[Microsoft.SharePoint.SPWebTemplate]" 
 
 # filter existing web templates and only keep if in the list of template names to keep 
 $newWebTemplates = $existingWebTemplates | Where-Object {$_.name -in $templateNamesToKeep} 
 $web.SetAvailableWebTemplates($newWebTemplates, 1033) 
 $web.Update() 
 
 Stop-SPAssignment -Global  
 

All the settings revolving around this page would be managed by the above piece of scripts with a minimal modifications. Hope this will help for the Administrators much.

Happy Coding.

Sathish Nadarajan.

Author Info

Sathish Nadarajan
 
Solution Architect
 
Rate this article
 
Sathish is a Microsoft MVP for SharePoint (Office Servers and Services) having 15+ years of experience in Microsoft Technologies. He holds a Masters Degree in Computer Aided Design and Business ...read more
 

Add snippets in Page layout using design manager

Santhosh Babu
 
Technology Specialist
January 5, 2014
 
Rate this article
 
Views
29542

In this post I am going to add a Web Part Zone snippet in page layout.

Step 1: Open the site then click design manager link from right top corner "Settings" menu.

clip_image002

Step 2: Click “Edit Page Layouts” link

clip_image004


Step 3: Click “SamplePageLayout” .It will open preview page.

clip_image006


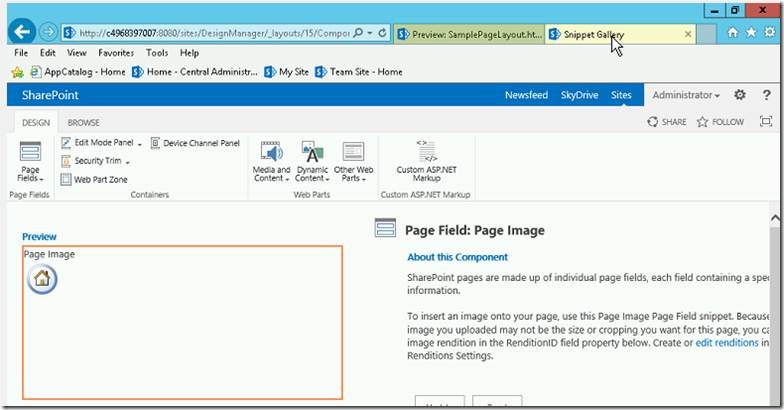
Step 4: Once open the preview page then click Snippets menu from top right side. It will open “Snippet Gallery” in new tab page.

clip_image008


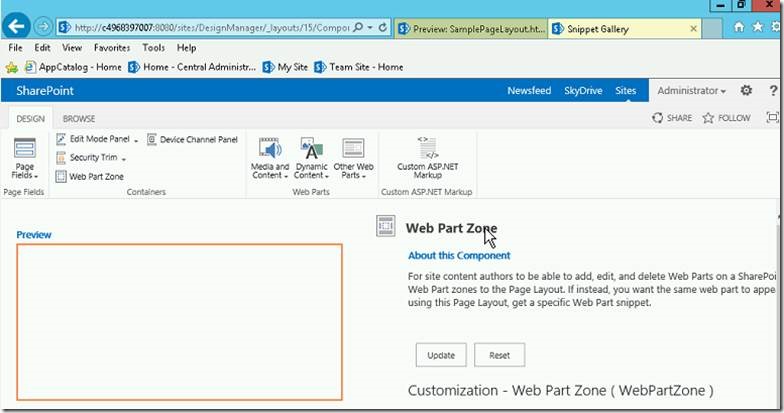
Step 5: Click the Web Part Zone menu item in “DESIGN “tab.

clip_image010


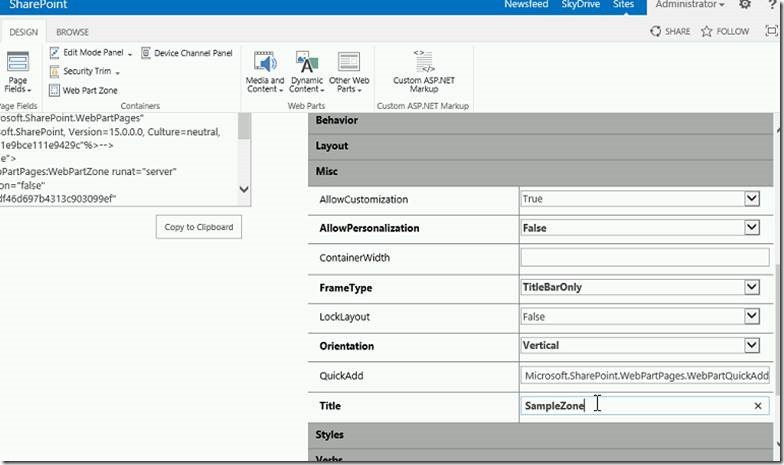
Step 6: In this page we can easy to configure component properties. Now, I will change the Web part Zone Title under Misc category. After customization must click the update button then only the changes are reflected in the component snippet.

clip_image012

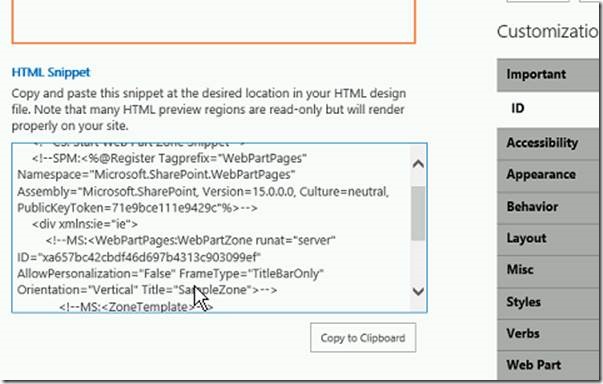
Step 7: Once click the update button the HTML code automatically generated in the “HTML snippet” box and click “Copy to Clipboard” button.

clip_image014


Step 8: Open the mapped network drive then open the page layout HTML file and paste HTML snippet where you want the web part zone to show.

clip_image016

Step 9: We should add the HTML snippet inside of the <asp:ContentPlaceHolder ID="PlaceHolderMain" runat="server">. In my example I am remove all the default div tags (inside of the content place holder) and paste with my HTML Snippet content.

Default content

clip_image018

Replaced Content


clip_image020

Step 10: Once complete the activity the save the page and publish the page layout in design manager.

clip_image022

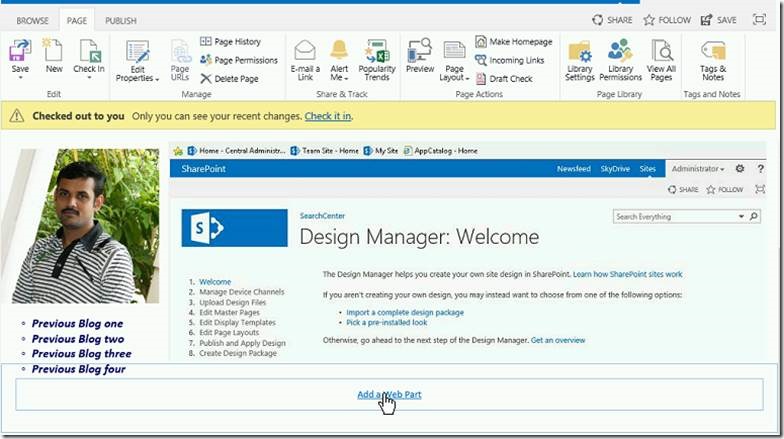
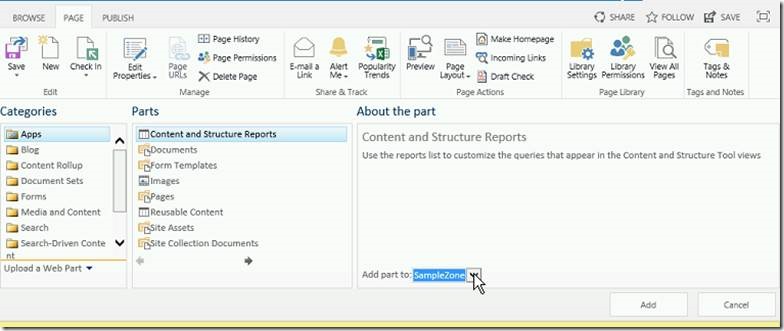
Step 11: Open the sample page (which we have used in “SamplePageLayout”) and click edit and try to “Add a Web Part”. You will see the web part zone title in the “Add part to” drop down.

clip_image024

clip_image026


Next Blog I will explain the create design manager master page package.

Happy Coding.

SanthoshBabu ManickaMohan

Author Info

Santhosh Babu
 
Technology Specialist
 
Rate this article
 
Working as a Technology Specialist in SharePoint ~ Cognizant ...read more
 

How to Create Page layout using design manager

Santhosh Babu
 
Technology Specialist
 
Rate this article
 
Views
16649

In this post I am going to create a page layout using design manager.

Step 1:

Open the site then click design manager link from right top corner "Settings" menu.

clip_image002

Step 2: Click “Edit Page Layouts” link


clip_image004


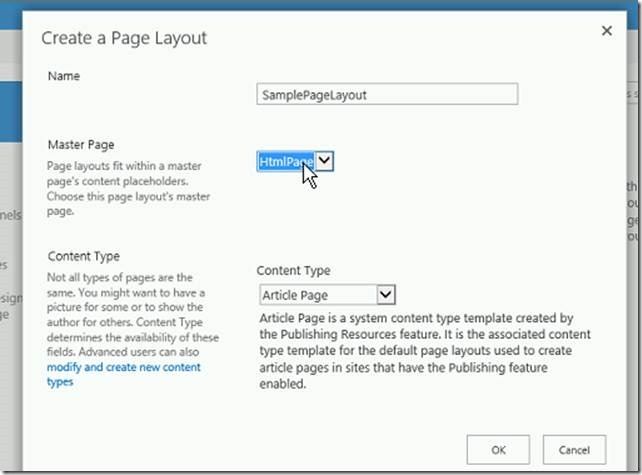
Step 3: Click “Create a page layout” link. It will open a popup window and select Master page (which we have created in earlier post) for this scenario we need to select “HTMLPage” then click ok button.

clip_image006


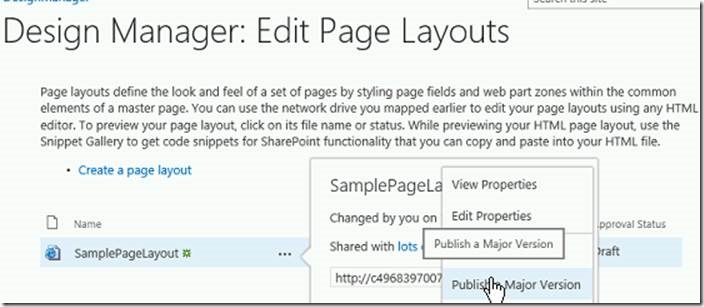
Step 4: Once the page layout created then publish the same.

clip_image008


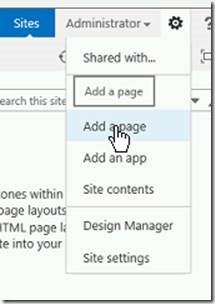
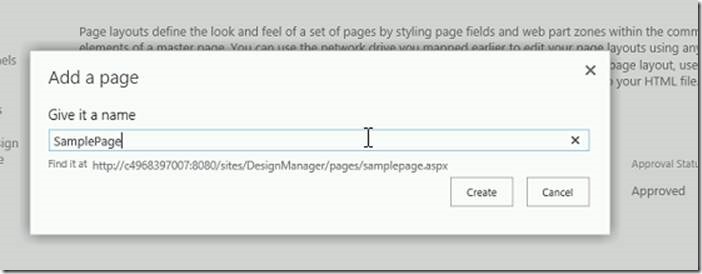
Step 5: After publish the page layout click the “Settings” icon then click Add a Page. It will open a popup window and provide the page name and click create button.

clip_image010

clip_image012


Step 6: After created page automatically redirect to the new page.

clip_image014


Step 7: Select the PAGE tab and open Page Layout menu then select “SamplePageLayout”. It will change the page layout. After then check-in and publish the page.


clip_image016


clip_image018


Next Blog I will explain about how to add code snippet in page layout.

Happy Coding.

SanthoshBabu ManickaMohan

Author Info

Santhosh Babu
 
Technology Specialist
 
Rate this article
 
Working as a Technology Specialist in SharePoint ~ Cognizant ...read more
 

Create Publishing Page using Custom PageLayout by PowerShell in SharePoint 2013

Sathish Nadarajan
 
Solution Architect
December 11, 2013
 
Rate this article
 
Views
29318

I was come up with an interesting requirement stating that, we need to create some huge numbers of pages based on a Custom PageLayout in our Site Collection. For that, I was planning to write a PowerShell with some configuration values. So that, on the execution, the script will create those pages. Thought of sharing this to the community.

Basically it is going to be a simple straight forward script. We have a publishing portal and the custom PageLayout has been deployed on the Publishing Portal.

The script is self-explanatory and doesn’t require much explanation I guess.

 # Add the PowerShell Snapin
 $snapin = Get-PSSnapin | Where-Object {$_.Name -eq 'Microsoft.SharePoint.Powershell'}
 if ($snapin -eq $null) 
 { 
     Add-PSSnapin "Microsoft.SharePoint.Powershell" 
 }
 
 # Get the SiteURL
 $SiteUrl = "https://MySiteCollectionURL"
 
 # Get the WebURL
 $WebUrl = "https://MyWebURL"
 
 # Get the PageLayout
 $PageLayoutRelUrl = "/_catalogs/masterpage/CustomPageLayout.aspx"
 
 # Get the Page URL
 $PageName = "Test.aspx"
 
 # Get the Title of the Page which is going to get created
 $PageTitle = "Test"
 
 # Initialize the Site Object
 $Site = Get-SPSite($SiteUrl)
 
 # Get the Publishing Site based on the SPSite
 $PubSite = New-Object Microsoft.SharePoint.Publishing.PublishingSite($Site)
 
 # Get the SPWeb Object
 $Web = Get-SPWeb $WebUrl
 
 # Initialize the PublishingWeb based on the SPWeb
 $PubWeb = [Microsoft.SharePoint.Publishing.PublishingWeb]::GetPublishingWeb($Web)
  
 # Get the PageLayouts Installed on the Publishing Site
 $Layouts = $PubSite.GetPageLayouts($False)
 
 # Get our PageLayout
 $PageLayout = $Layouts[$PageLayoutRelUrl]
  
 # Create a new publishing page.
 $Page = $PubWeb.AddPublishingPage($PageName, $PageLayout)
 
 # Assign the Title for the Page
 $Page.Title = $PageTitle
 
 # Update the Page
 $Page.Update();
 
 # Check in the Page with Comments
 $Page.CheckIn("Test Comment")
 
 # Publish the Page With Comments
 $Page.ListItem.File.Publish("Test Publish Comment")
 

That’s it. Run the script with the required privilege. To verify that, go the Pages Library and make sure that you are seeing Test.aspx there.

Happy Coding.

Sathish Nadarajan.

Author Info

Sathish Nadarajan
 
Solution Architect
 
Rate this article
 
Sathish is a Microsoft MVP for SharePoint (Office Servers and Services) having 15+ years of experience in Microsoft Technologies. He holds a Masters Degree in Computer Aided Design and Business ...read more
 

How to Create a Page Layout (PageLayout) with ContentType in SharePoint 2013 using Design Manager – Part III

Sathish Nadarajan
 
Solution Architect
November 16, 2013
 
Rate this article
 
Views
41751

In this article, let us see how to create a PageLayout using Design Manager. In the previous article, we saw about the creating a page layout using Visual Studio, SharePoint Designer. Here let us utilize a new feature in SharePoint 2013, which is not available on SharePoint 2010 – Design manager.

Design Manager is a new feature which is available only in SharePoint 2013 (not in the previous flavors of SP), that allows us to easily create the branding artifacts like MasterPages, CSS, PageLayouts Etc.,

Design Manager will be available only in Publishing template and not in the Developer Site Template. Hence, we need to create a Publishing Site for this demo.

Let me create a publishing Site.
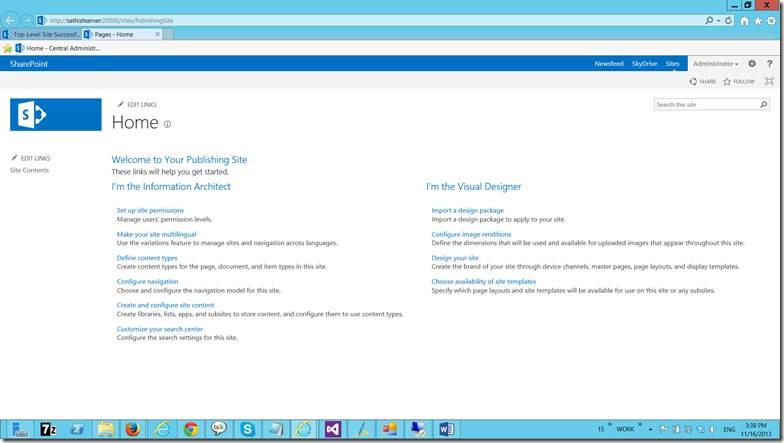
clip_image002

On the Settings Icon on the Right top corner, you can find a new link called Design Manager.
clip_image004

Design Manager will look like this.

clip_image006

Click on the Edit page Layouts link.

clip_image008

Click on the Create Page Layout.

clip_image010

Enter the name for the pagelayout and select the Content Type which we created.
clip_image011

Keep the master page as it is as of now. Since, we are not focusing that.

Now, we got the html file inside the pagelayouts folder.
clip_image013

Let us, publish this. Then the “Approval Status” will become “Approved”

clip_image015

Now, let us go to the Pages document library.

Associate this doc library into our Content Type which we created. To add our Content Type, follow the steps.

clip_image017

Go to Library Settings.

clip_image019

clip_image021clip_image023

That’s it. Now we added our Content Type.

To confirm that, go to the Files-> New Document. Our newly added content type will be listed there.
clip_image025

On the Create Page, you can find the Page Layout, which we created using the Design Manager.
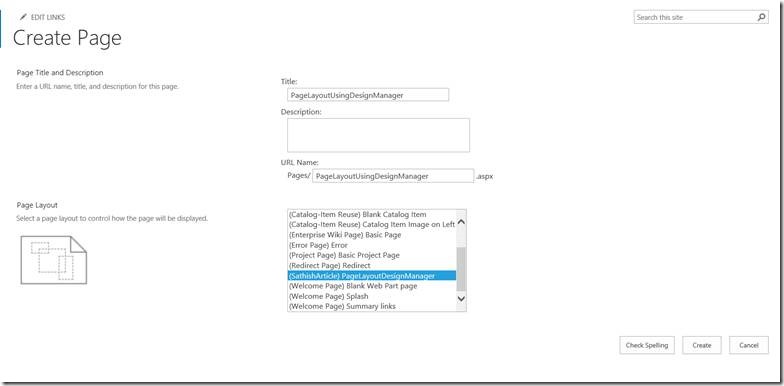
clip_image027

Let me create a page based on the page layout we created.

After giving the mandatory fields, our page will look like the below.

clip_image029

Now, let us see, how to modify the layout of the Page Layout which we created. To see that, go to Master Page Gallery.
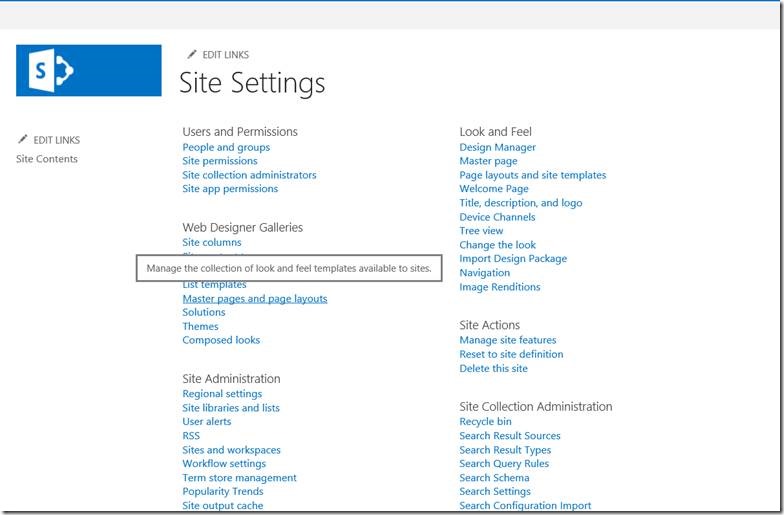
clip_image031

You can find the list of files, and the one which we created just now. For every PageLayout, created by the designer would be having 2 files. One aspx and one html. In our case, PageLayoutDesignmanager.aspx and PageLayoutDesignManager.html.

As far as concerning the Design manager approach, html file is very important. The aspx page will be overridden by html template when next time, sharepoint gets loaded. Hence, it is strongly recommended that not to modify the aspx. Modify only the html.

Being a developer/designer, we can use any tool to modify the html. To do that, we need to map the galleries into our local computer.

Open the Windows Explorer and Select Map Network Drive.
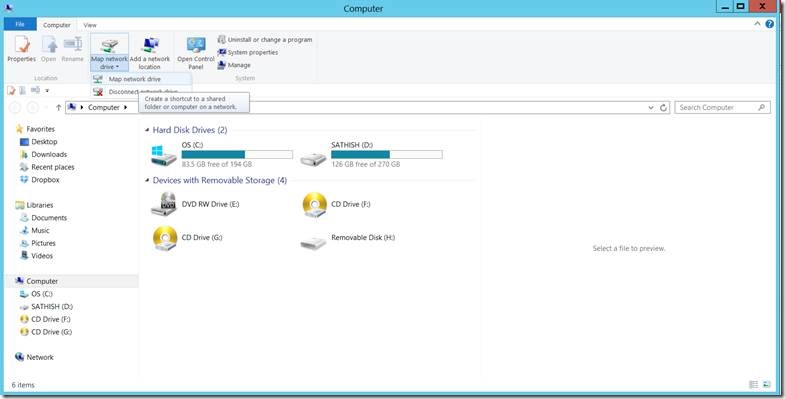
clip_image033

Enter the folder as the url of the masterpages gallery.
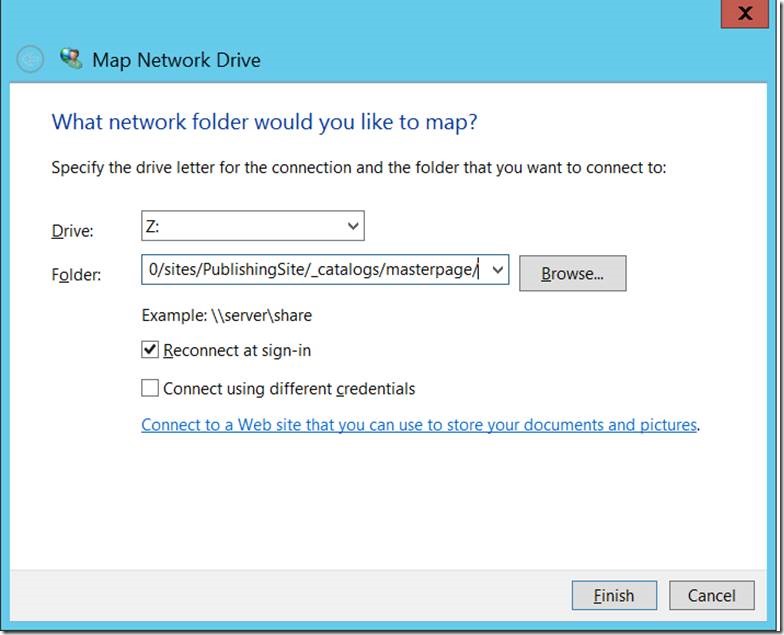
clip_image035

Now, the folder would be mapped to our local machine.

We can see the files, which we were talking about.
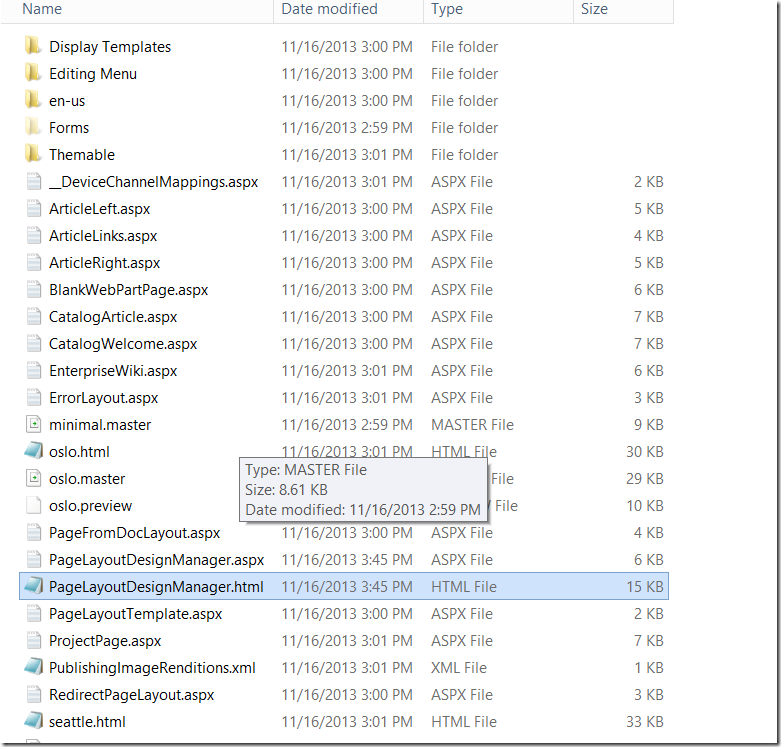
clip_image036

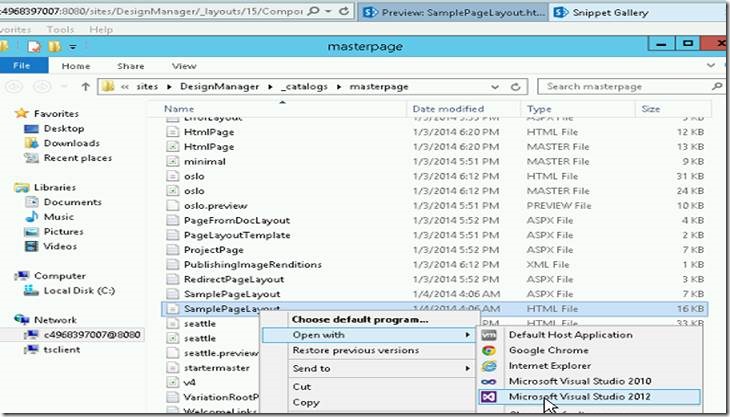
Now, open the html in your favourite editor and modify the layout. Let me open it using the visual studio itself.

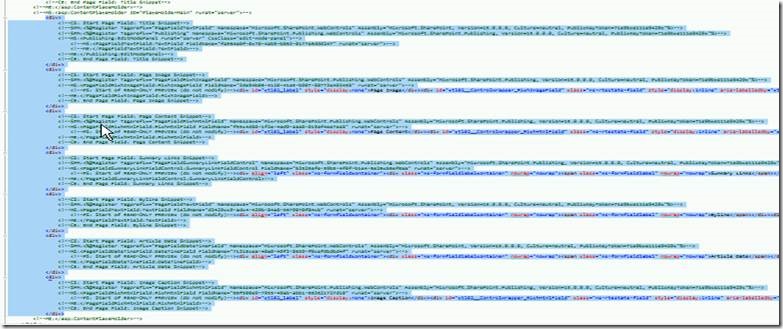
The page is a mixture of pure html code and commented aspx
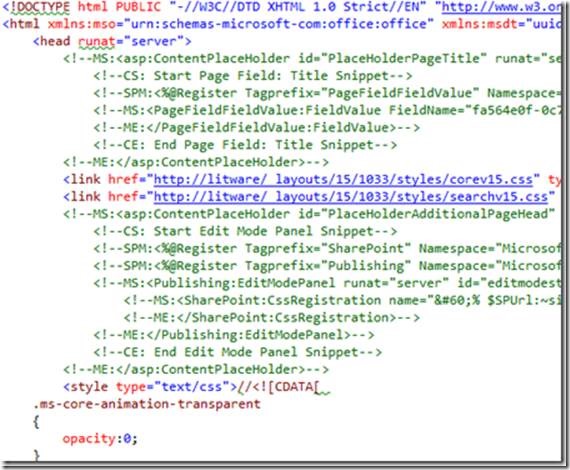
clip_image038

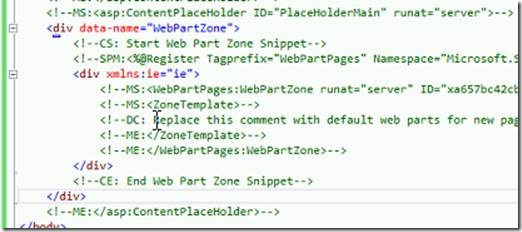
For instance in the html file, remove the following selection that displays the Title field in the Page Title:

clip_image040

As soon as you do it, the modification will be reflected in the associated aspx page:
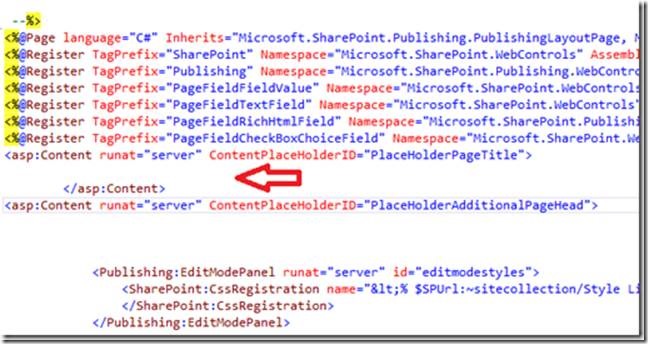
clip_image042

Now, let’s create a new Page Content from our new JobPosting page and you will see that everything works as expected.

When saved, the page looks like this:

clip_image044

There are no fields labels.

So update the html file with the following spans :
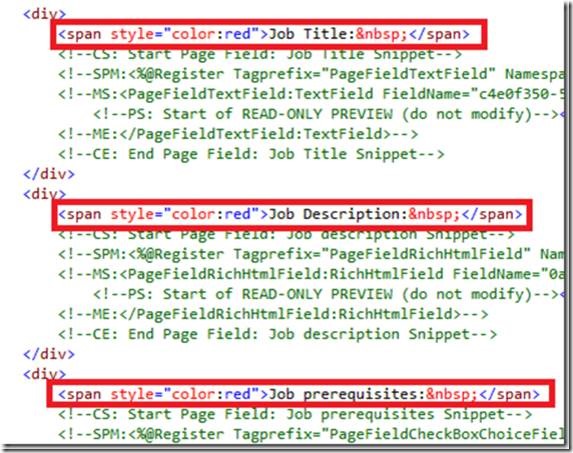
clip_image046

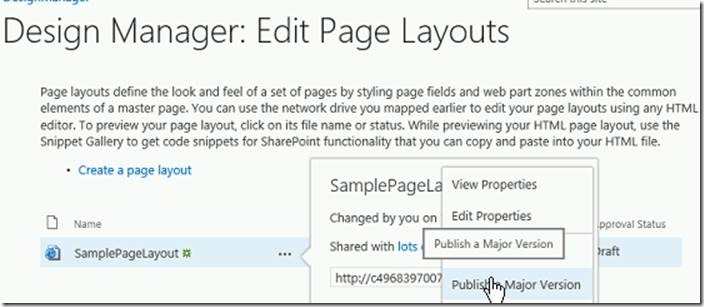
When you make any modification to the html file, don’t forget to Publish a Major version of the file (in the Master Page and Page Layouts gallery).
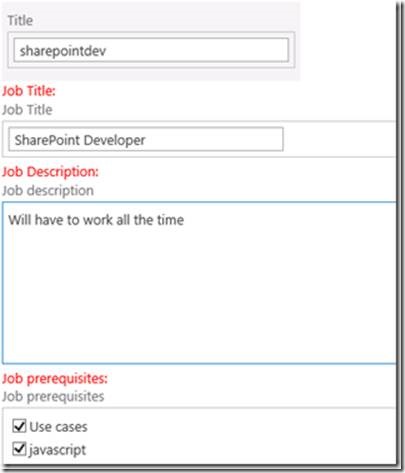
clip_image048

Now, we are going to redeploy the package.

Go to Design manager and Select Create Design Package.
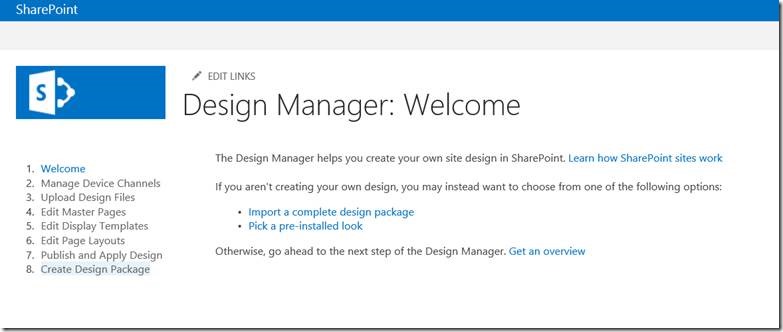
clip_image050

clip_image052

On clicking the Create,

clip_image054

By clicking the download, we can download our package.

The downloaded will be a WSP and we can open the WSP using visual studio and see, the artifacts. Then we need to copy those files and put in a separate visual studio solution to deliver the package alone.

Happy coding.

Sathish Nadarajan.
Author Info

Sathish Nadarajan
 
Solution Architect
 
Rate this article
 
Sathish is a Microsoft MVP for SharePoint (Office Servers and Services) having 15+ years of experience in Microsoft Technologies. He holds a Masters Degree in Computer Aided Design and Business ...read more
 

Leave a comment