Implementing Tab Order In Custom NewForm And EditForm In SharePoint Office 365 – TabIndex Will Not Work

Sathish Nadarajan
 
Solution Architect
December 18, 2018
 
Rate this article
 
Views
2860

Recently I created a Custom NewForm and EditForm for a List in Office 365 and the default tab order was implemented as a ROW wise. But, in my case, I wanted the tab order to be on the Column Wise. Hence, tried to edit the page on the Designer, from which I created those pages, and added the TabIndex Values. But, it was not working. The workaround is, to implement the TabIndex after the pageload on the JavaScript.

The sample code is as below.

 ST.Util.FindControlFieldByInternalName("SIClientIDLookup").attr('tabindex', 1).focus();

The FindControl method will be something like,

 ST.Util.FindControlField = function ($td) {
 
         var $control = $();
 
         switch (ST.Util.FindFieldType($td)) {
             case "SPFieldText":
             case "SPFieldDateTime":
                 {
                     $control = $td.find("input[type=text]");
                     break;
                 }
             case "SPFieldNumber":
             case "SPFieldCurrency":
                 {
                     $control = $td.find("input[type=text]");
                     break;
                 }
             case "SPFieldLookup":
             
             case "SPFieldChoice":
                 {
                     $control = $td.find("select");
                     break;
                 }
             case "SPFieldNote":
                 {
                     $control = $td.find("textarea");
                     break;
                 }
         }
 
         return $control;
     };
 

The above piece of method is very simple and easy way to implement the TabOrder in the custom forms. Hope this helps !!

Happy Coding,

Sathish Nadarajan.

Category : Office 365, SharePoint

Author Info

Sathish Nadarajan
 
Solution Architect
 
Rate this article
 
Sathish is a Microsoft MVP for SharePoint (Office Servers and Services) having 15+ years of experience in Microsoft Technologies. He holds a Masters Degree in Computer Aided Design and Business ...read more
 

How to add a SharePoint List Item using Express JS by passing Request Digest

Krishna KV
 
Team Leader, Aspire Systems
April 1, 2017
 
Rate this article
 
Views
4099

This article is about how to configure Express JS and pass the request digest for SharePoint to add a new list item.

Package.json

 {
   "name": "exp",
   "version": "1.0.0",
   "main": "index.js",
   "repository": {},
   "license": "MIT",
   "dependencies": {
     "body-parser": "^1.16.1",
     "compression": "^1.6.2",
     "cookie-parser": "^1.4.3",
     "express": "^4.14.1",
     "httpntlm": "1.7.4", 
     "cors": "2.8.1",
     "async": "2.1.5",
     "agentkeepalive": "3.1.0",
     "httpreq": "0.4.23", 
     "express-api-helper": "0.0.5",
     "request": "2.79.0"
   },
   "devDependencies": {}
 }

To create and update pass the Request-Digest

The below method will get the request digest and add the item to the SharePoint list.

 const express = require('express');
 let router = express.Router();
 let httpntlm = require('httpntlm');
 
 var ntlm = require('httpntlm').ntlm;
 var async = require('async');
 var httpreq = require('httpreq');
 var HttpsAgent = require('agentkeepalive').HttpsAgent;
 var keepaliveAgent = new HttpsAgent();
 
 var app = express()
 function getSPConfig() {
     return {
         url: "https://url-of-the-site/",
         username: 'username',
         password: 'password',
         domain: 'domain',
         workstation: '',
         headers: {
             "Accept": "application/json;odata=verbose",
             "content-type": "application/json;odata=verbose;"
         }
     }
 };
 
 router.post('/', function (req, res) {
 
     getDigest(function (json) {
         let opt = getSPConfig();
          opt.url= opt.url + "_api/web/lists/getByTitle('Testing')/items";
         let metdata = {
             __metadata: { 'type': 'SP.Data.TestingListItem' },
             Title: req.body.Title
         };
         console.log(metdata);
 
         console.log(json.d.GetContextWebInformation.FormDigestValue);
         opt.headers['X-RequestDigest'] = json.d.GetContextWebInformation.FormDigestValue
         opt.json =metdata;
         httpntlm.post(opt, function success(error, addResponse) {
             res.status(200).send("Added");
         });
     }, function error(err) {
         res.status(500).send(err);
     });
 
 });

App.js

 const express = require('express');
 const bodyParser = require('body-parser');
 const compression = require('compression');
 let port = 3000;
 let app = express();
 let router = express.Router();
 app.use(compression());
 app.use(bodyParser.json());
 app.use('/api', router); // Adding router middleware in the express js 
 
 let doc = require('./doc');
 router.use('/doc', doc);
 
 app.listen(port, (err, req, res, next) => {
        console.log(`server started at ${port}`);
 });
 

Doc.js

 const express = require('express');
 let router = express.Router();
 let httpntlm = require('httpntlm');
 
 var ntlm = require('httpntlm').ntlm;
 var async = require('async');
 var httpreq = require('httpreq');
 var HttpsAgent = require('agentkeepalive').HttpsAgent;
 var keepaliveAgent = new HttpsAgent();
 
 var app = express()
 function getSPConfig() {
     return {
         url: "https://sitecollectionurl",
         username: 'username',
         password: 'password',
         domain: 'domain',
         workstation: '',
         headers: {
             "Accept": "application/json;odata=verbose",
             "content-type": "application/json;odata=verbose;"
         }
     }
 };
 
 router.post('/', function (req, res) {
 
     getDigest(function (json) {
         let  opt = getSPConfig();
         let title=req.body.Title;
 
         console.log(json.d.GetContextWebInformation.FormDigestValue);
         opt.headers['X-RequestDigest'] = json.d.GetContextWebInformation.FormDigestValue
         opt.json = { __metadata: { 'type': 'SP.Data.TestingListItem' },title  };
         httpntlm.post(opt, function success(error, addResponse) {
             res.status(200).send("Added");
         });
     }, function error(err) {
         res.status(500).send(err);
     });
 
 });
 
 function getDigest(returnfun) {
 
             let spConfig = getSPConfig();
 async.waterfall([
     function (callback) {
 
         var type1msg = ntlm.createType1Message(spConfig);
 
         httpreq.post(spConfig.url + "_api/contextinfo", {
             headers: {
                 'Connection': 'keep-alive',
                 'Authorization': type1msg,
                 'accept': 'application/json;odata=verbose'
             },
             agent: keepaliveAgent
         }, callback);
     },
 
     function (res, callback) {
 
         if (!res.headers['www-authenticate'])
             return callback(new Error('www-authenticate not found on response of second request'));
 
         var type2msg = ntlm.parseType2Message(res.headers['www-authenticate']);
         var type3msg = ntlm.createType3Message(type2msg, spConfig);
 
         setImmediate(function () {
             httpreq.post(spConfig.url + "_api/contextinfo", {
                 headers: {
                     'Connection': 'Close',
                     'Authorization': type3msg,
                     'accept': 'application/json;odata=verbose'
                 },
                 allowRedirects: false,
                 agent: keepaliveAgent
             }, callback);
         });
     }
 ], function (err, response) {
     var json = JSON.parse(response.body);
     return returnfun(json);
 
 });
 }
 
 module.exports = router;
 

To Run the express api

Open Command prompt and execute bellow

npm install – to install the node dependencies

node app.js – to run the express js

nodemon app.js – to reload the express api while changing (install the nodemon globally -npm install –g nodemon)

Currently using postman to test the app

clip_image001

clip_image002

Author Info

Krishna KV
 
Team Leader, Aspire Systems
 
Rate this article
 
Krishna K.V has been working in IT Industry for over 7+ years. He holds a Master Degree in Information Technology. He is more interested to learn and share new technologies, ...read more
 

How to Get All Items from SharePoint List and Display it in Custom HTML table with Sorting using AngularJS

Ahamed Fazil Buhari
 
Senior Developer
October 10, 2016
 
Rate this article
 
Views
18255

Hello everyone, in this article we will look into the approach on how to get all the SharePoint List Items and showing that in a Custom page using HTML table. Here we’re using two important things from AngularJS, one is $scope object and another one is $http service. To know more about $scope object and other basic stuffs in AngularJS, please refer my previous article – Basics of AngularJS in SharePoint

About $http service: HTTP is a service that Angular provides, and it is an object with methods we can use to make HTTP calls. The methods are named after the HTTP methods, so the methods on this object are GET, POST, PUT, and DELETE.

 var MainController = function ($scope, $http) {
     $scope.user = $http.get('url/users/547226'); //wrong way, bcz its async so we won’t get the result immediately.
 };


Making use of Promise

As the name implies, the promise object is an object that promises to give us some result in the future, and that output might be the data that we need, or the result might be an error if the server was unreachable or unavailable or some issue. We need to call a then method on my promise and pass the then method a function that will be called in the future.

 var MainController = function ($scope, $http) {
     var promise = $http.get('/users/547226'); 
 	promise.then(function(response){
 		$scope.user = response.data;
 });
 };
 OR
 var MainController = function ($scope, $http) {
     var onSuccess = function(response) {
 	$scope.user = response.data;
     };
     var onError = function(reason) {
 	$scope.error = “Something went wrong”;
     };
 
     $http.get('/users/547226')
 	.then(onSuccess, onError); 
 };
 

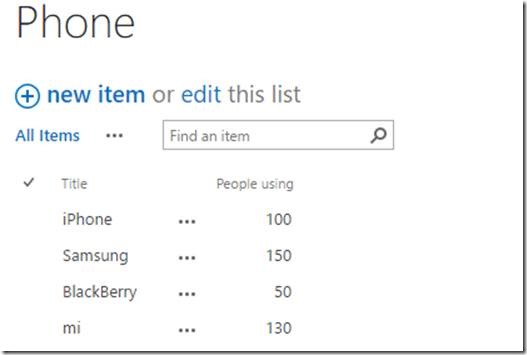
.then – This method is called when the function is ready. Let’s explain the $http service with an example. Consider that we have a SharePoint list as shown below,

clip_image002

Here, I’ve created custom page and added this below HTML element in it.

 <div id="appDiv" ng-app="myapp">
     <div id="controllerDiv" ng-controller="MyController">
         {{error}}
 	Order By:
         <select ng-model="customOrderBy">
             <option value="Title">Asc - Title</option>
             <option value="-Title">Desc - Title</option>
             <option value="People_x0020_using">Asc - Ppl using</option>
             <option value="-People_x0020_using">Desc - Ppl using</option>
         </select>
         <br />
         <table id="userDetails" border="1px solid">
             <thead>
                 <tr>
                     <th>Phone Title</th>
                     <th>No. of ppl using</th>
                 </tr>
             </thead>
             <tbody>
                 <tr ng-repeat="ppl in people | orderBy:customOrderBy">
                     <td>{{ppl.Title}}</td>
                     <td>{{ppl.People_x0020_using | number}}</td>
                 </tr>
             </tbody>
         </table>
     </div>
 </div>
 

In my previous article I’ve explained about some very common directives like ng-app, ng-controller, ng-model in AngularJS. Here we’ve another useful directives ng-repeat and filter.

ng-repeat: ng-repeat="ppl in people" , ng-repeat is a lot like foreach loop in C#.

filters: In addition to directives, Angular also has the concept of filters. A filter is something that we invoke and pipe data through, by using the symbol | and then the name of the filter (number, currency, lowercase, uppercase etc.)

Basic format: expression | filterName:parameter

Name 
currency{{amount | currency:”USD$”}}
date{{startDate | date:’short’}}
filterppl in people | filter:Title
json{{ ppl | json }}
limitToppl in people | limitTo:10
lowercase, uppercase{{ ppl.name || uppercase }}
number{{ count | number }}
orderByppl in people | filter: searchTerm| orderBy: ‘Title’

Added the below script in my JS file,

 (function () { //IIFE 
 
     //Creating a Module
     var app = angular.module("myapp", []);
 
     var MyController = function ($scope, $http) {
 
         var json_listdata = {};
 
         var onSuccess = function (response) {
             //this result will be in json format, so we are getting the 'value' from the 'response.data'
             var json_values = response.data.value;
      //we assign it simply like shown below
 	     $scope.people = json_values;
             /*or we can iterate through all the items and assign it to our own jsom obj
             $.each(json_values, function (key, val) {
                 var jsonObj_Values = {};
                 jsonObj_Values["Title"] = val.Title;
                 jsonObj_Values["People Using"] = val.People_x0020_using;
 
                 json_listdata[val.ID] = jsonObj_Values;
             });
             //assigning the value into angular $scope element 
             $scope.people = json_listdata;
      */
         };
 
         var onError = function (reason) {
             $scope.error = "Could not fetch, something went wrong";
         };
 
         function getSPListItems() {
             var getURLVal = _spPageContextInfo.webAbsoluteUrl + "/_api" + "/web/lists/getbytitle('Phone')/Items?$select=*";
             //getURLVal, this only tells from which list and what items under what condition it should be fetched
             //$http.get
             $http.get(getURLVal)
 	          .then(onSuccess, onError);
         }
 
         getSPListItems();
 
     };
 
     //Registering the controller in the module
     app.controller("MyController", MyController);
 
 }());
 

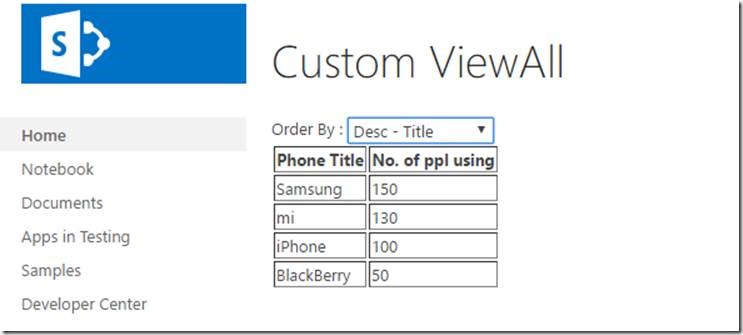
And the output will be shown as below,

clip_image004

Based upon the Order By: dropdown value, the ordering in the table will differ. I hope, you got some idea about $http service and ng-repeat from this article.

Happy Coding

Ahamed

Author Info

Ahamed Fazil Buhari
 
Senior Developer
 
Rate this article
 
Ahamed is a Senior Developer and he has very good experience in the field of Microsoft Technologies, especially SharePoint, Azure, M365, SPFx, .NET and client side scripting - JavaScript, TypeScript, ...read more
 

How to use Client Side Rendering (JSLink) in a SharePoint Hosted APP

Krishna KV
 
Team Leader, Aspire Systems
September 18, 2016
 
Rate this article
 
Views
11295

JSLink is a new feature that is introduced in SharePoint 2013. It is a combination of Html, javascript and css to customize the rendering of SharePoint List views and forms. It can be called as Client Side Rendering (CSR rather than writing a XSLT)

· The rendering happens in the client side, so the pages can load faster with CSR.

· Compare to XSLT, JavaScript will be easier to development and debugged.

· We can customize specific fields, header, body and footer.

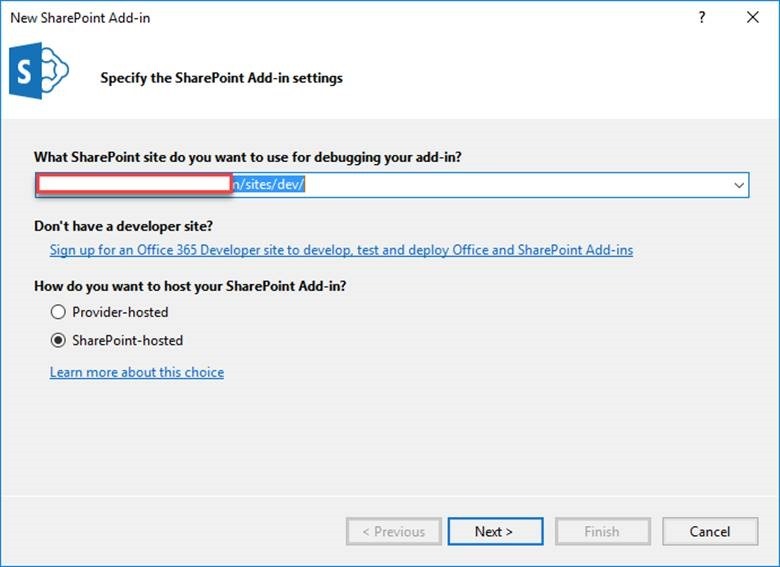
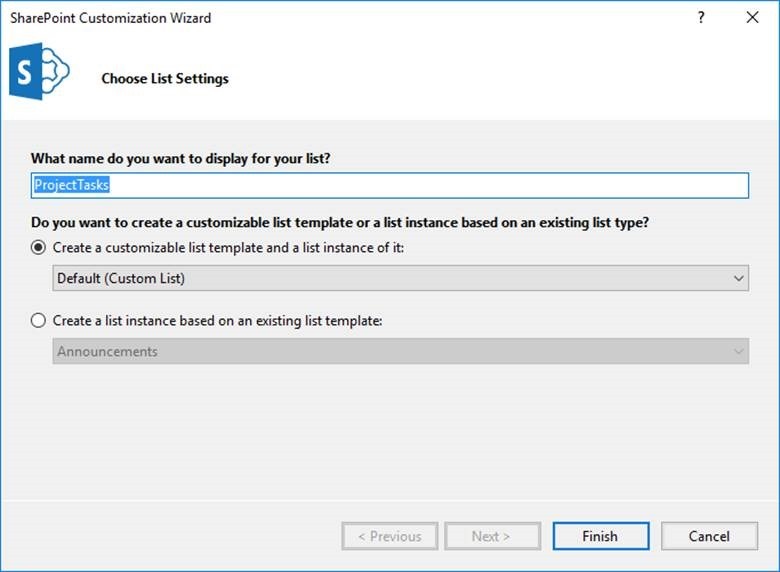
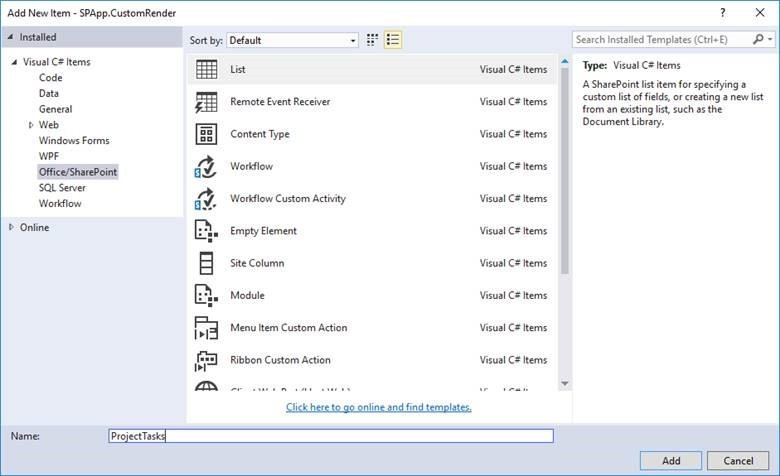
Create a SharePoint hosted app.

clip_image002

clip_image004

clip_image006

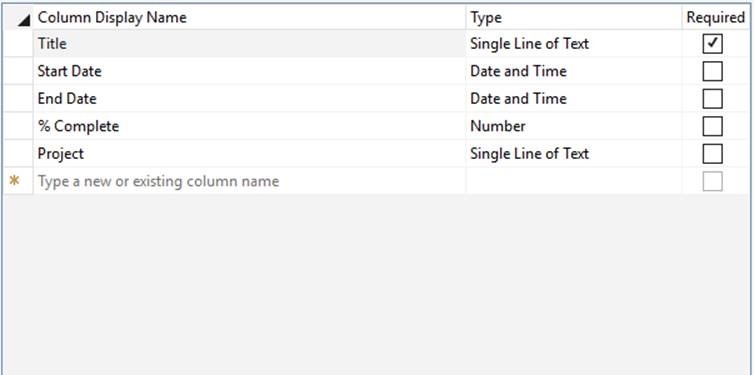
Adding columns in the list.

clip_image008

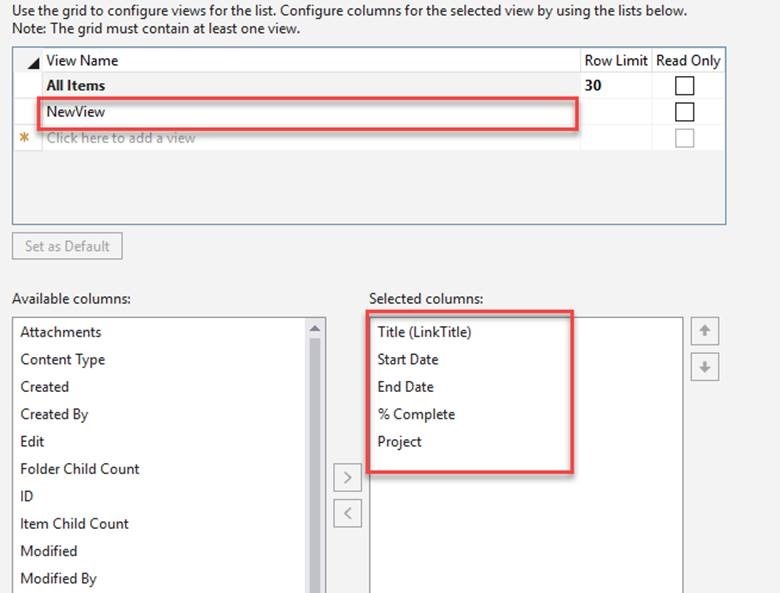
Adding custom view to the list can be provide any name and select the columns to view.

clip_image010

Schema.xml under view 2 include the custom script.

 <View BaseViewID="2" Name="2757a7d6-f368-47e7-bbda-5bcfdb318b60" DisplayName="NewView" Type="HTML" WebPartZoneID="Main" SetupPath="pagesviewpage.aspx" Url="NewView.aspx">
 <ViewFields>
     <FieldRef Name="LinkTitle" />
     <FieldRef Name="StartDate" />
     <FieldRef Name="_EndDate" />
     <FieldRef Name="PercentComplete" />
     <FieldRef Name="Project" />
     <FieldRef Name="Edit" />
 </ViewFields>
 <Query />
 <Toolbar Type="Standard" />
 <XslLink Default="TRUE">main.xsl</XslLink>
 <JSLink Default="TRUE">~site/Scripts/ListRender.js</JSLink>
 </View>

Add the ListRender.js under the script folder

 (function () {
     var overrideCtx = {};
     overrideCtx.Templates = {};
     overrideCtx.Templates.Header = "<h2><#=ctx.ListTitle#></h2>" +
         "<table class='table table-striped'><tr><th>Title</th><th>Start Date</th><th>End Date</th><th>Project</th><th>Progress </th></tr>";
     // This template is assigned to the CustomItem function.
     overrideCtx.Templates.Item = customItem;
     overrideCtx.Templates.Footer = "</table>";
     overrideCtx.BaseViewID = 2;
     overrideCtx.ListTemplateType = 100;
     overrideCtx.OnPreRender = loadCss;
     SPClientTemplates.TemplateManager.RegisterTemplateOverrides(overrideCtx);
 })();
 
 function customItem(ctx) {
     var ret = "<tr><td>" + ctx.CurrentItem.Title + "</td>";
     ret += "<td>" + ctx.CurrentItem.StartDate + "</td>";
     ret += "<td>" + ctx.CurrentItem._EndDate + "</td>";
     ret += "<td>" + ctx.CurrentItem.Project + "</td>";
     ret += "<td>" + getProgress(parseInt(ctx.CurrentItem["PercentComplete."])) + "</td></tr>"
     return ret;
 }
 
 function getProgress() {
     return  '<div class="progress">' +
             '<div class="progress-bar" role="progressbar" aria-valuenow="70" aria-valuemin="0" aria-valuemax="100" style="width:' + value + '%">' + value + '%' +
             '</div></div>';
 }
 
 function loadCSS(ctx) {
     document.write('<link rel="Stylesheet" type="text/css" href="../../Content/bootstrap.css"/>');
 }

clip_image012

clip_image014

Author Info

Krishna KV
 
Team Leader, Aspire Systems
 
Rate this article
 
Krishna K.V has been working in IT Industry for over 7+ years. He holds a Master Degree in Information Technology. He is more interested to learn and share new technologies, ...read more
 

How to Execute CAML Query for More than One filtering dataset records in SharePoint 2013

Sathish Nadarajan
 
Solution Architect
May 19, 2015
 
Rate this article
 
Views
12159

In one of the requirement, I was supposed to retrieve the records from a List by filtering on multiple records and Columns. i.e.,

I have a configuration List, on which the columns are Key, Category and Value.

Based on the Key and Category Pair, the Value needs to be retrieved. This we can execute with the basic CAML Query. But, in my case, I was supposed to retrieve the Values based on the multiple Key and Category Collection. i.e., on the page load, we will identify, what are the Keys and Categories used on this page and we need to fetch all the Values in a single query. Basically this is to reduce the multiple hits to the configuration list and reduces the execution time.

To be more clear, the input set will be Key{Key1, Key2, Key3} and Category{Cat1, Cat2, Cat3}. I need the records which has the above set of values alone. For this, we frame the CAML Query by string builder. But, there is another efficient way of doing this using LINQ.

 public List<ConfigListKeyBE> GetConfigKeyValueCollection(List<ConfigListKeyBE> objConfigListKeyBEList, string siteURL)
         {
             List<ConfigListKeyBE> objConfigListKeyBEListOutput = new List<ConfigListKeyBE>();
             try
             {
                 List<string> keyNames = (from k in objConfigListKeyBEList
                                          select k.KeyName).ToList();
 
                 List<string> categoryNames = (from k in objConfigListKeyBEList
                                               select k.CategoryName).ToList();
 
                 objConfigListKeyBEListOutput = GetConfigListKeyBE(siteURL, objConfigListKeyBEListOutput);
 
                 objConfigListKeyBEListOutput = (from p in objConfigListKeyBEListOutput
                                                 where keyNames.Contains(p.KeyName) && categoryNames.Contains(p.CategoryName)
                                                 select p).ToList();
 
                 return objConfigListKeyBEListOutput;
             }
             catch (Exception ex)
             {
                  
                 throw ex;
             }
             
         }
 
          
         public List<ConfigListKeyBE> GetConfigListKeyBE(string siteURL, List<ConfigListKeyBE> objConfigListKeyBEListOutput)
         {
             SPSecurity.RunWithElevatedPrivileges(delegate()
             {
                 using (SPSite site = new SPSite(siteURL))
                 {
                     SPWeb web = site.RootWeb;
                     SPList configList = web.Lists[LIST_CONFIGURATION];
                     if (configList != null)
                     {
                         if (configList.ItemCount > 0)
                         {
 
 
                             SPListItemCollection configListItemCollection = configList.GetItems();


                             if (configListItemCollection != null)
                             {
                                 if (configListItemCollection.Count > 0)
                                 {
                                     foreach (SPListItem item in configListItemCollection)
                                     {
                                         ConfigListKeyBE obj = new ConfigListKeyBE();
                                         obj.CategoryName = Convert.ToString(item[ConstantVariables.SC_CONFIGLIST_CONFIGUATIONCATEGORY]);
                                         obj.KeyName = Convert.ToString(item[ConstantVariables.SC_CONFIGLIST_TITLE]);
                                         obj.Value = Convert.ToString(item[ConstantVariables.SC_CONFIGLIST_CONFIGVALUE]);
                                         objConfigListKeyBEListOutput.Add(obj);
                                     }
 
 
                                 }
                             }
 
                         }
                     }
                 }
             });
             return objConfigListKeyBEListOutput;
         }
 

Here what I am doing is, first we retrieve all the List Items and apply a LINQ Query on top if for the required Key-Category collection.

 objConfigListKeyBEListOutput = (from p in objConfigListKeyBEListOutput
                                                 where keyNames.Contains(p.KeyName) && categoryNames.Contains(p.CategoryName)
                                                 select p).ToList();


Instead of writing many lines of code to frame the CAML Query, the above single line will do the magic for us. Moreover, we have a question like for the first time, retrieving all the records is an expensive process. I agree with that, but we can use the session or any other storing variable, so that for all the pageloads, we can use the same input data.

Happy Coding,

Sathish Nadarajan.

Author Info

Sathish Nadarajan
 
Solution Architect
 
Rate this article
 
Sathish is a Microsoft MVP for SharePoint (Office Servers and Services) having 15+ years of experience in Microsoft Technologies. He holds a Masters Degree in Computer Aided Design and Business ...read more
 

Configure List/Library Settings for Information Rights Management – SharePoint 2013

Sathish Nadarajan
 
Solution Architect
April 21, 2015
 
Rate this article
 
Views
11643

In this article, let us see, how to configure the Information Rights Management for a List / Library in SharePoint 2013.

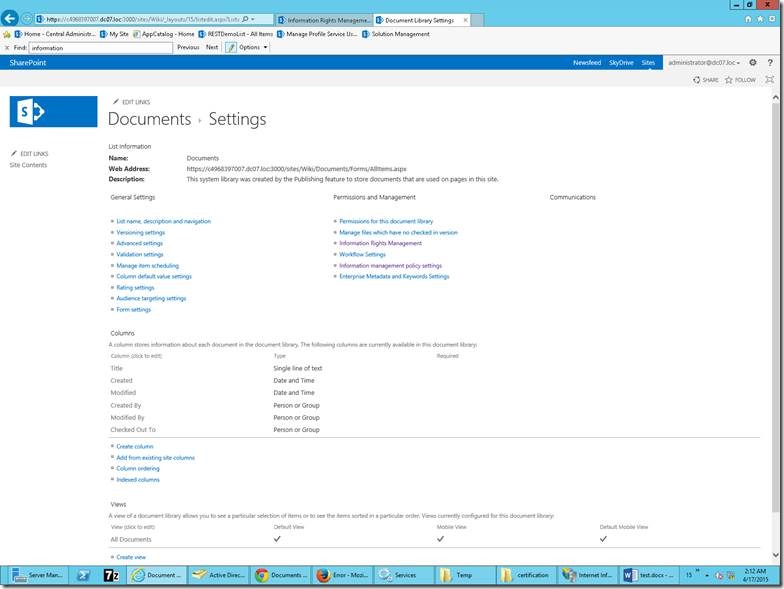
1. Go to the List Settings

clip_image002

2. Under “Permissions and Management” Section, Click on the “Information Rights Management”

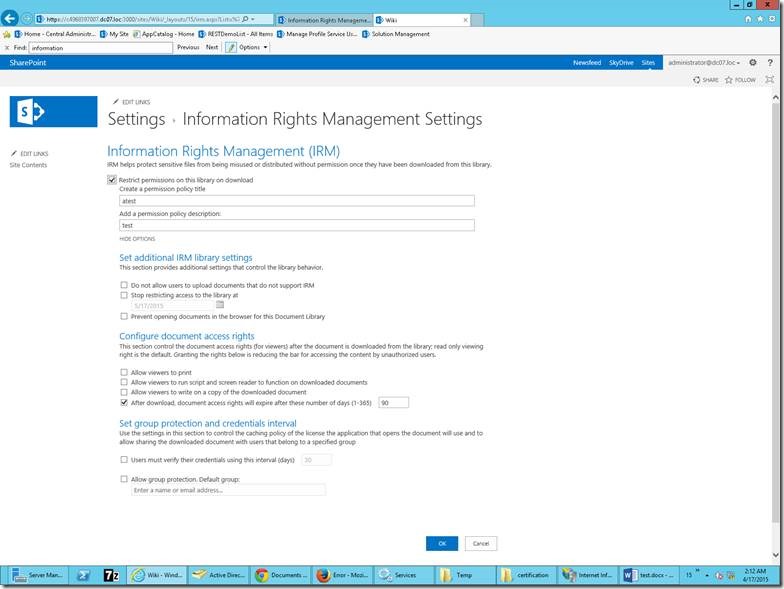
clip_image004

3. Give appropriate options and Click OK.

Note:

If the Information Rights Management link does not appear, IRM might not be enabled for your site. Contact your server administrator to see if it is possible to enable IRM for your site. The Information Rights Management link does not appear for picture libraries.

Happy Coding,

Sathish Nadarajan.

Category : SharePoint

Author Info

Sathish Nadarajan
 
Solution Architect
 
Rate this article
 
Sathish is a Microsoft MVP for SharePoint (Office Servers and Services) having 15+ years of experience in Microsoft Technologies. He holds a Masters Degree in Computer Aided Design and Business ...read more
 

Sync Excel with SharePoint list for Bulk Insert & Update Records.

Arunraj Venugopal
 
SharePoint Developer
March 30, 2015
 
Rate this article
 
Views
45736

By default, Sync excel with Sharepoint list was available with the previous version of excel, but the synch feature is not existing in the excel 2010 version onwards for which in Google, add one synchronization reference should be uploaded in the excel file which is not working.

When we export the sharepoint list into excel, the synchronization option will not be available in the right click properties for which the below macro to be added and executed to get the desire sharepoint list and sync option in the right click properties.

Let us look at the steps to synch excel with sharepoint list.

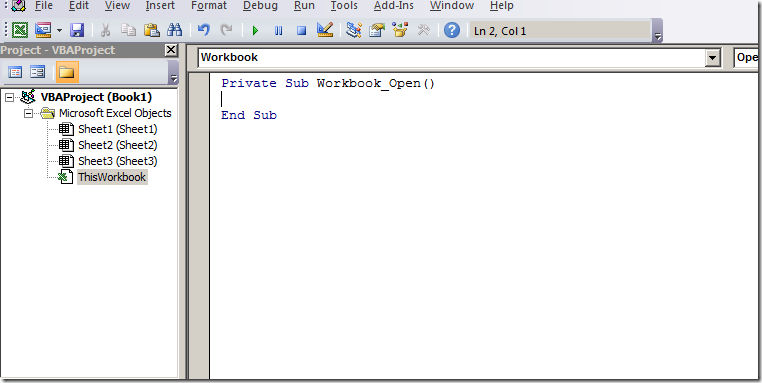
1. Open an excel file and press Alt +F11. Select Workbook from the list.

clip_image001

2. Following macro to be added in the workbook open method

 Dim ws  As worksheet
 Set ws =thisworkbook.worksheets(1)
 Dim src(1) As Variant
 Src(0) = http://contoso.com/sites/Sitename/Experiments”  & ”/_vi_bin”
 Src(1) =”D28c1csD-F969-47C1-9C0C-61CAEB57C26A” (List Id)
 If ws.listObjects.count = 0 then
 	Ws.ListObjects.Add xlSrcExternal, src,True,xlYes, ws.Range(“A1”)
 Else
   Set ObjListObj=ws.ListObjects(1)
 ObjListObj.Refresh
 End if 
 

The macro will fetch data from the list “Test” in the SharePoint site “experiments” and insert into the excel sheet 1.

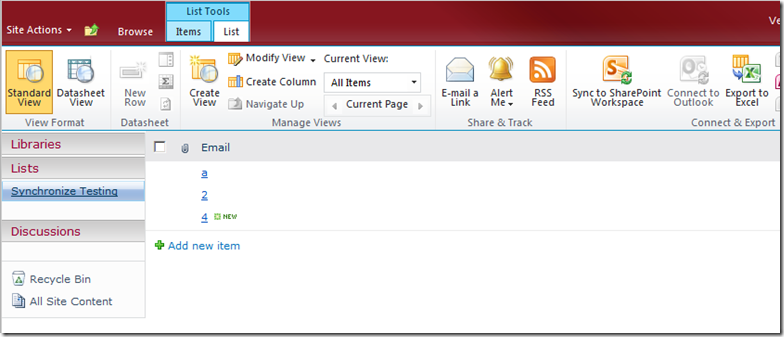
3. Go to SharePoint site and the list which has to be sync with excel file. Click Export to Excel

clip_image003

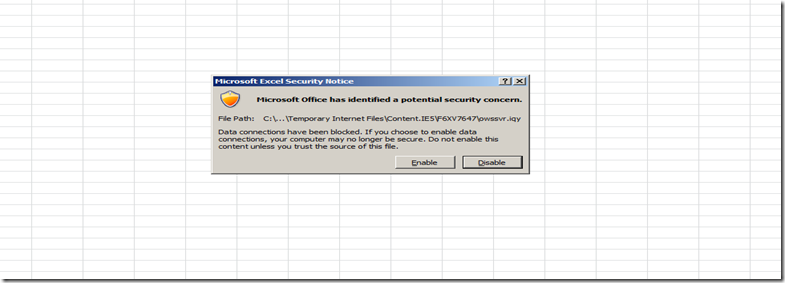
4. Click Enable button

clip_image005

5. Click Data -> Connection->Properties

clip_image007

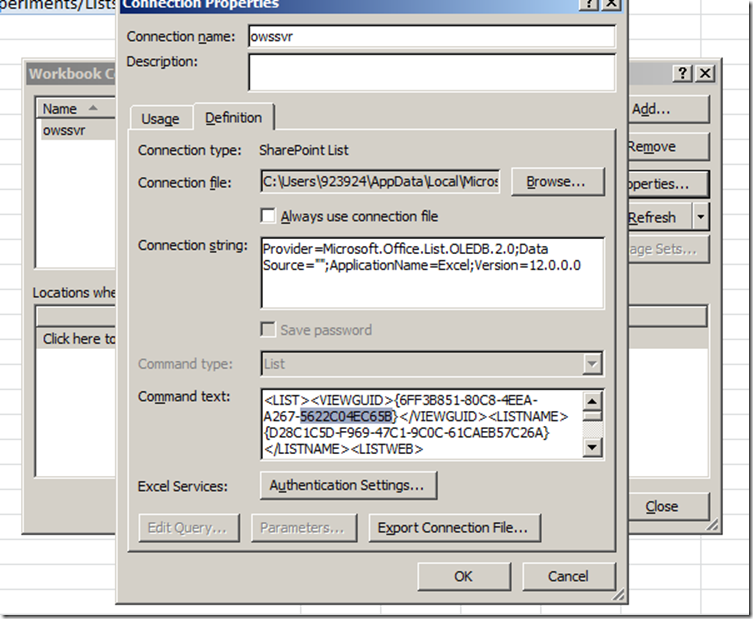
6. Click Definition tab and copy the content in the Command Text field& close the excel file.clip_image009

7. The value for src(1) is <LISTNAME>{D28C1C5D-F969-47C1-9C0C-61CAEB57C26A}</LISTNAME>

8. The value for src(0) is <LISTWEB>http://Contoso.com/sites/SiteName/Subsite//_vti_bin</LISTWEB>

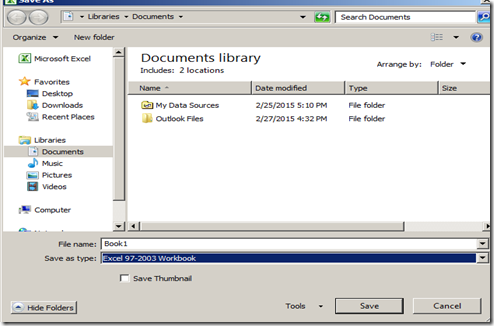
9. Save the excel file as Excel 97-2003 workbook

clip_image011.

10. Whenever the workbook is opened, the macro get executed and retrieved the SharePoint list into the excel sheet if the macro is enabled by default. Otherwise click enable macro at the top of the excel file.

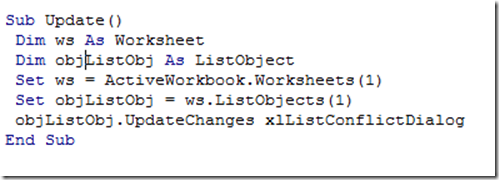
11. Execute the Update method once the insert or update process is done. Or

Right click on the sheet in which the sharepoint list data retrieved from the SP and select Sync with sharepoint list. In this case, no need to use the below code..

clip_image013

12. Press F8 (line by line execution ) or F5 to execute the macro

13. Refresh the SharePoint list to make sure that the insert / modify records are synchronized with the list

Category : SharePoint

Author Info

Arunraj Venugopal
 
SharePoint Developer
 
Rate this article
 
Works as a SharePoint Developer in a CMM Level 5 Company ...read more
 

SetRating in Reputation Class in SharePoint 2013 using Javascript and C# CSOM

Sathish Nadarajan
 
Solution Architect
November 16, 2013
 
Rate this article
 
Views
25844

Some time back, we saw how to do the SetRating using the SocialRatingManager class here. But it requires modifications on the List Permission Settings, and moreover it has a dependency of the Social Rating Synchronization timer Job. Now, let us see an alternative option for this. By using the Class Reputation on the namespace Microsoft.Office.Server.ReputationModel, we can achieve this. Let us see, how easy this is.

First let us see, how to use this class in C#. The biggest advantage of this class is, this is part of our CSOM functionality. Hence, there is no dependency on the Microsoft.SharePoint.dll.

Implementing SetRating by Reputation on C# CSOM.

try

{

// Get the Client Context

using (ClientContext ctx = new ClientContext("http://sathishserver:20000/sites/VHS/"))

{

//Get the Web Object

Web w = ctx.Web;

List l = w.Lists.GetByTitle("SocialRating");

ctx.Load(l, info => info.Id);

ctx.ExecuteQuery();

string ListID = l.Id.ToString();

int ItemID = 2;

int RatingValue = 4;

//Call the SetRating methohd

Microsoft.Office.Server.ReputationModel.Reputation.SetRating(ctx, ListID, ItemID, RatingValue);

ctx.ExecuteQuery();

}

}

catch (Exception ex)

{

}

 try
             {
 // Get the Client Context
                 using (ClientContext ctx = new ClientContext("http://sathishserver:20000/sites/VHS/"))
                 {
 //Get the Web Object
                     Web w = ctx.Web;
                     List l = w.Lists.GetByTitle("SocialRating");
                     ctx.Load(l, info => info.Id);
                     ctx.ExecuteQuery();


                     string ListID = l.Id.ToString();
                     int ItemID = 2;
                     int RatingValue = 4;
 //Call the SetRating methohd
                     Microsoft.Office.Server.ReputationModel.Reputation.SetRating(ctx, ListID, ItemID, RatingValue);
                     ctx.ExecuteQuery();
                 }
             }
             catch (Exception ex)
             {
  
             }
 

The code snippet is somewhat straight forward. Only thing, is the parameters for SetRating method. Even the method is not overloaded. Only 4 parameters are required.

Ctx – Client Context

ListID – String (GUID of the List)

Item ID – Int (List Item ID)

RatingValue – Int (Value ranging from 0 to 5)


Implementing SetRating by Reputation on Javascript.

Nowadays javascripts become more powerful. Through which we are able to call any method, access any objects from any dll. Let us see, how we can use Javascript for calling the SetRating method and how we are utilizing them.


 function SetRating() {
 
         itemID = 4;
 listID = “0F4BA645-5753-4526-A978-6BF2C0A2E654”
 RatingValue = 1;
 
         EnsureScriptFunc('reputation.js',
                 'Microsoft.Office.Server.ReputationModel.Reputation',
                 function () {
                     var ctx = new SP.ClientContext(“http://sathishserver:20000/sites/PublishingSite/”);
                     rating = Microsoft.Office.Server.ReputationModel.Reputation.setRating(ctx, listID, itemID, RatingValue);
 
                     ctx.executeQueryAsync(Function.createDelegate(this, this.RatingSuccess), Function.createDelegate(this, this.RatingFailure));
                 });
 
     }
 
 
     function RatingSuccess(sender, args) {
         alert('Rating Done Successfully');
     }


     function RatingFailure(sender, args) {
         alert(‘SetRating failed:' + args.get_message());
     }
 

But there is no other straight forward method to fetch the Rating. For that, we need to go with the normal list item itself. Let us see that how to fetch from Javascript.

 function GetRating(sender, args) {
 
                
         var ctx = new SP.ClientContext(“http://sathishserver:20000/sites/VHS/”);
         var web = ctx.get_web();
         this.list = web.get_lists().getByTitle(ListName);
         this.listItems = list.getItemsByID(ItemID);
 
         ctx.load(listItems, 'Include(ID, AverageRating)');
         ctx.executeQueryAsync(Function.createDelegate(this, GetRatingSuccess), Function.createDelegate(this, GetRatingFailure));
 
     }
 
 function GetRatingSuccess (sender, args) {
 
         RatingValue = listItems.itemAt(0).get_item("AverageRating");
         
 
     }
 
     function GetRatingFailure (sender, args) {
 
         alert(‘GetRating():' + args.get_message());
 
     }


In the same manner, by C# also, there is no direct method. We need to use the client context to fetch the item and the property “AverageRating” will give you the Rating Value.

That’s all. It is very simple when comparing with the SocialRating Manager.


Happy Coding..

Sathish Nadarajan.

Author Info

Sathish Nadarajan
 
Solution Architect
 
Rate this article
 
Sathish is a Microsoft MVP for SharePoint (Office Servers and Services) having 15+ years of experience in Microsoft Technologies. He holds a Masters Degree in Computer Aided Design and Business ...read more
 

Leave a comment