SharePoint Online Authentication Options – Part 1

Sriram Varadarajan
 
Solution Architect
October 16, 2016
 
Rate this article
 
Views
9506

I ended up spending too many hours in demystifying how SharePoint online works in a federated environment but apparently I didn’t get many details, though I got few but it wasn’t in one location. I thought let me put all the information I collected here.

Let’s start with some basic; As we all know SharePoint online is a SAAS offering (Software As A Service) and for user to consume this service their account should be present somewhere for the system to authenticate them.

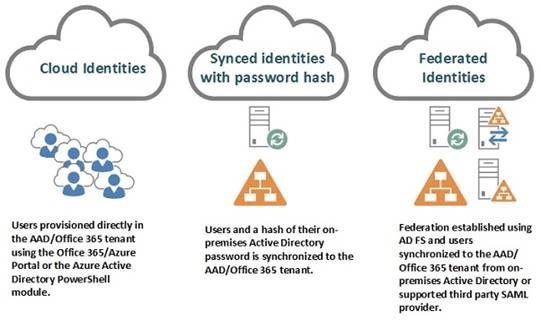
As of now we have got 3 identity models:

clip_image002

Let’s see in detail about each one of them at a very high level:

Cloud Identities:

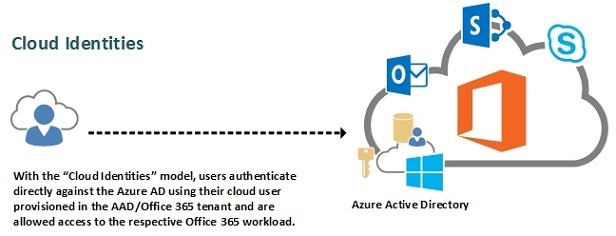
To put it simple, these are the account which gets created in cloud.

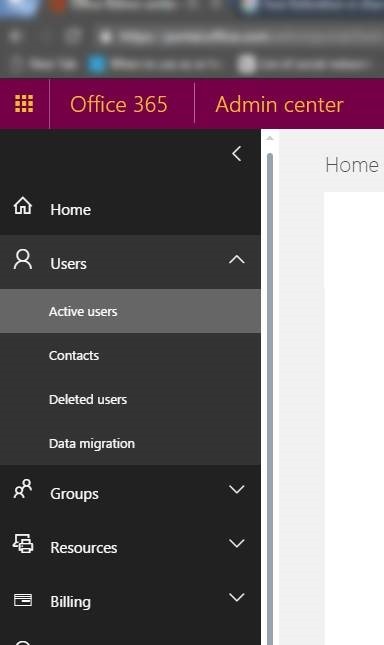
Go to https://portal.office.com/adminportal/home#/users

Click Users Tab in the left side navigation and select ACTIVE users in it

clip_image004

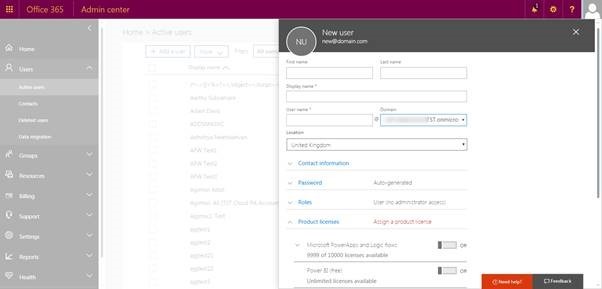
Click ADD user in the right side:

clip_image006

You will see the list of domain associated for your tenant under Domain Drop down and in that, one of domain would like something like this YOURTENANTNAME.Onmicrosoft.com

clip_image008

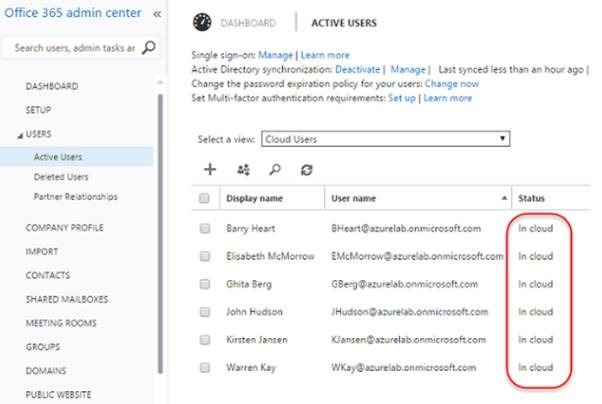
Create an account with this Domain been selected, eventually you will see that those users created with this domain will be showed as CLOUD account in the active user’s page

clip_image010

The major benefit of the cloud identity model is that you do not need to make any changes or deploy any new servers in the on-premises infrastructure.

clip_image011

Synchronized Identities:

The second identity model is synchronized identities, where the existing users in the on-premises Active Directory are synchronized to the AAD/Office 365 tenant using a directory synchronization tool.

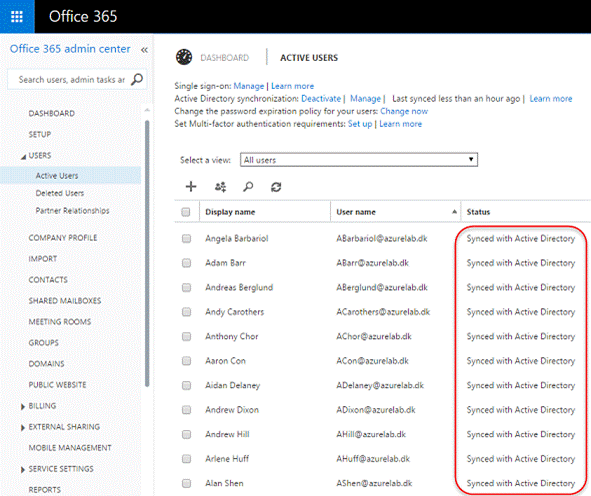
In this case any account created in on-prem would get synced with Office 365 and any account that syncs like this would look like this in ACTIVE users page.

clip_image013

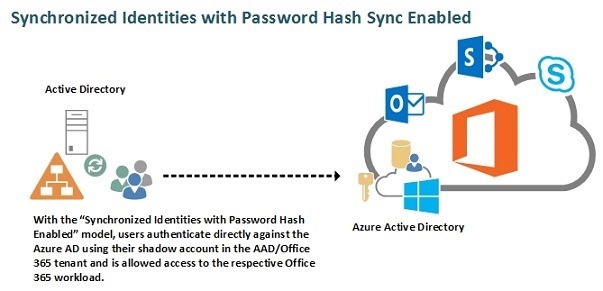
The major benefit of using this identity model over the cloud identities is that users will be provisioned automatically using the directory synchronization tool and will be able to use the same set of credentials as they already use in their on-premises Active Directory resulting in not a “single sign-on” but “same sign-on” scenario where the user object and passwords are managed in the on-premises Active Directory. In a “same sign-on” scenario, the end user will, as mentioned, be able to use his existing credentials but needs to authenticate when accessing an Office 365 workload.

clip_image014

it’s important to note that the end user passwords will not be stored in the AAD/Office 365 tenant. It will be a hash of a hash of the on-premises Active Directory password that will be stored there and the password itself cannot be retrieved through the hash of the hash of the password by a malicious user.

Let’s talk more on Federation model and also on the modern authentication in the next blog post.

Category : Office 365, SharePoint

Author Info

Sriram Varadarajan
 
Solution Architect
 
Rate this article
 
Sriram is a Technology Evangelist with 15+ years experience in Microsoft Technologies. He is an enterprise architect working for large pharmaceutical organization which has presence globally with largest Microsoft implementation ...read more
 

How to Setup Azure AD (Active Directory)

Sathish Nadarajan
 
Solution Architect
July 15, 2016
 
Rate this article
 
Views
5590

Recently I came up with a requirement to set up the Azure AD and create some users on the Azure AD and host Web Application on Azure and make sure the test users are able to login to the Web Application as a Proof of Concept. It was quite interesting, as this is the first time, I am going to work with Azure.

So as usual, let us go by step by step. I assume that, we have a valid Azure Subscription. Even, if we don’t have, Microsoft offers a Month free subscription. We can very well make use of it.

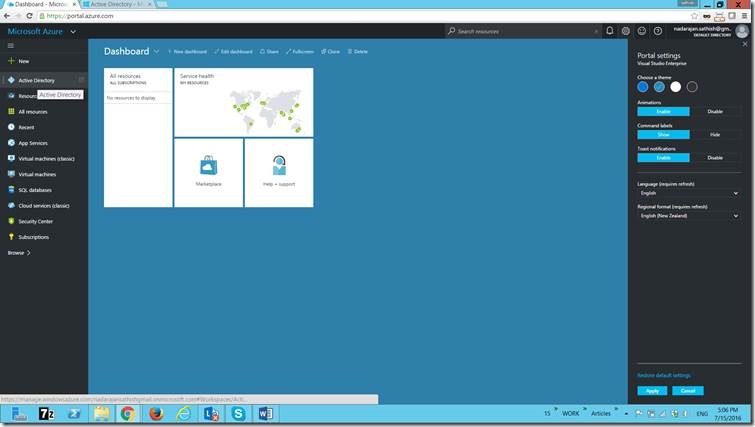
1. Login to https://portal.azure.com.

clip_image002

2. Click on Active Directory on the left hand navigation pane.

3. If we could not see that, then click on Browse and select Active Directory.

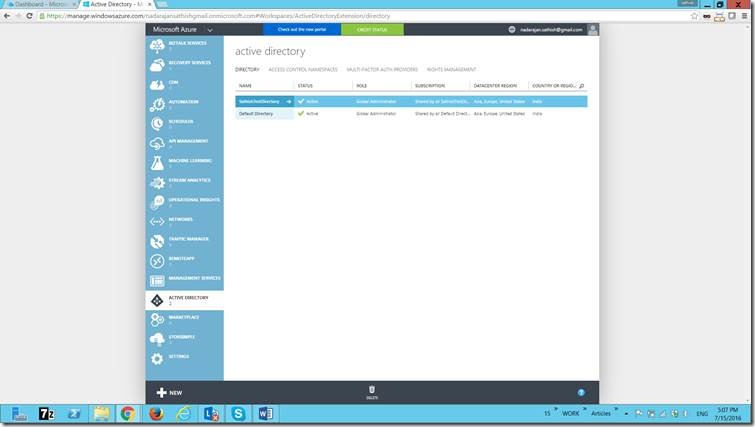
clip_image004

4. Azure Active directory will be displayed as in the above image.

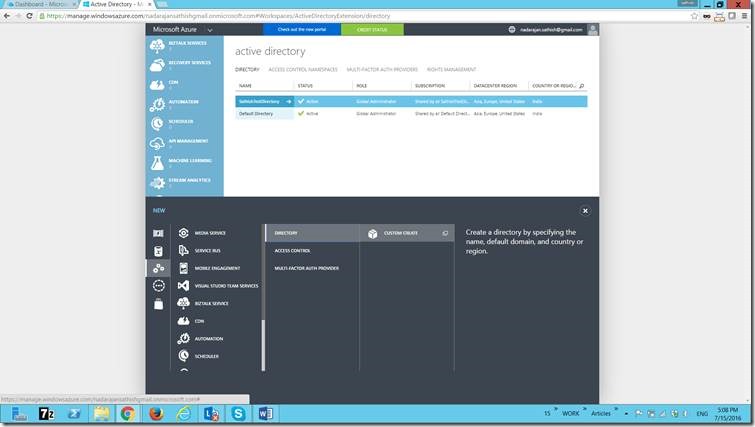
5. Click on “New” at the bottom

6. Create a New Directory, with Custom Option.

clip_image006

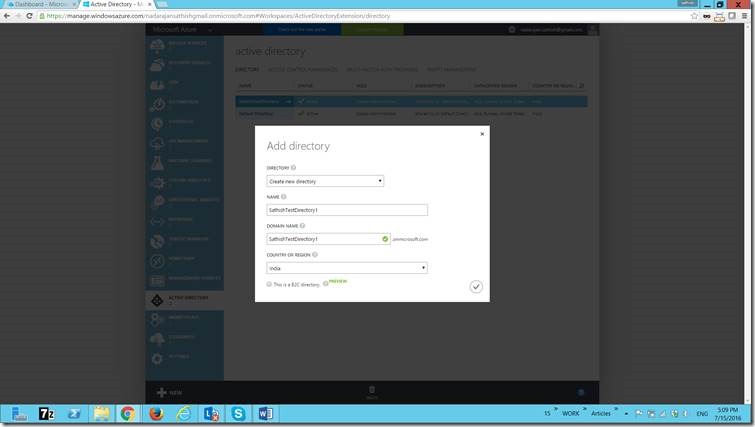
7. Enter the Values appropriately and click on Save.

clip_image008

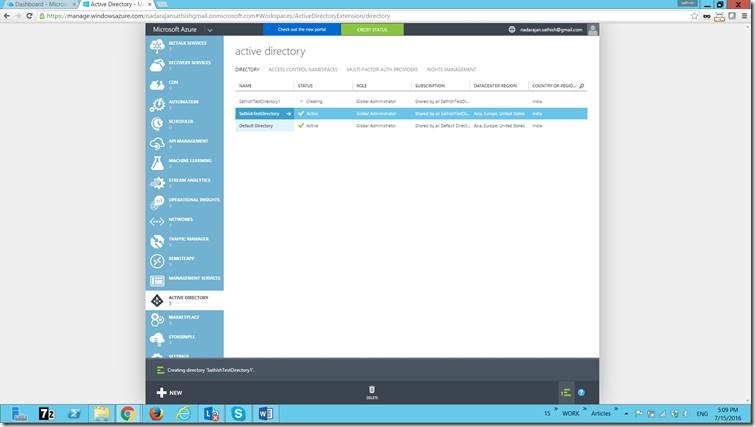
8. That will take some minutes to get Created.

clip_image010

9. We can click on the Active Directory and create the Users, Groups, Domains Etc.,

Let us have a look on the User Creation, Groups on the later articles.

Happy Coding,

Sathish Nadarajan.

Category : Active Directory, Azure

Author Info

Sathish Nadarajan
 
Solution Architect
 
Rate this article
 
Sathish is a Microsoft MVP for SharePoint (Office Servers and Services) having 15+ years of experience in Microsoft Technologies. He holds a Masters Degree in Computer Aided Design and Business ...read more
 

SharePoint User Account and AD (Active Directory) Group Migration using PowerShell script in SharePoint 2010

Ahamed Fazil Buhari
 
Senior Developer
June 20, 2016
 
Rate this article
 
Views
13244

If the SharePoint site has been migrated from one domain (user@abc.com) to another domain (user@xyz.com) using Content DB backup & restore or any other mode of migration where the contents are migrated but not the user accounts, then we can migrate the User accounts and AD groups using PowerShell script. The below scripts are tested and verified in SharePoint 2010 to SharePoint 2010 migration from one domain (abc.com) to another domain (xyz.com)

About User Accounts:

User account gives the control that who can access the SharePoint site. We can make use of existing domain or network server account which is already available in the environment. For example, if you have your SharePoint site in your ABC organization. Then, your user account would be yourname@abc.com

About Active Directory Group:

First and foremost, let’s see the difference between SharePoint Group and AD Group.

There’s much difference between SharePoint Group and Active Directory Group. In simple, SharePoint groups are something that is handled inside the SharePoint site and it contains collection of users & groups. It is mostly administrated by a SharePoint site owner.

Active Directory groups have a collection of users and groups stored in Active Directory (Domain level). These groups are managed by the AD admin.

SharePoint user accounts and active directory group migration will be accomplished using the below PowerShell scripts.

The following ps command will be executed on the SharePoint application server for each of the migrated users –

 *************************************************************************
 $farm.MigrateUserAccount( $_.oldlogin, $_.newlogin, $_. enforceSidHistory ) 
 
 Oldlogin(string) - A string that contains the old login name.
 Newlogin(string)- A string that contains the new login name	
 enforceSidHistory(Boolean)- true to query Active Directory for the SID history attribute to ensure that the new login name corresponds to the old one; otherwise, false
 *************************************************************************
 

User accounts migration and AD group remapping will be accomplished with step by step approach as outlined below –

Step 1: Extract Users from all the migrated site collections

Following script provides the list of users that are added to the SharePoint site. The script will be executed for all the migrated site collections.

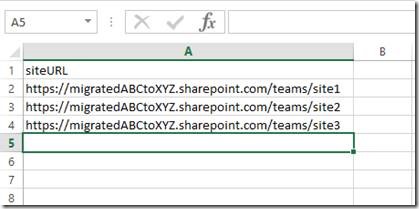
FetchURL.csv should contain the list of SharePoint sites.

clip_image002

 $CSVData = Import-CSV -path "C:FetchURL.csv"
 foreach ($row in $CSVData)  
 {
     $exportlist = @() 
     #Creating SPSite Object 
     $MySiteCollection = new-object Microsoft.SharePoint.SPSite($row.siteURL)
     $MyWeb = $MySiteCollection.openweb()
     #Getting the SP Users available in that site 
     $siteUsers = $MyWeb.SiteUsers
     #Exporting the users into csv file 
     $exportlist = @()
     foreach($user in $siteUsers){
         $obj = New-Object PSObject -Property @{
             “ABCuser”= $user.LoginName
             “XYZuser”=’’
         }
         $exportlist += $obj 
         $DocPath =$row.siteURL.Split("/")
  	  #Saving the csv file into local drive 
         $path = 'C:'+ $DocPath[$DocPath.Length-1]+'.csv'
         $exportlist | Export-Csv -path $path
     }
     $MyWeb.Dispose()
     $MySiteCollection.Dispose()
 } 


Step 2: Update the User Accounts as per the target environment naming convention

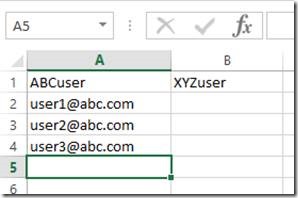
The output csv files from Step 1 will have the user account names available in those sites as shown below,

clip_image004

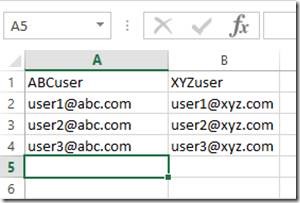
Update the corresponding user account in XYZuser column. Here, the user account user1@abc.com has its corresponding account in target environment as user1@xyz.com and so on for other accounts.

Finally the csv file will be updated as below,

clip_image006

*************************************************************************

Step 3: Extract AD groups from all the migrated site collections

Following script provides the list of AD groups that are added to the SharePoint site. The script will be executed for all the migrated site collections.

FetchURL.csv should contain the list of SharePoint sites.

 $CSVData = Import-CSV -path "C:FetchURL.csv"
 foreach ($row in $CSVData)  
 { 
     $exportlist = @() 
     #Creating SPSite object
     $MySiteCollection = new-object Microsoft.SharePoint.SPSite($row.siteURL)
     $MyWeb = $MySiteCollection.openweb()
     #Fetching the AD groups available in that SP Site
     $groups = $MyWeb.sitegroups
     #Exporting all the AD groups into csv file
     foreach ($grp in $groups) {
         foreach($user in $grp.Users)
         {
             if ($user.IsDomainGroup -eq $true) {
                 $obj = New-Object PSObject -Property @{
                     “abcGroup”= $user.LoginName
                     "xyzGroup" = ''
                 }
                 $exportlist += $obj 
             }
         }
     }
     $DocPath =$row.siteURL.Split("/")
     #saving the csv file in local drive
     $path = 'C:'+ $DocPath[$DocPath.Length-1]+'_Group.csv'
     $exportlist | Export-Csv -path $path
 }
 $MyWeb.Dispose()
 $MySiteCollection.Dispose() 
 
Step 4: Migrate Users and AD groups into the Target SP farm

The following PowerShell command will be used to migrate all the Users and AD groups from the csv file into the target SP farm

 If ((Get-PSSnapIn -Name Microsoft.SharePoint.PowerShell -ErrorAction SilentlyContinue) -eq $null )
 { 
  Add-PSSnapIn -Name Microsoft.SharePoint.PowerShell
 }
 function MigrateUserOrGroups($migrationType, $csvFile)
 {
    #Getting the SPFarm object
    $farm = Get-SPFarm 
    Write-Host $migrationType
    #Checking whether the user input the type of Migration as Group
    if($migrationType -eq "Group"){
    Import-Csv $csvFile | ForEach-Object{
       Write-Host "Migrating Group" $_. abcGroup "to" $_. xyzGroup -ForegroundColor Green
       $farm.MigrateGroup($_.abcGroup, $_.xyzGroup)      
        }
       }      
     #Checking whether the user input the type of Migration as User
     if($migrationType -eq "User")      {        
         Import-Csv $csvFile | ForEach-Object{
         Write-Host "Migrating User" $_. ABCuser "to" $_. XYZuser -ForegroundColor Green
         $farm.MigrateUserAccount( $_.ABCuser, $_.XYZuser, $false)
         }      
       }
       
    Write-Host "Migration Completed" -ForegroundColor Cyan  
    # $farm.Name
 }
 MigrateUserOrGroups $args[0] $args[1] 


Inputs for the PowerShell script:

For User migration: Open ‘SharePoint 2010 Management Shell’ and Run the following command. ./PowershellfileName.ps1 “User” “<Path of CSV file which has both ABC and XYZ user account details>”

For Group migration: Open SharePoint 2010 Management Shell and Run the following command.

./PowershellfileName.ps1 “Group” “<Path of CSV file which has both ABC and XYZ AD Group details>”

Happy Coding,

Ahamed Buhari

Category : PowerShell, SharePoint

Author Info

Ahamed Fazil Buhari
 
Senior Developer
 
Rate this article
 
Ahamed is a Senior Developer and he has very good experience in the field of Microsoft Technologies, especially SharePoint, Azure, M365, SPFx, .NET and client side scripting - JavaScript, TypeScript, ...read more
 

How to make a Web Application as Form Based Authentication With LDAP credentials (Active Directory Credentials) in SharePoint 2013

Sathish Nadarajan
 
Solution Architect
April 23, 2015
 
Rate this article
 
Views
16569

In this article, let us see, how to create a web application, which gets authenticated using Form Based Authentication (FBA) against the Active Directory (LDAP). Usually, the Form Based Authentication will happen against the SQL DB. But in this case, let us see how the authentication is going to happen against the Active Directory.

As usual, let us go by Step by Step from the beginning.

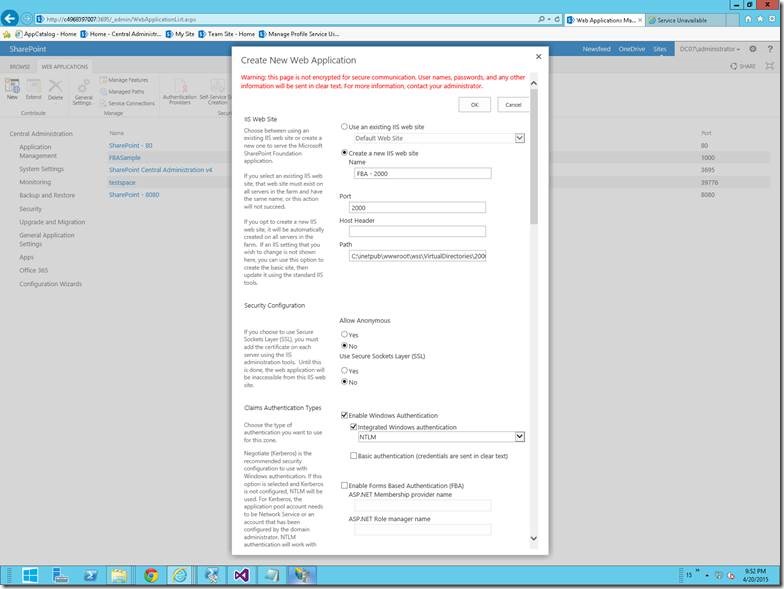
1. Create a Web Application from the Central Admin.
clip_image002

2. I have given the Name and the Port Number alone. The rest of the default settings, we will modify later. If we face any problem while creating the web application as mentioned on this post we can go with the PowerShell Script. The Script is as follows.

 $ap = New-SPAuthenticationProvider
 New-SPWebApplication -Name "FBA" -ApplicationPool "FBA" -ApplicationPoolAccount "DC07SPFarm" -URL "http://C4968397007:1000" -AuthenticationProvider $ap
 $template = Get-SPWebTemplate "DEV#0"
 $template
 New-SPSite -Url  http://C4968397007:1000/Sites/DeveloperSite  -OwnerAlias  "SSAdministrator" -Template $template
 

3. There are three config files we need to modify.

a. Web.Config of Central Administration

b. Web.Config of SecurityTokenServiceApplication

c. Web.Config of the Web Application which we created in the previous step.

4. Make sure that you have taken the backup of the Web.Config files before doing any changes. Because, that will help us a lot while roll back if anything goes wrong.

5. In the Central Admin add the following TAG under <Configuration ><System.Web> tag

 <membership defaultProvider="AspNetSqlMembershipProvider">
       <providers>
         <add name="FBAMembershipProvider" 
              type="Microsoft.Office.Server.Security.LdapMembershipProvider, Microsoft.Office.Server, Version=15.0.0.0, Culture=neutral, PublicKeyToken=71e9bce111e9429c" 
              server="C4968397007.DC07.Loc" 
              port="389" 
              useSSL="false" 
              userDNAttribute="distinguishedName" 
              userNameAttribute="sAMAccountName" 
              userContainer="CN=Users,DC=DC07,DC=Loc" 
              userObjectClass="person" 
              userFilter="(ObjectClass=person)" 
              scope="Subtree" 
              otherRequiredUserAttributes="sn,givenname,cn" />
       </providers>
     </membership>
     <roleManager enabled="true" defaultProvider="AspNetWindowsTokenRoleProvider" > 
       <providers>
         <add name="FBARoleManager" 
              type="Microsoft.Office.Server.Security.LdapRoleProvider, Microsoft.Office.Server, Version=15.0.0.0, Culture=neutral, PublicKeyToken=71e9bce111e9429c"
              server="C4968397007.DC07.Loc" 
              port="389"
              useSSL="false"
              groupContainer="DC=internal,DC=DC07,DC=Loc"
              groupNameAttribute="cn"
              groupNameAlternateSearchAttribute="samAccountName"
              groupMemberAttribute="member"
              userNameAttribute="sAMAccountName"
              dnAttribute="distinguishedName"
              groupFilter="(ObjectClass=group)"
              userFilter="(ObjectClass=person)"
              scope="Subtree" />
       </providers>
  </roleManager>
 

In the above Tags, modify the following attributes according to your environment. The values given here are based on the CloudShare Environment which I used for my demo purpose.

· <add name="FBAMembershipProvider"

· server="C4968397007.DC07.Loc" – To get this value, we can use the PowerShell

o [System.Net.DNS]::GetHostByName(”).HostName

· userContainer="CN=Users,DC=DC07,DC=Loc"

o I am using the Users Group from the Active Directory as my Canonical Name

· <add name="FBARoleManager"

· server="C4968397007.DC07.Loc" – To get this value, we can use the PowerShell

o [System.Net.DNS]::GetHostByName(”).HostName

· groupContainer="DC=internal,DC=DC07,DC=Loc"

o This, give the first DC as Internal and the rest of the DC depends on your Domain Name.

6. Now, we have completed the modifications on the Central Admin Web.Config.

7. Let us go to the SecureTokenServiceApplication Web.Config

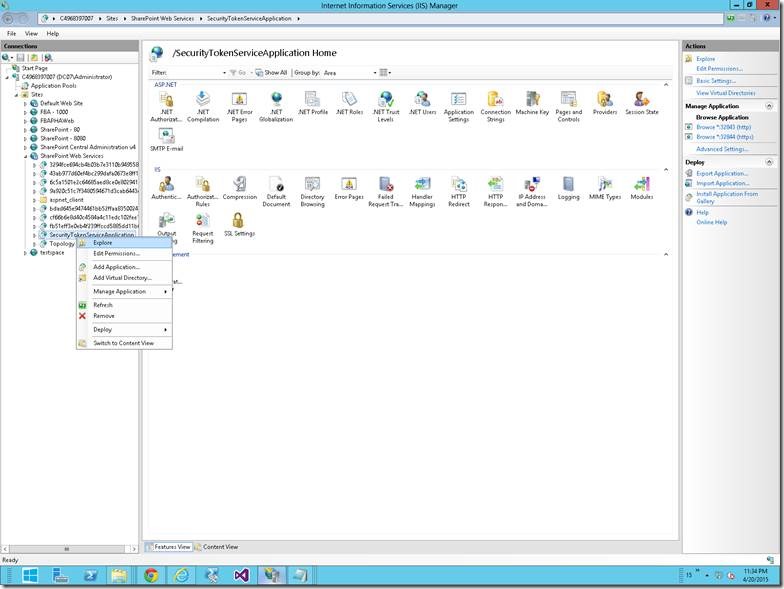
8. If does not know the exact port number, then go to the IIS. And follow the steps as shown in the screen shots.
clip_image004

On the SharePoint WebServices Site, select the Security Token Service Application Application and right Click, Explore. By default the location would be C:\Program Files\Common Files\Microsoft Shared\Web Server Extensions\15\WebServices\SecurityToken

9. Again, take a back up of the web.config and start making the changes.

10.Add the following entry under the <Configuration ><System.Web>

 <membership>
       <providers>
         <add name="FBAMembershipProvider" 
              type="Microsoft.Office.Server.Security.LdapMembershipProvider, Microsoft.Office.Server, Version=15.0.0.0, Culture=neutral, PublicKeyToken=71e9bce111e9429c" 
              server="C4968397007.DC07.Loc" 
              port="389" 
              useSSL="false" 
              userDNAttribute="distinguishedName" 
              userNameAttribute="sAMAccountName" 
              userContainer="CN=Users,DC=DC07,DC=Loc" 
              userObjectClass="person" 
              userFilter="(&(ObjectClass=person))" 
              scope="Subtree" 
              otherRequiredUserAttributes="sn,givenname,cn" />
       </providers>
     </membership>
     <roleManager enabled="true" > 
       <providers>
         <add name="FBARoleManager" 
              type="Microsoft.Office.Server.Security.LdapRoleProvider, Microsoft.Office.Server, Version=15.0.0.0, Culture=neutral, PublicKeyToken=71e9bce111e9429c"
              server="DC07.Loc" 
              port="389"
              useSSL="false"
              groupContainer="DC=internal,DC=DC07,DC=Loc"
              groupNameAttribute="cn"
              groupNameAlternateSearchAttribute="samAccountName"
              groupMemberAttribute="member"
              userNameAttribute="sAMAccountName"
              dnAttribute="distinguishedName"
              groupFilter="(ObjectClass=group)"
              userFilter="(ObjectClass=person)"
              scope="Subtree" />
       </providers>
     </roleManager>
 

11. The parameters to change are same as that of the Central Admin Web.Config. The highlighted values are based on the Cloud Share Environment which I used for the demo purpose.

12. Now, let us go to the Third Web.Config file changes.

13. In the <Configuration> section, find the <system.web> section.

14. Find the <membership defaultProvider="i"> section and add the following example entry to the <Providers> section:

 <add name="FBAMembershipProvider" type="Microsoft.Office.Server.Security.LdapMembershipProvider, Microsoft.Office.Server, Version=15.0.0.0, Culture=neutral, PublicKeyToken=71e9bce111e9429c" 
 server="DC07.Loc" 
 port="389" 
 useSSL="false" 
 userDNAttribute="distinguishedName" 
 userNameAttribute="sAMAccountName" 
 userContainer="CN=Users,DC=DC07,DC=Loc" userObjectClass="person" userFilter="(&(ObjectClass=person))" 
 scope="Subtree" 
 otherRequiredUserAttributes="sn,givenname,cn" />
 

15. Find the <roleManager defaultProvider="c" enabled="true" cacheRolesInCookie="false"> section and add the following example entry to the <Providers> section:

 <add name="FBARoleManager"
  type="Microsoft.Office.Server.Security.LdapRoleProvider, Microsoft.Office.Server, Version=15.0.0.0, Culture=neutral, PublicKeyToken=71e9bce111e9429c" 
 server="C4968397007.DC07.Loc" 
 port="389" 
 useSSL="false" 
 groupContainer="DC=internal,DC=DC07,DC=Loc" 
 groupNameAttribute="cn"
  groupNameAlternateSearchAttribute="samAccountName" 
 groupMemberAttribute="member" 
 userNameAttribute="sAMAccountName" 
 dnAttribute="distinguishedName" 
 groupFilter="(&(ObjectClass=group))" 
 userFilter="(&(ObjectClass=person))" scope="Subtree" />
 

16. With the above changes, let us come back to the Central Admin again.

17. Go to Manage Web Application.

18. Select the Web Application on which our Site Collection resides.

19. Click on the “Authentication Providers” on the Ribbon.
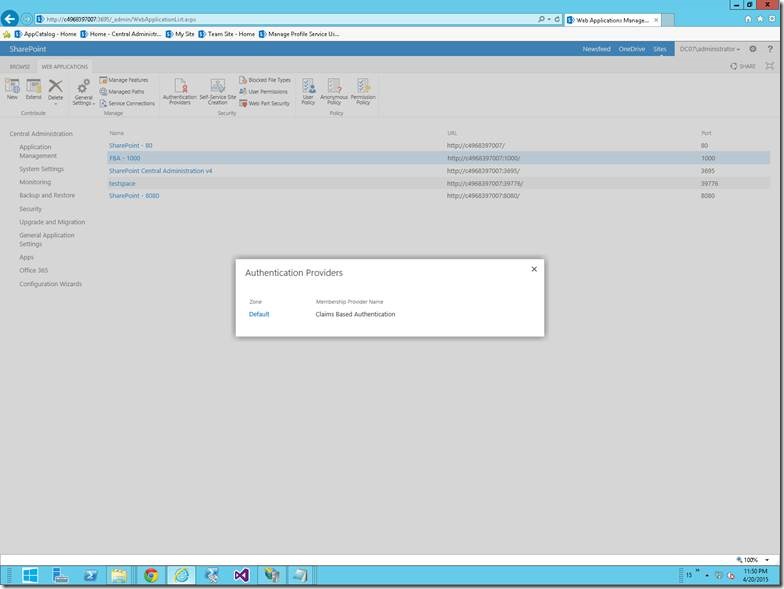
clip_image006

20. Click on the Default HyperLink

21. On the below screen, Check the “Enable Form Based Authentication”

22. And give the proper values for the Provider and the role Manager.
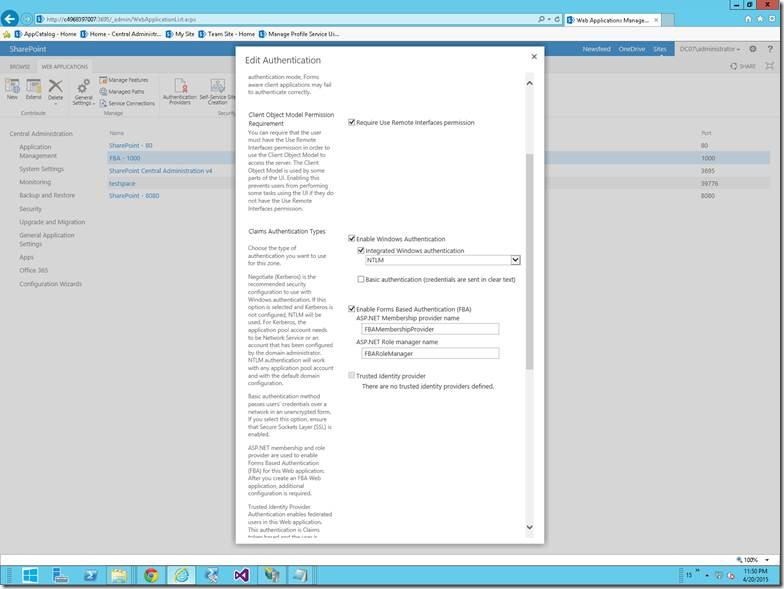
clip_image008

23. With this, let us try to open the Site Collection. Here my site collection is http://c4968397007:1000/sites/developerSite

24. The login screen would be something like,
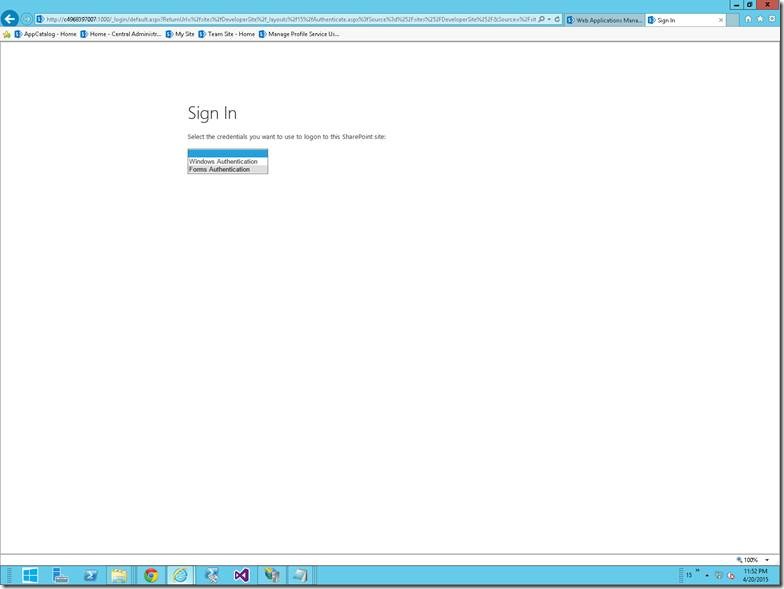
clip_image010

25. On Selecting the Forms Authentication, you will be redirected to a default login page.
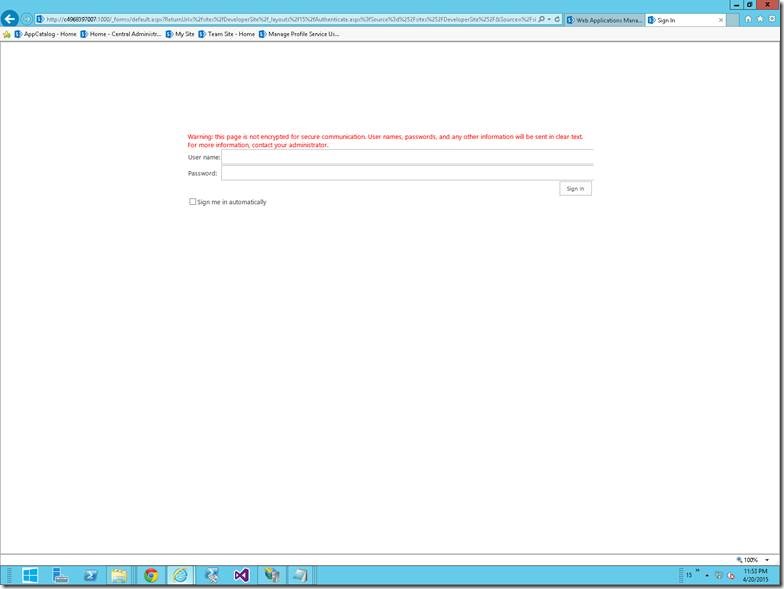
clip_image012

26. Enter the appropriate credentials and this screen will authenticate you against the Active Directory using the LDAP Services.

Hope this would have helped to implement the Form Based Authentication using Active Directory in SharePoint 2013. In the coming article, let us see, how to use a custom sign in page, instead of this blank white screen given by SharePoint.

Download the Sample Config Files Here

Happy Coding,

Sathish Nadarajan.
Author Info

Sathish Nadarajan
 
Solution Architect
 
Rate this article
 
Sathish is a Microsoft MVP for SharePoint (Office Servers and Services) having 15+ years of experience in Microsoft Technologies. He holds a Masters Degree in Computer Aided Design and Business ...read more
 

How to setup Active Directory Rights Management Service Role on Windows Server 2012

Sathish Nadarajan
 
Solution Architect
April 17, 2015
 
Rate this article
 
Views
11319

In this article, let us see how to setup AD RMS (Active Directory Rights Management Service) Role & Feature on Windows Server 2012.

1. Go to Server Manager.

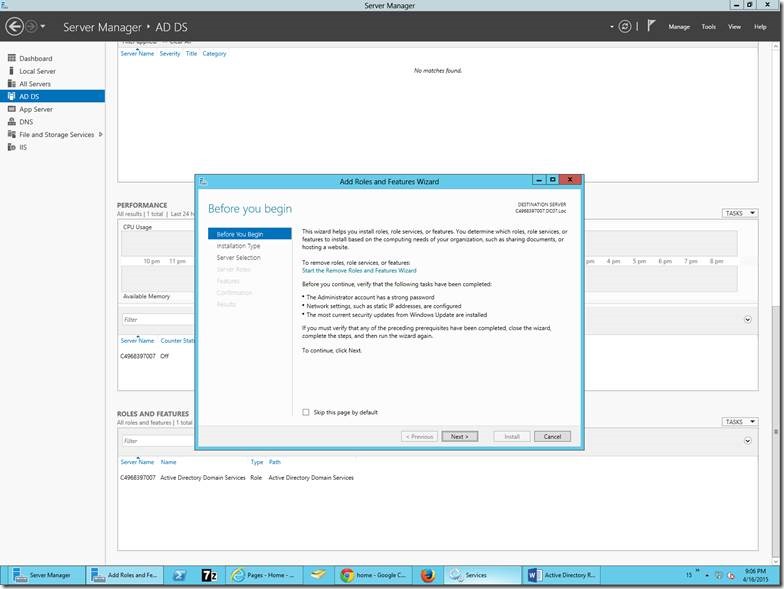
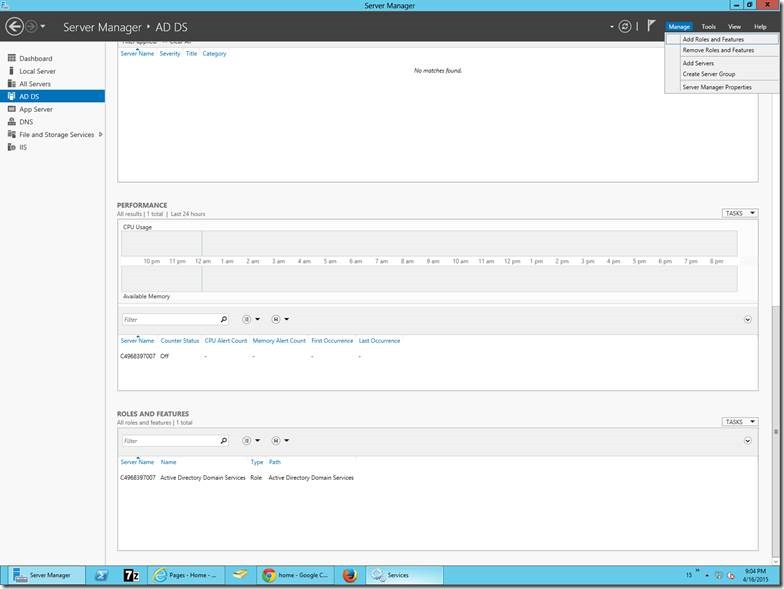
2. On the top right corner, under Manage Click “Add Roles and Features”.

clip_image002

3. Click on Next

clip_image004

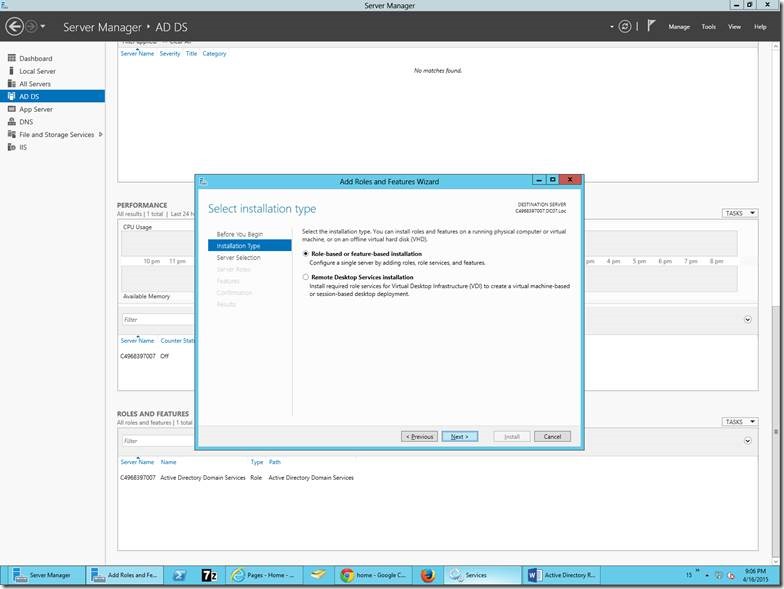
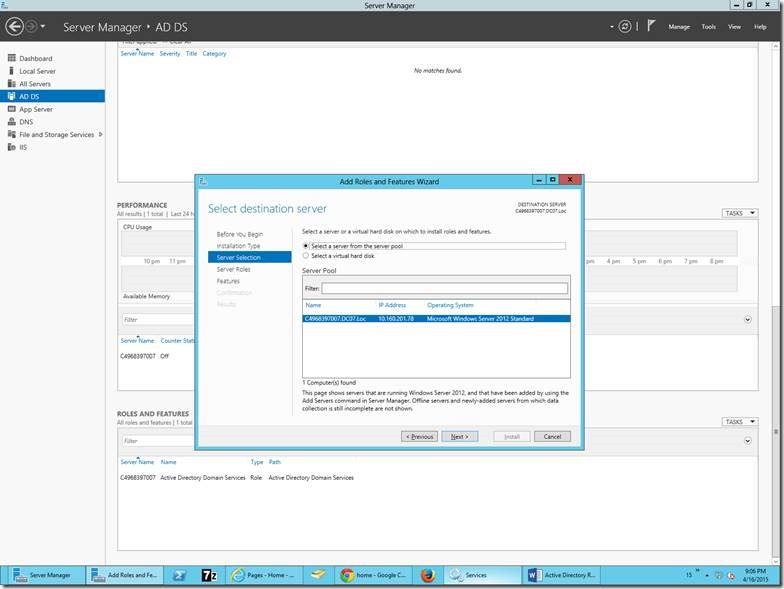
4. Select the Options as below.

clip_image006

clip_image008

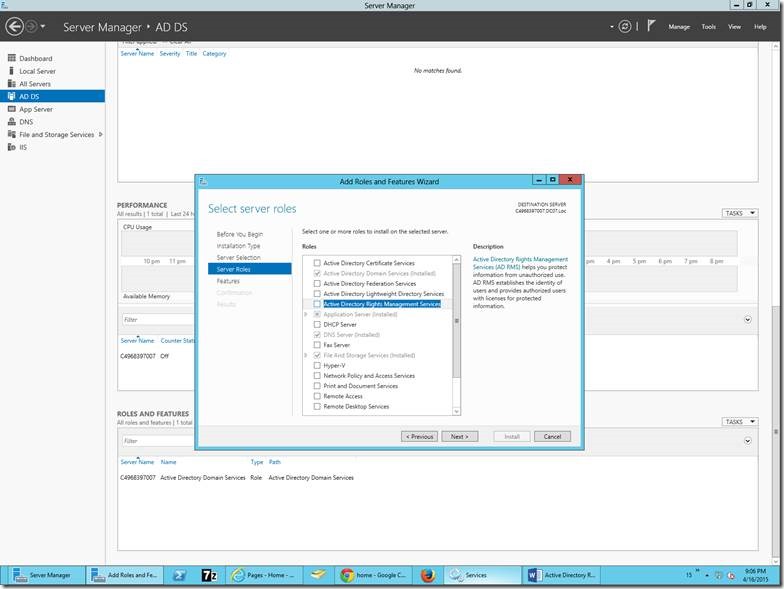
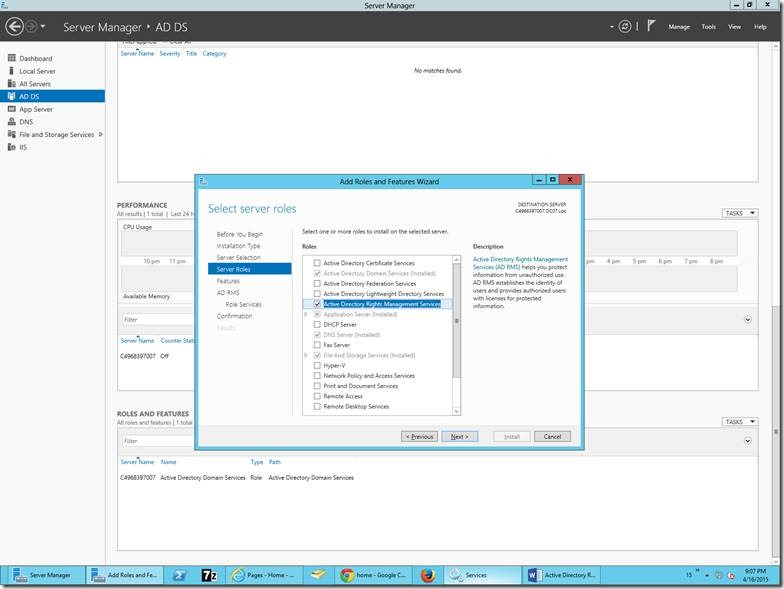
5. Select the Check Box, “Active Directory Rights Management Service”

clip_image010

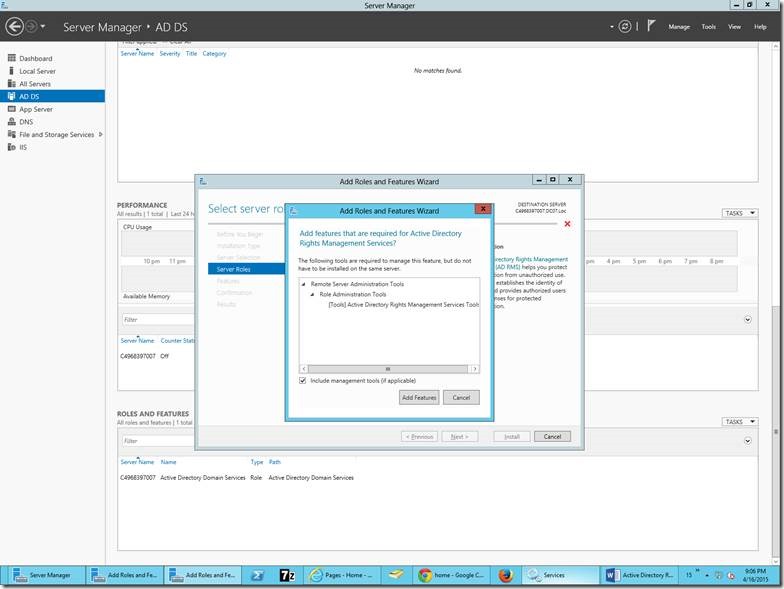
6. The corresponding Feature will also automatically selected. Click on Add Features.

clip_image012

7. Click on Next

clip_image014

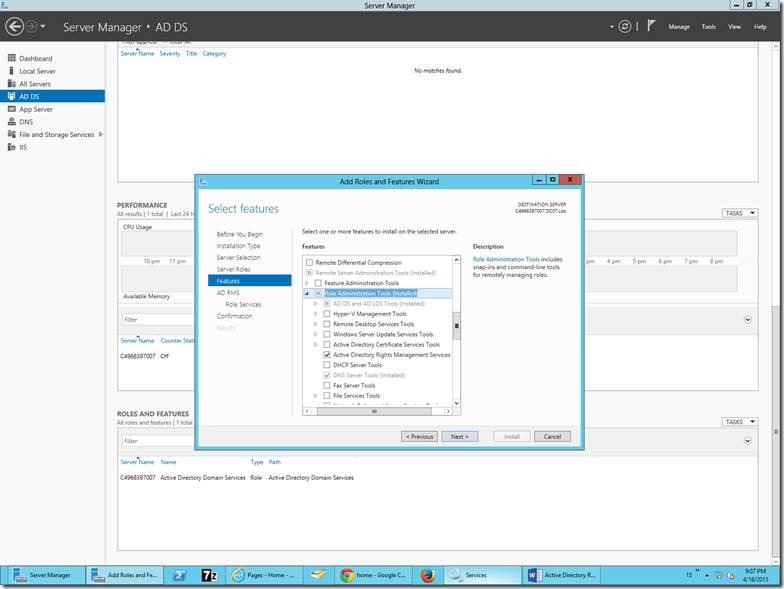
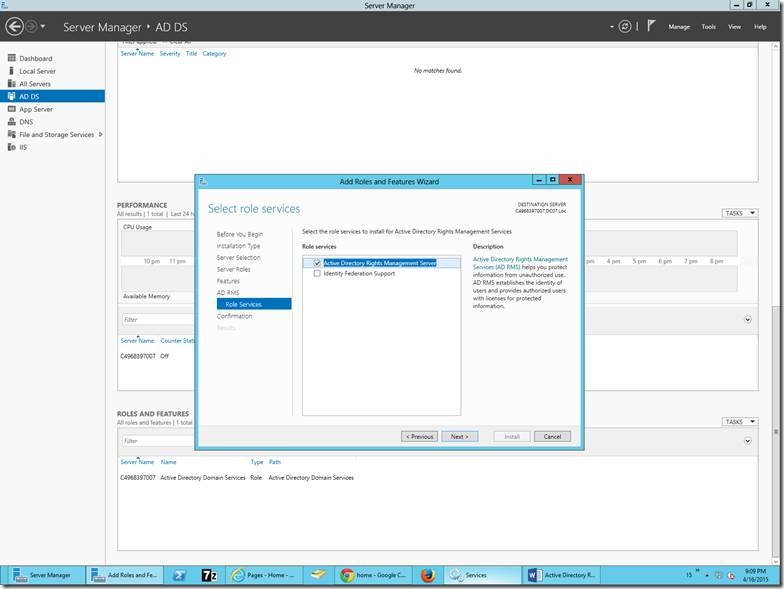
8. Make sure that the Feature “Active Directory Rights Management Services” is selected. It would be selected by default. Even then, we are double checking here.

clip_image016

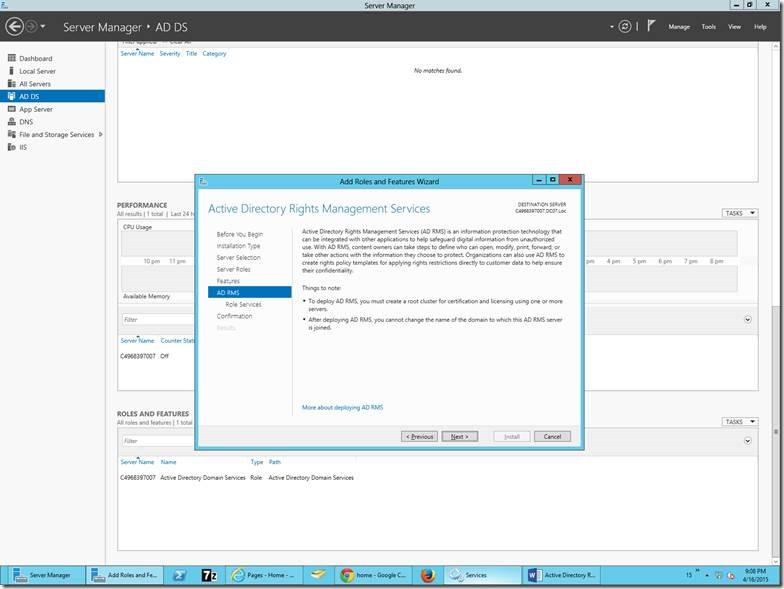
9. Click on Next

clip_image018

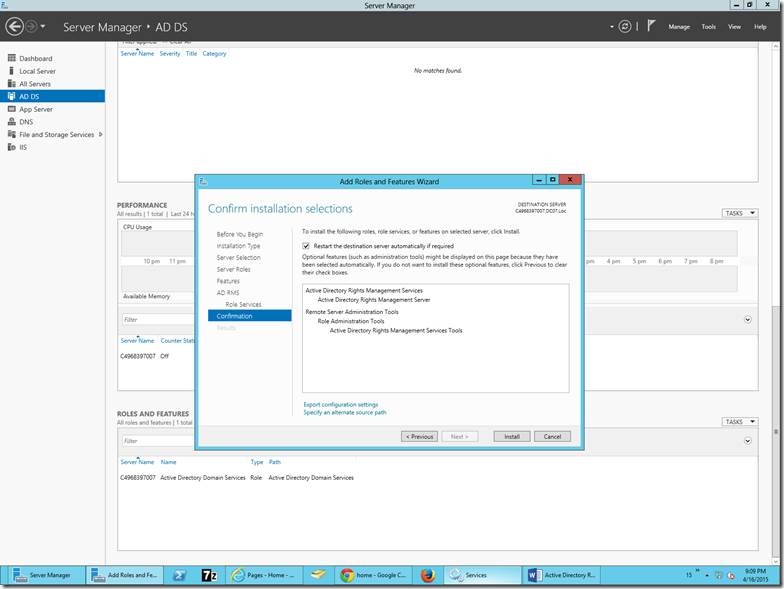
10. In this screen also, no need to change anything.

clip_image020

11. Restart if required.

clip_image022

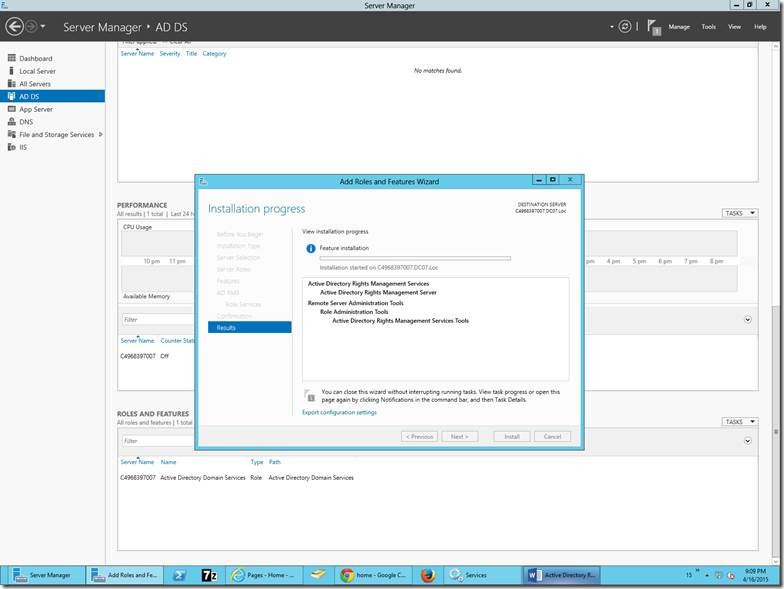
12. Installation is in Progress.

clip_image024

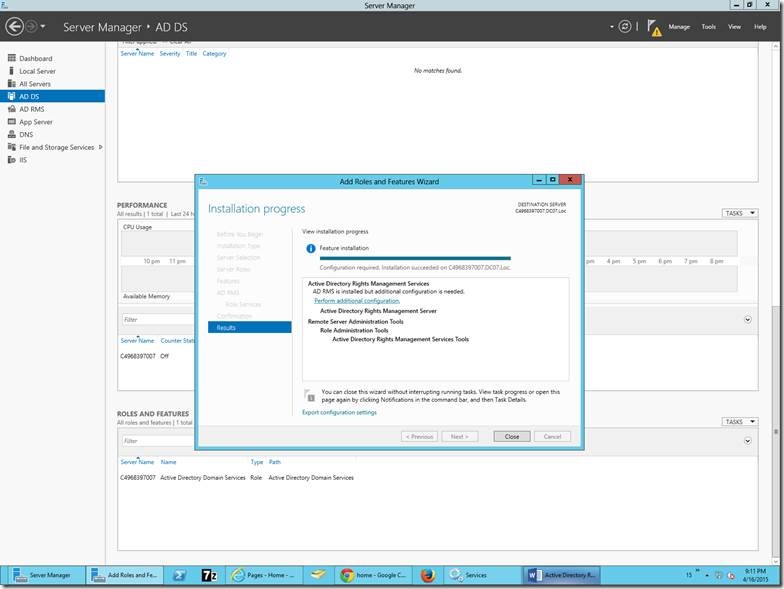
13. After the successful installation, we need to configure the AD RMS.

clip_image026

14. The Configuration section let us see in a separate article.

Happy Coding,

Sathish Nadarajan.
Category : Windows

Author Info

Sathish Nadarajan
 
Solution Architect
 
Rate this article
 
Sathish is a Microsoft MVP for SharePoint (Office Servers and Services) having 15+ years of experience in Microsoft Technologies. He holds a Masters Degree in Computer Aided Design and Business ...read more
 

How to Configure the Active Directory Rights Management Service in Windows Server 2012

Sathish Nadarajan
 
Solution Architect
 
Rate this article
 
Views
13417

In this section, let us see how to configure the AD RMS (Active Directory Rights Management Service) in Windows Server 2012.

1. As we saw on the last article, to install the Role and Feature, at the end, there will be a link to open the Configuration Module. On Click of that link, the below screen will be opened.

clip_image002

2. Select the option “Create a new AD RMS root Cluster”

clip_image004

3. Select a Server and the DB Instance. In my case, I have given the server name and the Default DB Instance

clip_image006

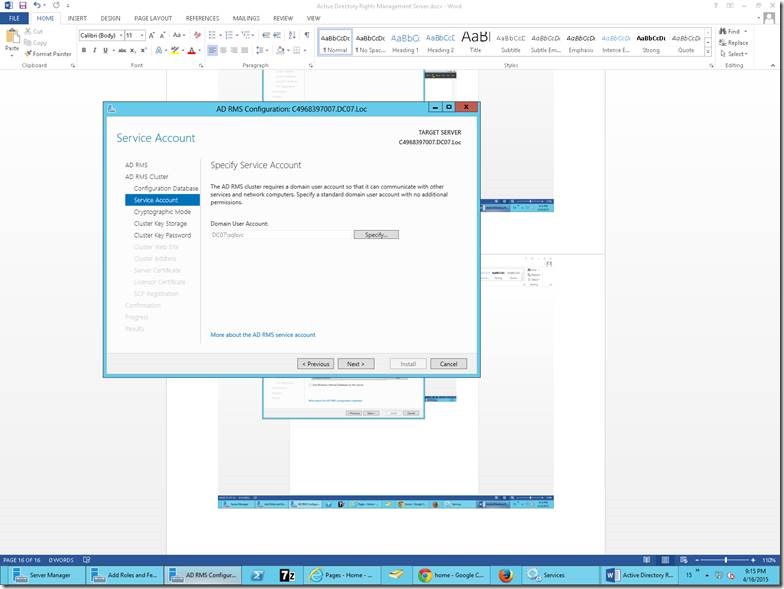
4. Specify the Service Account. This is the account by which the Active Directory Rights Management Service will be running on the Service.msc console. This account, we cannot give the same account which we are using to install. In my case, I have given an account called SQLSVC which has all the rights over the DB and a part of my domain admin as well.

clip_image008

5. Select the default options on the consecutive screens.

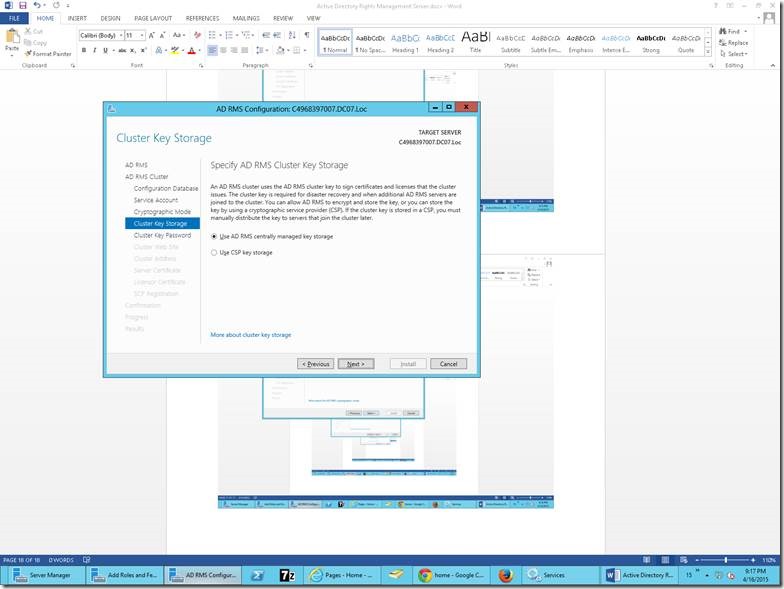
clip_image010

clip_image012

6. Give the Password and keep the password safe. As this should be used later and cannot be retrieved by any more.

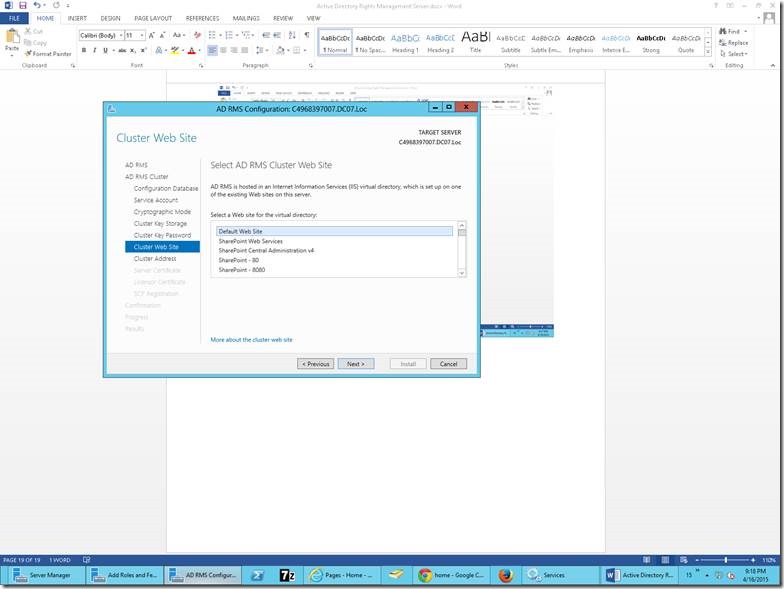
7. Select the Default website as my virtual directory.

clip_image014

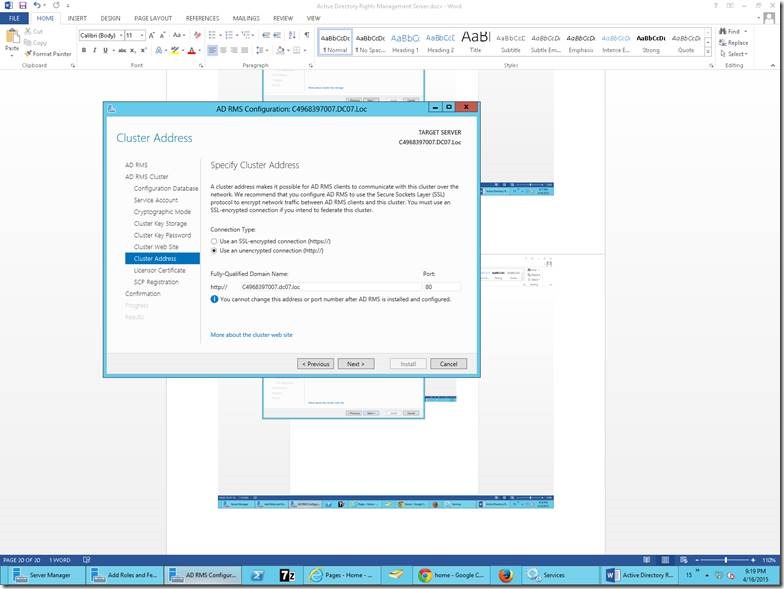
8. Select a Protocol. Either you can go with HTTPS or HTTP. In my case, I am going with HTTP.

clip_image016

9. Give the Name of your server.

clip_image018

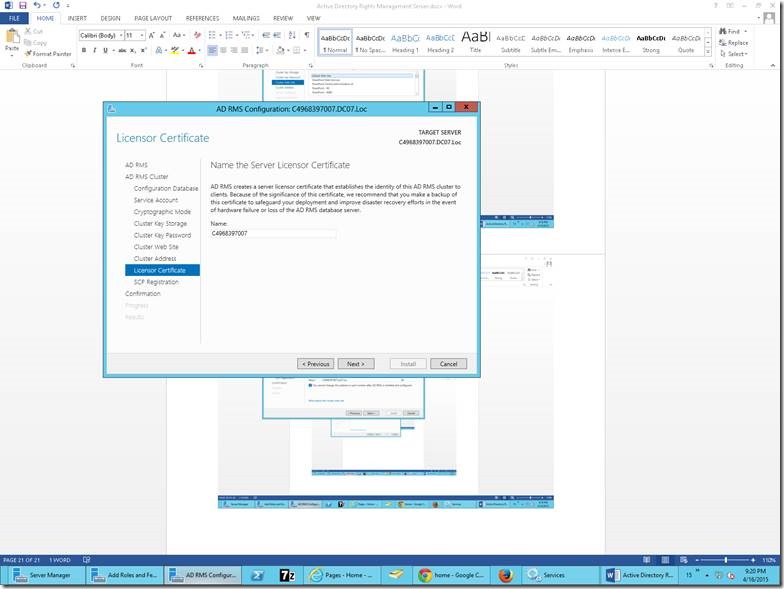
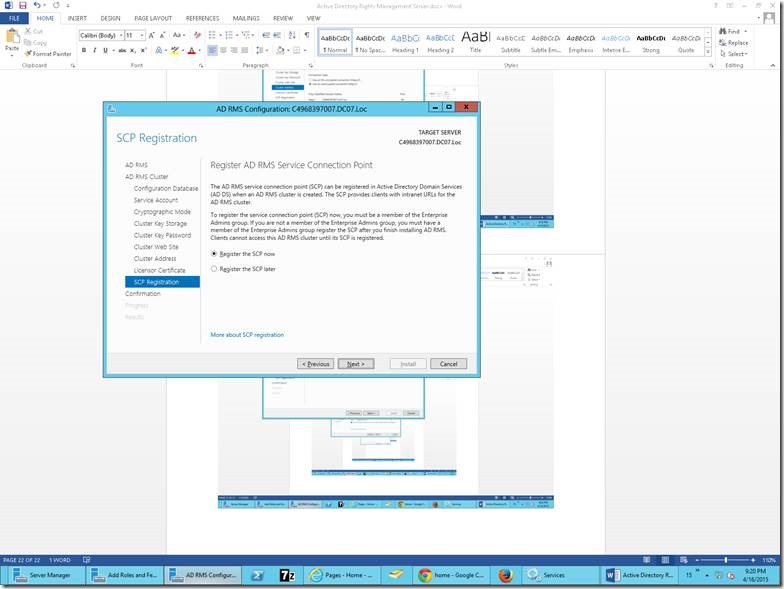
10. Register the SCP Now. (Service Connection Point)

clip_image020

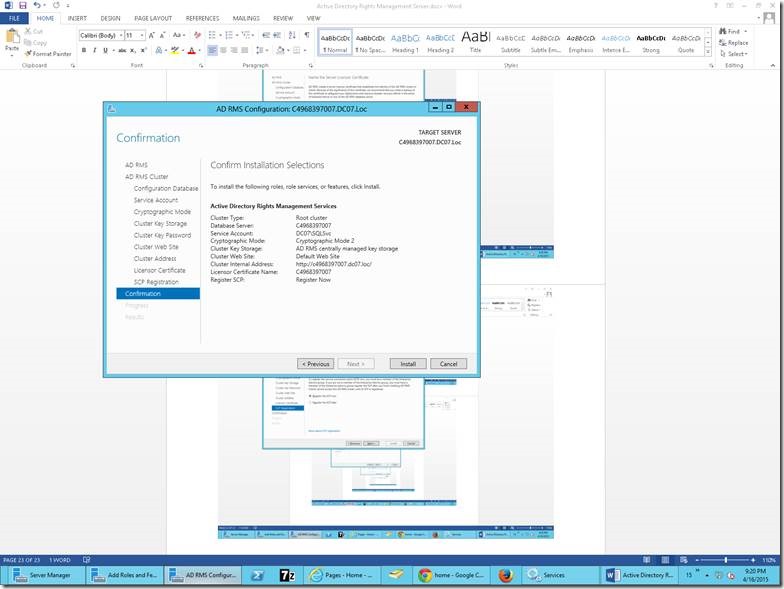
11. Click on the Install.

clip_image022

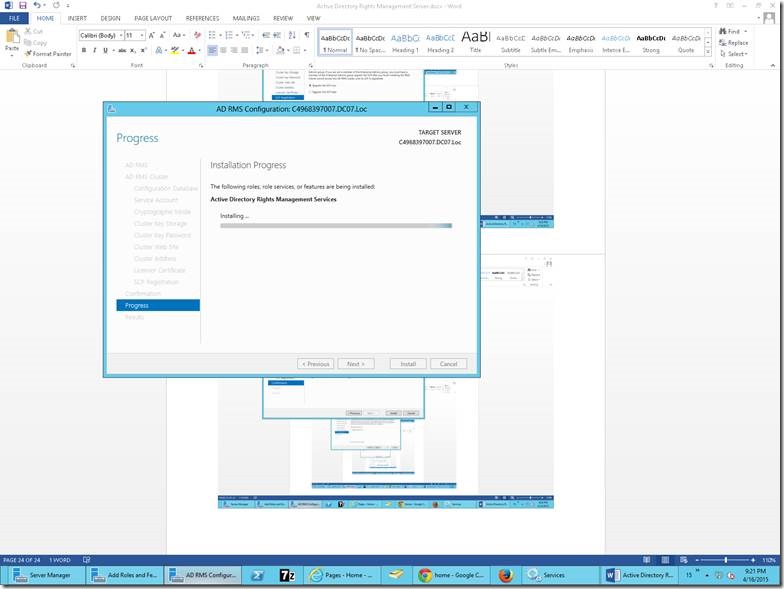
12. This will progress for 30 to 60 mins.

clip_image024

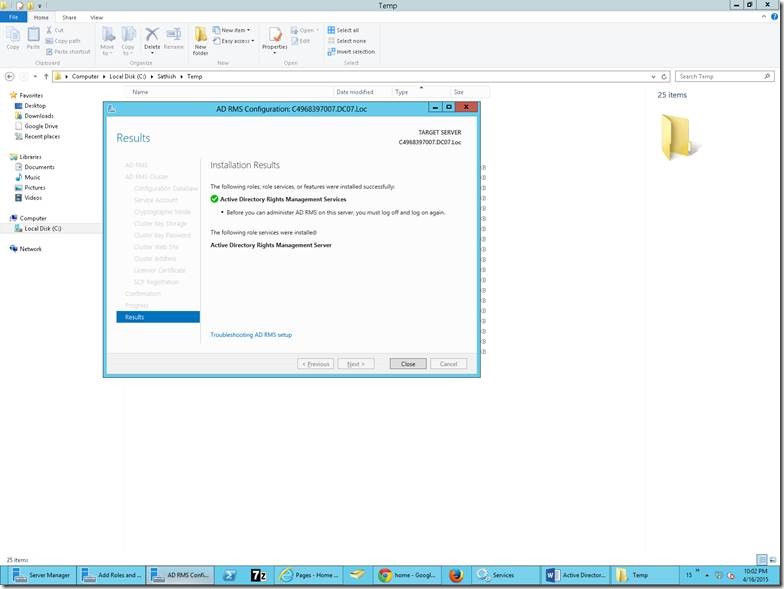
13. Once, the installation completes, we can close the screen.

clip_image026

14. Do a Reboot without fail, to make sure that all our changes are reflecting on the server.

Happy Coding,

Sathish Nadarajan.
Category : Windows

Author Info

Sathish Nadarajan
 
Solution Architect
 
Rate this article
 
Sathish is a Microsoft MVP for SharePoint (Office Servers and Services) having 15+ years of experience in Microsoft Technologies. He holds a Masters Degree in Computer Aided Design and Business ...read more
 

How to Configure Active Directory Domain Services on Windows Server 2012

Sathish Nadarajan
 
Solution Architect
April 11, 2014
 
Rate this article
 
Views
14395

In this article, let us see, how to convert our Windows Server 2012 WorkGroup machine to a Domain Controller. That is, we need to configure ADDS on our System and install the DNS. Installing DNS Can be covered on a separate article. Now, let us focus only on ADDS.

Let us see the step by step procedure.

1. Login to the Windows Server 2012 with Administrator Privilege.

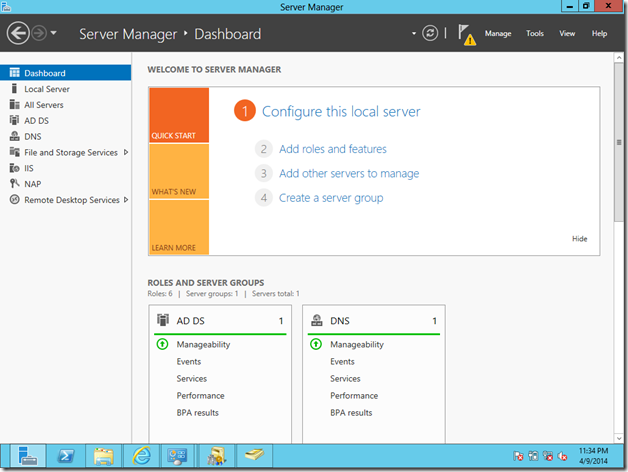
2. Go to Server Manager.

image

3. Select the Add roles and features.

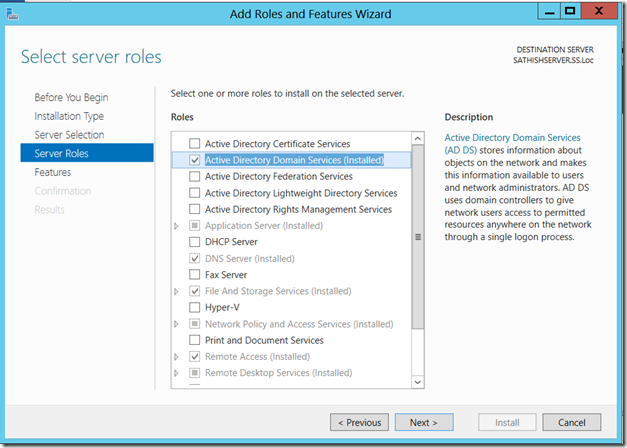
4. On the Feature, select the Active Directory Domain Services.

image

5. And Click Next and Install. This doesn’t require much assistance.

6. Now, after installing, the ADDS, we need to configure that.

7. For that, go to the Server Manager again after a restart.

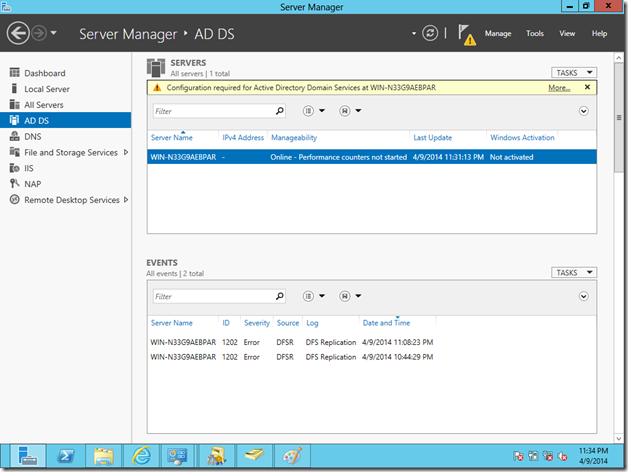
8. On the Left Pane, you can find a new entry for ADDS.

image

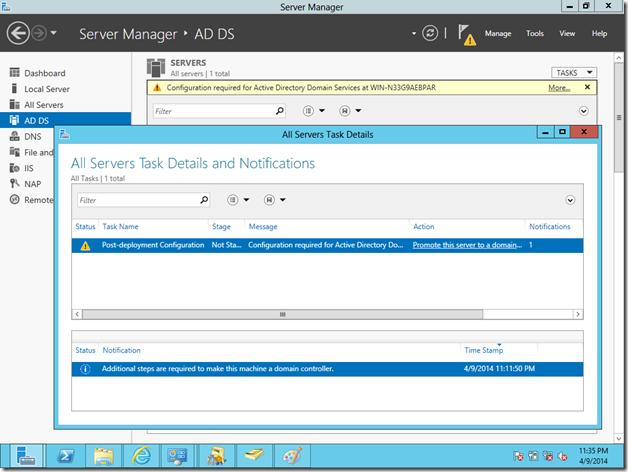
9. On the Top, select More hyperlink.

image

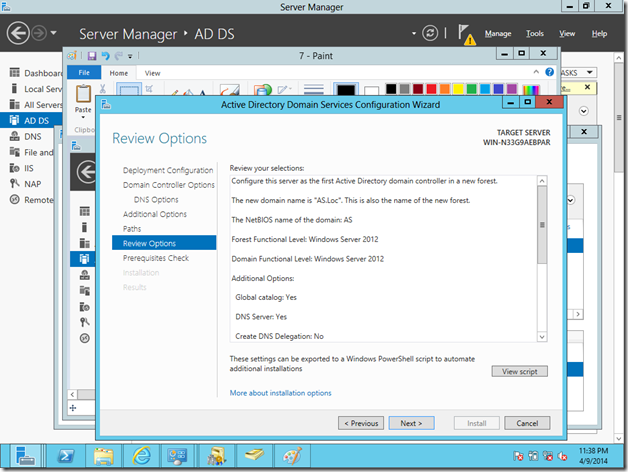
10. Select the “Promote this Server to a domain controller option”.

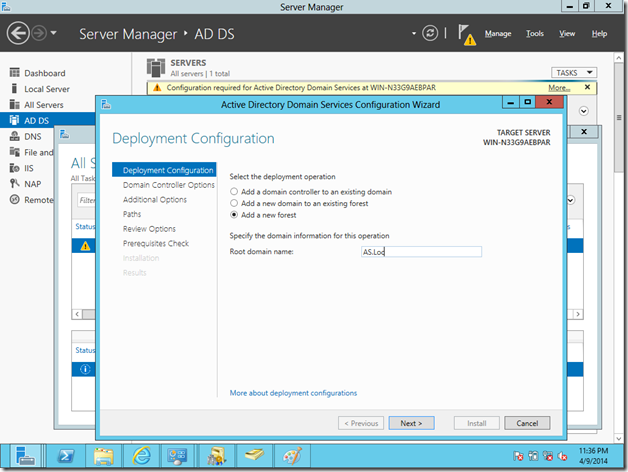
11. Select the third option. i.e., “Add a new Forest”

image

12. Specify a name for your Root Domain.

13. Click Next.

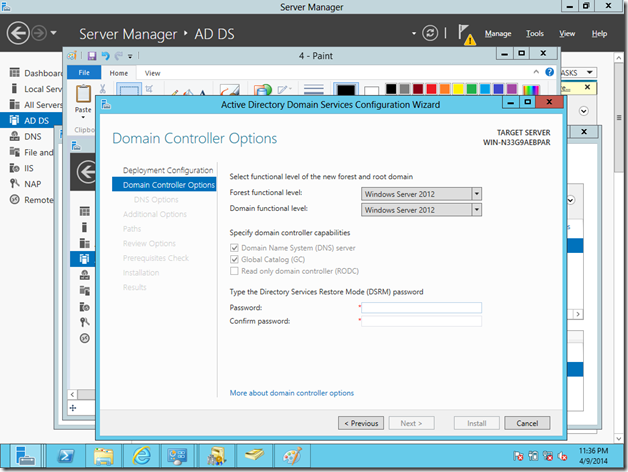
14. Specify a password

image

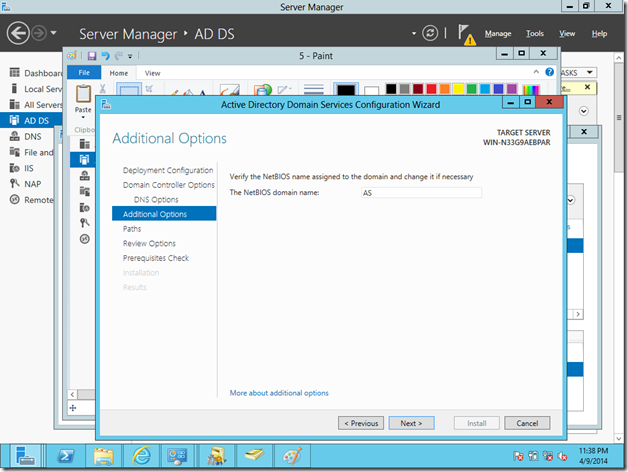
15. On the next screen, the NetBIOS Domain will appear automatically.

image

16. Select Next.

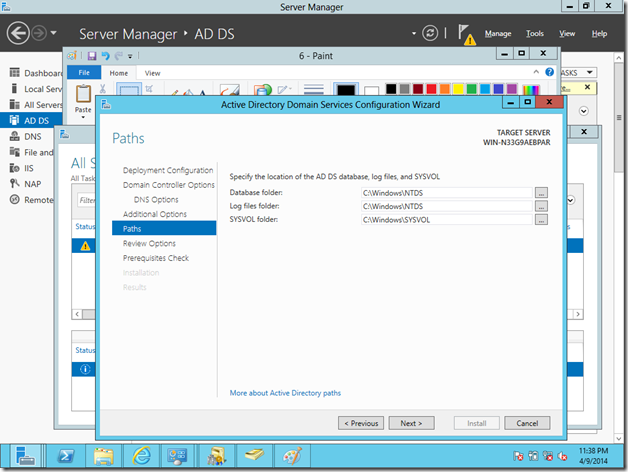
17. Keep the default values on this.

image

image

18. Once the pre-requisite check runs and succeeds, Select Install. Do a restart.


19. We can see the ADDS configured. To verify that, you can login to the Active Directory and verify the Name.

20. After completing this, you can add your machines to this Domain.

Note:

I would recommend that, before installing SharePoint and SQL Server, configuring the ADDS will be very much helpful. This would be very useful, when we are planning to have more than one machine on VMs on our Dev Environment.

Hope this helps.

Happy Coding.

Sathish Nadarajan.

Author Info

Sathish Nadarajan
 
Solution Architect
 
Rate this article
 
Sathish is a Microsoft MVP for SharePoint (Office Servers and Services) having 15+ years of experience in Microsoft Technologies. He holds a Masters Degree in Computer Aided Design and Business ...read more
 

How to Custom Attributes in Active Directory in Windows Server 2012 ADDS

Sathish Nadarajan
 
Solution Architect
February 5, 2014
 
Rate this article
 
Views
62774

Sometimes, we may require some additional attributes to be added on the Active Directory, irrespective of the default fields given by Microsoft. For example, an attribute called Marital Status may not be there by default. But, if a new employee joins our organization, we may gather those information and we want that information needs to be present on the SharePoint portal as well. In that case, it is always better to keep those information on the Active Directory itself. Hence, whenever a synchronization happens, it will fetch the information from the Active Directory itself. This will reduce the time as well as a manual intervention.

Let us see a step by step approach for adding a custom attribute in to our Active Directory on Windows Server 2012.

The steps are as follows.

1. Mounting AD Schema

2. Creating Custom Attribute

3. Adding to User Class

4. Restarting Active Directory Domain Services

Mounting AD Schema

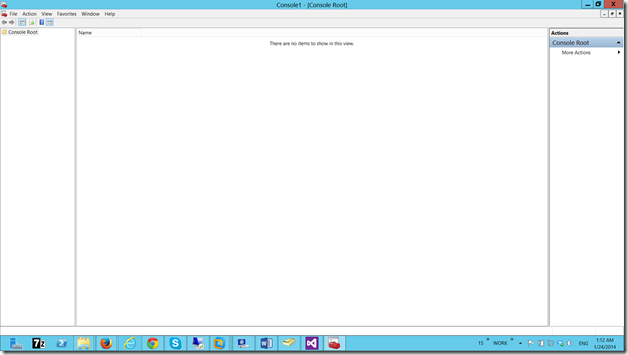
The first step would be, we need to mount the active directory schema. Then only, it will be visible on the MMC Console. In detail, let us go to the MMC.

image

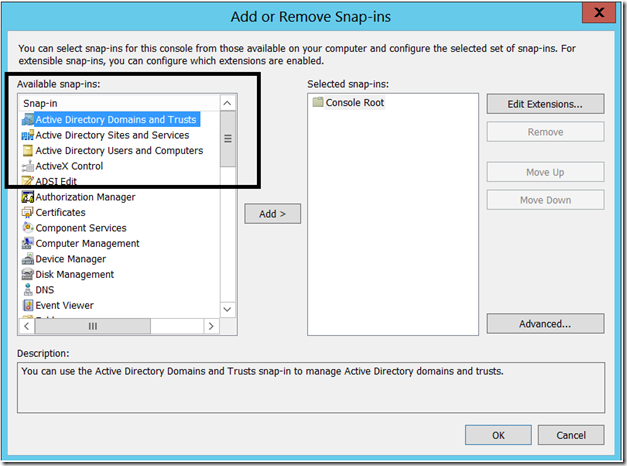
Go to File->Add/Remove Snapin

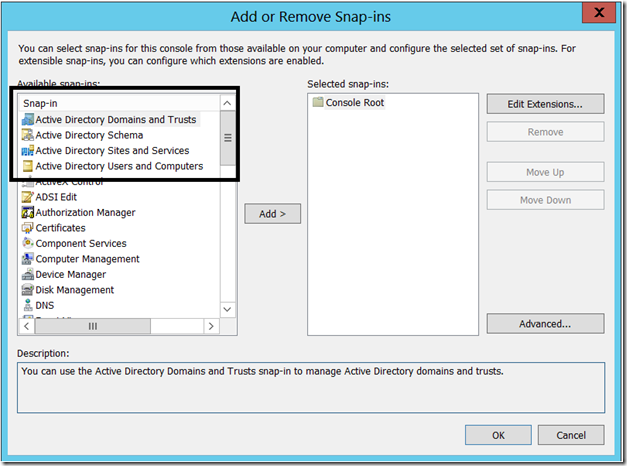
You cannot see anything like, Active Directory Schema by default. The screen would be something like,

image

Now, on that, we want the load the Active Directory Schema.

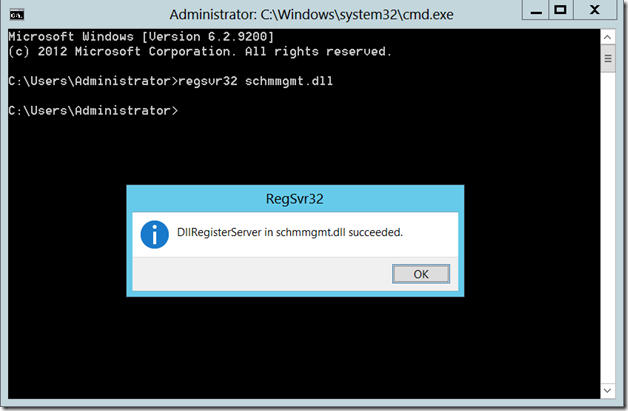
Hence, we need to execute the following command on the command prompt with Administrator privilege.

image

Once, this is succeeded, then go back to MMC and see, whether the Schema is listed or not.

Now, it got listed.

image

Creating Custom Attributes

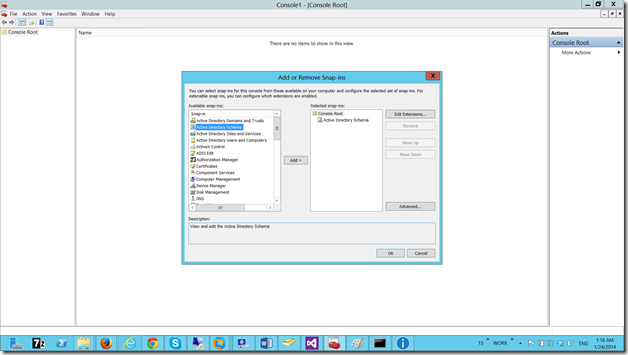
Now, we loaded the Schema. Hence, we need to Add the Schema into the MMC.

image

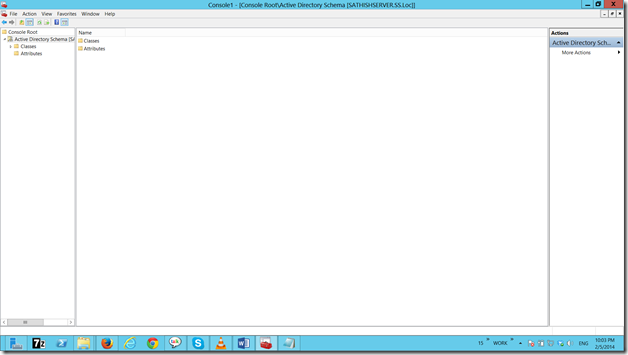
Once we add, the MMC console will be looking like this.

image

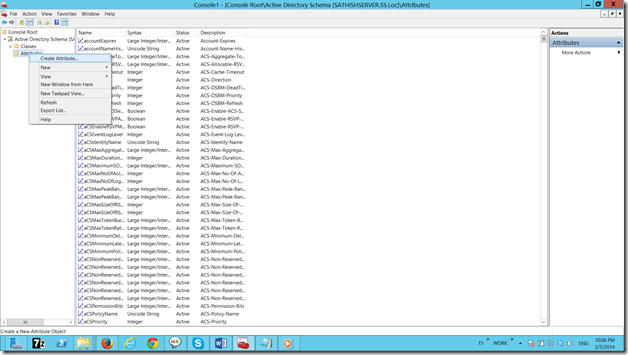
On that let us start adding the Attributes section.

Right click on Attribute node and select Create Attribute

image

Let me name it as MaritalStatus.

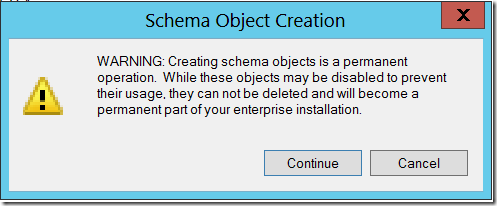
Read the warning and click continue.

image

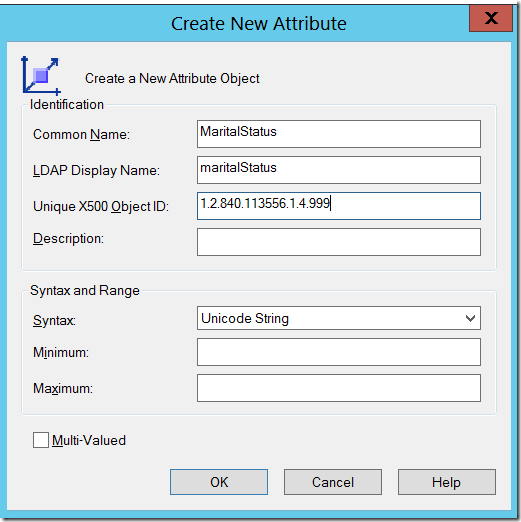
Enter the Common Name – i.e., the Attribute Name. I am giving as “MaritalStatus”.

LDAP Display Name will be generated automatically.

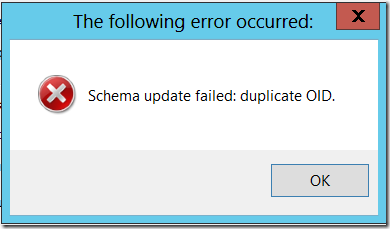
The Unique Identifier is nothing but you can take from the default attributes and modify the last portion alone. To make sure that you are giving a Unique one, copy the existing Unique ID from any other attribute and paste it here. The system will throw an error message.

image

By this, we can confirm that, we need to give a Unique OID.

image

We can select Multi-Valued also. It is based on our requirement.

If required, give the Description. Then click OK.

Now, the attributes has been added to the Schema.

Adding to User Class

Now, after adding the Schema, we need to add this schema to the Users Class. Then only, it will get reflected on the Active Directory, Users Attributes.

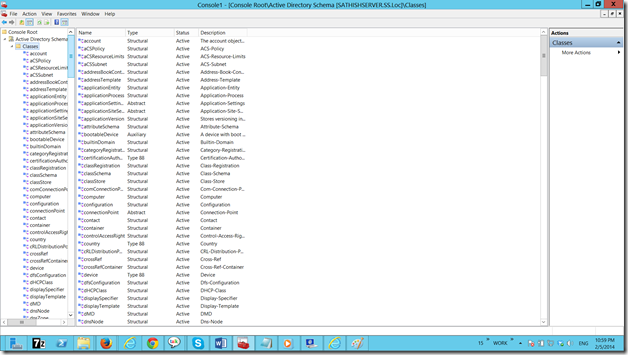
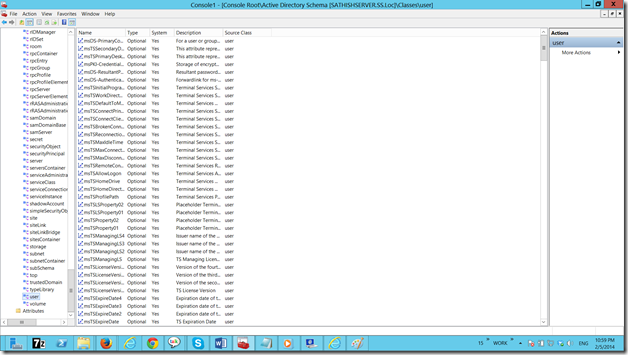
Open the Classes Node.

image

Select the User Class

image

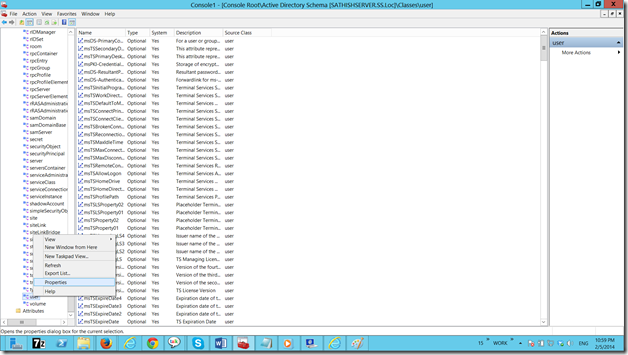
Go to the Properties of the User Class.

image

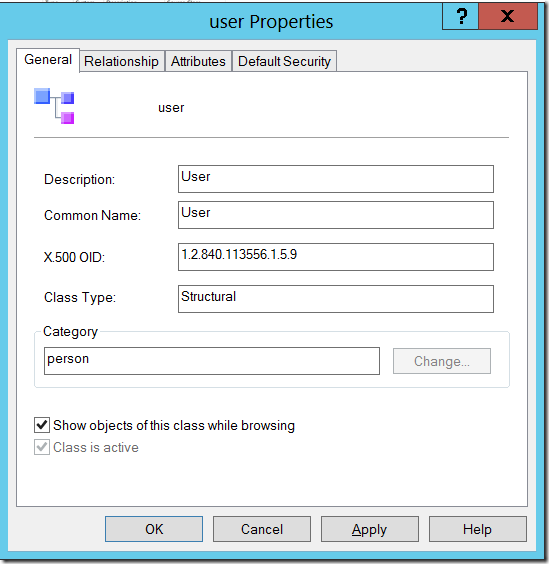
Properties popup will appear like this.

image

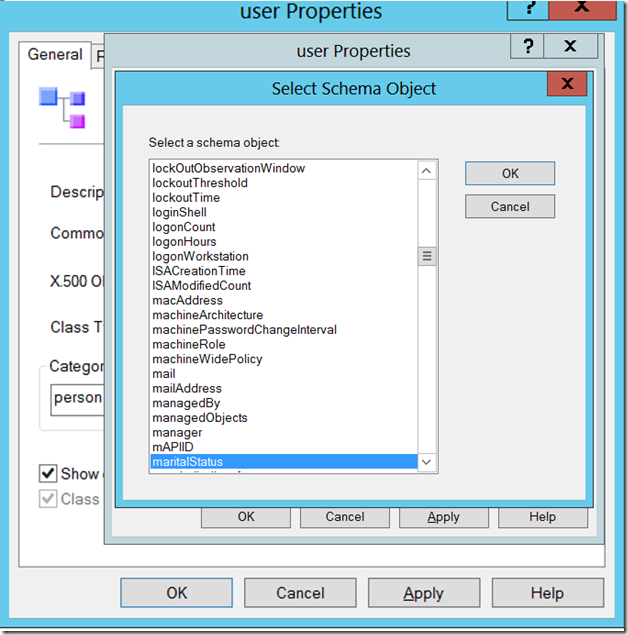
Go to the Attributes Tab and Click Add.

Select the Attribute which we added and click OK.

image

Apply and OK.

Now we added our Attribute to the Users Class.

Restarting Active Directory Domain Services

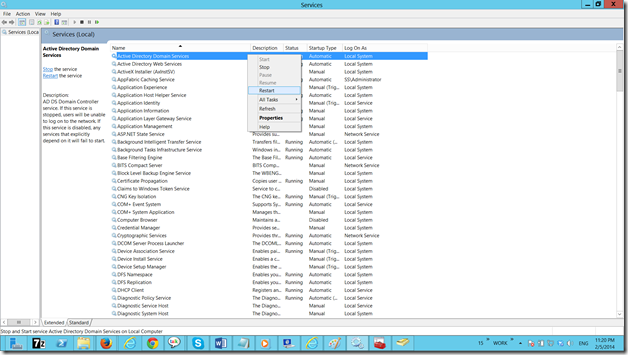
The last step is, we need to restart the Active Directory Domain Services.

For that, go to Services.msc -> Select the Service -> Restart the Service.

image

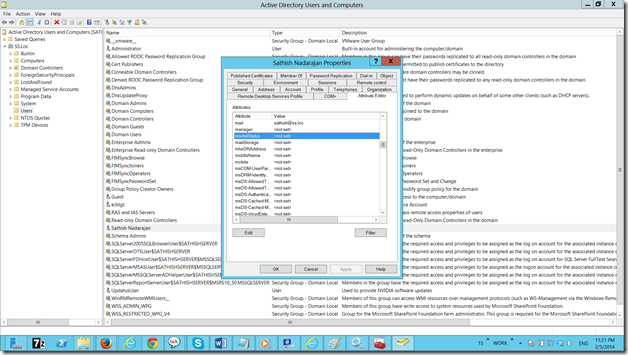
With this, we added our Custom Attribute to the Active Directory Users Attribute. If we go to the Active directory, Users, Attribute Editor, then we can see our Attribute is getting listed over there.

image

Let us see, how to use this Custom Attribute as a Claim to our SharePoint Site in future article.

Happy Coding.

Sathish Nadarajan.

Author Info

Sathish Nadarajan
 
Solution Architect
 
Rate this article
 
Sathish is a Microsoft MVP for SharePoint (Office Servers and Services) having 15+ years of experience in Microsoft Technologies. He holds a Masters Degree in Computer Aided Design and Business ...read more
 

Attributes Tab is missing in Active Directory User Properties on Windows Server 2012

Sathish Nadarajan
 
Solution Architect
January 12, 2014
 
Rate this article
 
Views
23597

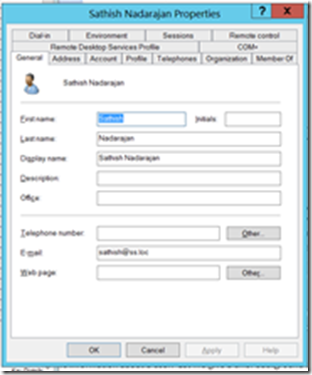
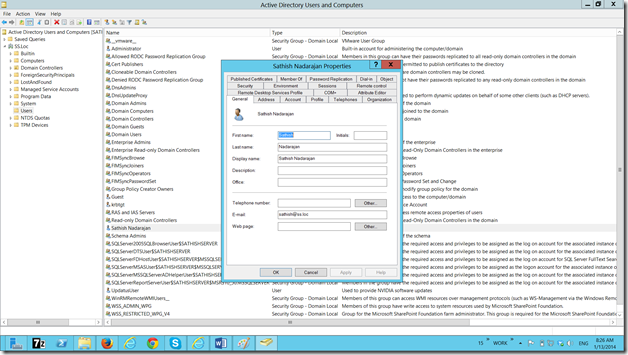
Somehow, accidentally I was trying to look on the properties of a user on Active Directory. Actually I was interested on looking at the Attributes associated with a user. Hence, I opened the Active Directory and selected a particular user. Select the properties. The properties popup came. But, I could not see the Attributes tab on it. The Properties Pane was like below.

Sometimes, we may require some additional attributes to be added on the Active Directory, irrespective of the default fields given by Microsoft. For example, an attribute called Marital Status may not be there by default. But, if a new employee joins our organization, we may gather those information and we want that information needs to be present on the SharePoint portal as well. In that case, it is always better to keep those information on the Active Directory itself. Hence, whenever a synchronization happens, it will fetch the information from the Active Directory itself. This will reduce the time as well as a manual intervention.

image

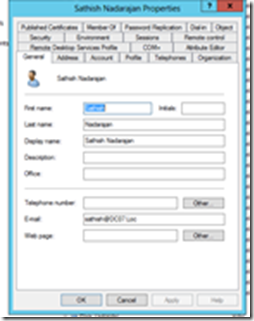
But, somehow, I was expecting something like

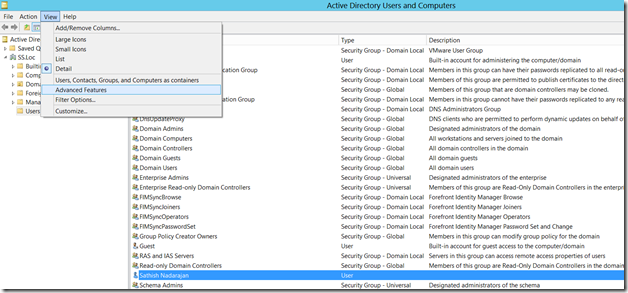
Initially I was panic about this and later came to a conclusion that, this could be something relevant to the View setting. Hence, I tried one by one with all the options on the View. Later as we suspected, there is a setting on the View only.

image

1. Go to View and Select Advanced Featuresimage


2. Now, we will be able to see all the properties.

image

Though it looks like very simple, this will definitely save some one’s one hour I guess.

Happy Coding.

Sathish Nadarajan.
Author Info

Sathish Nadarajan
 
Solution Architect
 
Rate this article
 
Sathish is a Microsoft MVP for SharePoint (Office Servers and Services) having 15+ years of experience in Microsoft Technologies. He holds a Masters Degree in Computer Aided Design and Business ...read more
 

Leave a comment