How to get Data from Excel to DataTable using ClosedXML in C# and avoid duplicate rows

Ahamed Fazil Buhari
 
Senior Developer
January 21, 2018
 
Rate this article
 
Views
31275

Hello everyone,

We had a requirement to read data from Excel and get it in your code. We utilized ClosedXML to achieve this functionality. ClosedXML is one of the useful dll which is used for accessing Excel, XML files and manipulate those files, to know more about ClosedXML – please refer this github. In this article we will see how to easily fetch data from Excel by column names.

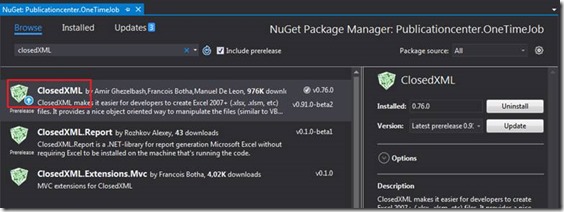
Add ClosedXML reference to your project, by going to Manage NuGet Package, as shown below.

clip_image002

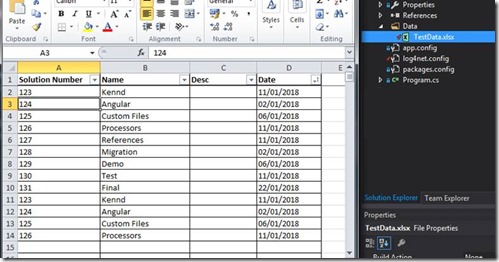
As you can see in the below screenshot, we have TestData Excel file in Data folder.

clip_image004

Initially we are getting data from Excel and querying the data based on column name and pass it to a List<string[]> then we are converting it to DataTable using a function ConvertListToDataTable based on your requirement.

 private void GetDataFromExcel()
         {
             var xmlFile = Path.Combine(Environment.CurrentDirectory, "Data\TestData.xlsx");
             using (var workBook = new XLWorkbook(xmlFile))
             {
                 var workSheet = workBook.Worksheet(1);
                 var firstRowUsed = workSheet.FirstRowUsed();
                 var firstPossibleAddress = workSheet.Row(firstRowUsed.RowNumber()).FirstCell().Address;
                 var lastPossibleAddress = workSheet.LastCellUsed().Address;
 
                 // Get a range with the remainder of the worksheet data (the range used)
                 var range = workSheet.Range(firstPossibleAddress, lastPossibleAddress).AsRange(); //.RangeUsed();
                 // Treat the range as a table (to be able to use the column names)
                 var table = range.AsTable();
 
                 //Specify what are all the Columns you need to get from Excel
                 var dataList = new List<string[]>
                 {
                     table.DataRange.Rows()
                         .Select(tableRow =>
                             tableRow.Field("Solution Number")
                                 .GetString())
                         .ToArray(),
                     table.DataRange.Rows()
                         .Select(tableRow => tableRow.Field("Name").GetString())
                         .ToArray(),
                     table.DataRange.Rows()
                     .Select(tableRow => tableRow.Field("Date").GetString())
                     .ToArray()
                 };
                 //Convert List to DataTable
                 var dataTable = ConvertListToDataTable(dataList);
                 //To get unique column values, to avoid duplication
                 var uniqueCols = dataTable.DefaultView.ToTable(true, "Solution Number");
 
                 //Remove Empty Rows or any specify rows as per your requirement
                 for (var i = uniqueCols.Rows.Count - 1; i >= 0; i--)
                 {
                     var dr = uniqueCols.Rows[i];
                     if (dr != null && ((string)dr["Solution Number"] == "None" || (string)dr["Title"] == ""))
                         dr.Delete();
                 }
                 Console.WriteLine("Total number of unique solution number in Excel : " + uniqueCols.Rows.Count);
             }
         }
 
 
         private static DataTable ConvertListToDataTable(IReadOnlyList<string[]> list)
         {
             var table = new DataTable("CustomTable");
             var rows = list.Select(array => array.Length).Concat(new[] { 0 }).Max();
 
             table.Columns.Add("Solution Number");
             table.Columns.Add("Name");
             table.Columns.Add("Date");
 
             for (var j = 0; j < rows; j++)
             {
                 var row = table.NewRow();
                 row["Solution Number"] = list[0][j];
                 row["Name"] = list[1][j];
                 row["Date"] = list[2][j];
                 table.Rows.Add(row);
             }
             return table;
         }
 

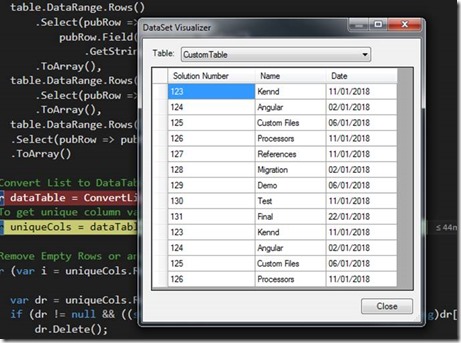
In the below screenshot you can find all the data in the DataTable.

clip_image006

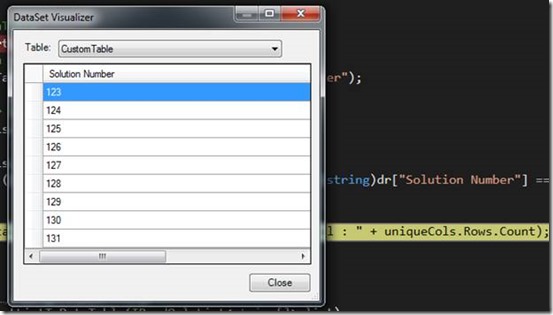
UniqueCols holds the unique rows in ‘Solution Number’ column,

clip_image008

The reason for getting unique value is that, you can query main DataTable by using this unique value so that you can get all the rows with this particular value.

I hope this article is helpful for you. Thank you for reading


Happy Coding

Ahamed
Author Info

Ahamed Fazil Buhari
 
Senior Developer
 
Rate this article
 
Ahamed is a Senior Developer and he has very good experience in the field of Microsoft Technologies, especially SharePoint, Azure, M365, SPFx, .NET and client side scripting - JavaScript, TypeScript, ...read more
 

How to visualize Access 2013 web app data in Excel

Sriram Varadarajan
 
Solution Architect
March 31, 2017
 
Rate this article
 
Views
1941

Issue Description: The expectation is to consume the Access Web App data inside excel to get some report out of it. But, this may not work for everyone as it needs some network configuration in place to consume this data.

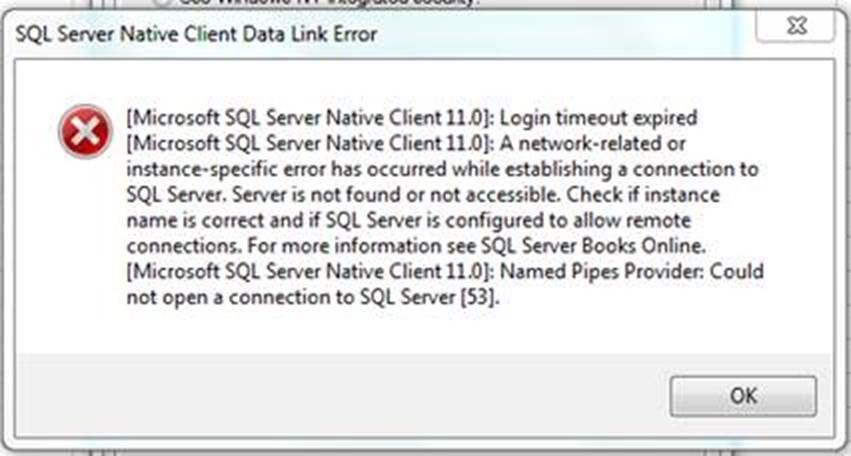
When you try connecting to from Excel, you might end up seeing this error

clip_image002

One of the reason for this might be port 1433 being blocked by firewall.

Resolution:

We could open the Access Web app in the Access client and set “From Any Location” under the connection properties. Once we do that, we could create the connection successfully and get the data.


Additionally, another error may likely be the result of port 1433 being blocked by a firewall rule.


To check this, you can do the following:


1. Open and Administrative command prompt.

2. Type the following:


C:\> ping <myserver>.database.windows.net


3. You would receive 4 “Request timed out” messages.

4. At the end of these messages, you would see that your server name resolved to an IP address.

5. We need this IP address for the next step


6. Now type the following to see if there are any firewalls/routers blocking traffic to port 1433.


C:\>telnet <IP Address> 1433


If Telnet is successful, the window will change to a completely blank screen. If it fails, you will see an error saying it is unable to connect.

Category : Office 365, SharePoint

Author Info

Sriram Varadarajan
 
Solution Architect
 
Rate this article
 
Sriram is a Technology Evangelist with 15+ years experience in Microsoft Technologies. He is an enterprise architect working for large pharmaceutical organization which has presence globally with largest Microsoft implementation ...read more
 

Steps to Configure Excel Services With Secure Store Target Application and SQL Database Service Account In SharePoint 2013

Ahamed Fazil Buhari
 
Senior Developer
December 27, 2016
 
Rate this article
 
Views
4670

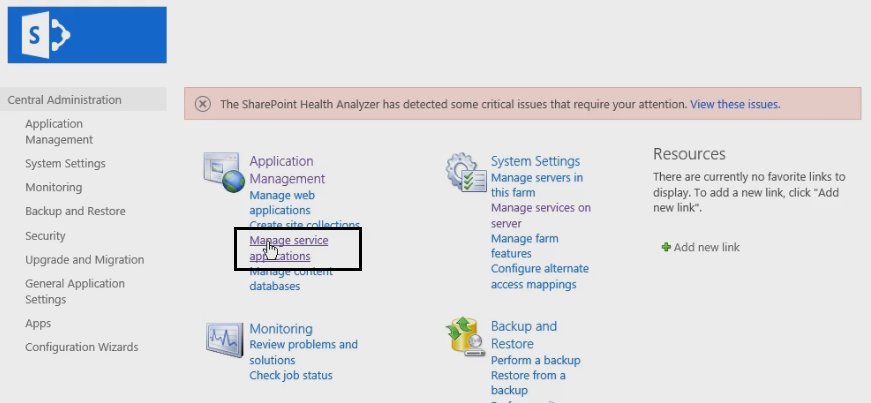
This is the continuation of my previous article “How to Create a New Target Application in Secure Store Service – SharePoint 2013”. Alright, now in this article we’re going to go ahead and take that Target Application which we created earlier and assign it to Excel Services. Below you can find step by step approach to achieve this.

Step 1: Go to Central Administration -> Manage service application.

image

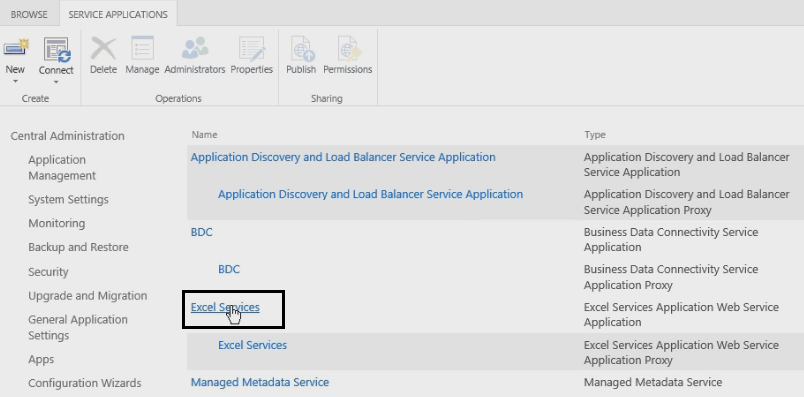
Step 2: Click on Excel Services in ServiceApplications.aspx page.

image

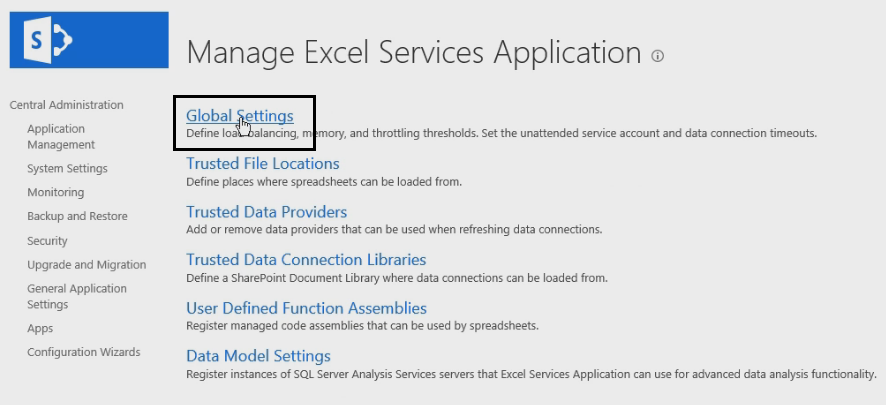
Step 3: In Manage Excel Services Application page, go to Global Settings.

image


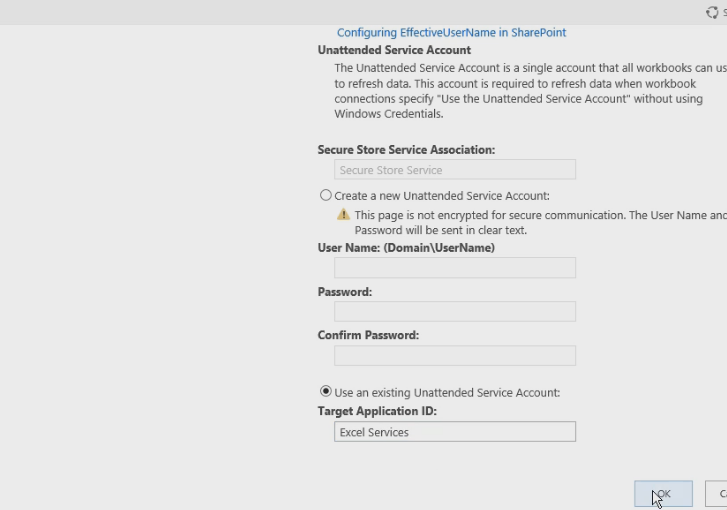
Step 4: Under Global Settings you can find lots of things in that. Now scroll down and go to the bottom of the page to the Unattended Service Account and we can create a new unattended service account or we can use the existing unattended service account.

Here, we’re going to use existing unattended service account option and provide the Target Application ID, (To know how to create the Target Application ID, then refer my previous article “How to Create a New Target Application in Secure Store Service – SharePoint 2013”) and click on OK.

image

Now Excel Services has that Target Application to use. Anytime the Excel Services tries to reach out to our SQL, then it will use those credentials provided in Target Application.

Still we need to go ahead and tell the SQL to allow that account to have various access like read/write and whatever we want in data.

Add Service Account Login to SQL Database

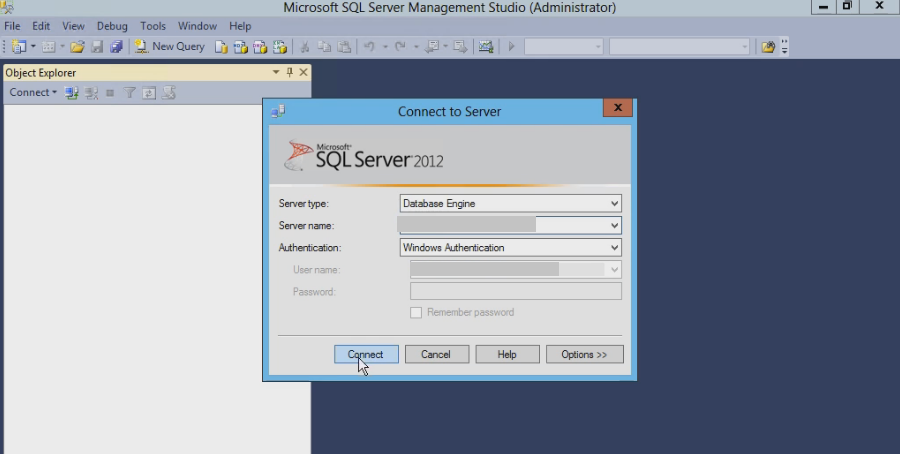
Step 1: Open SQL Server Management Studio.

image


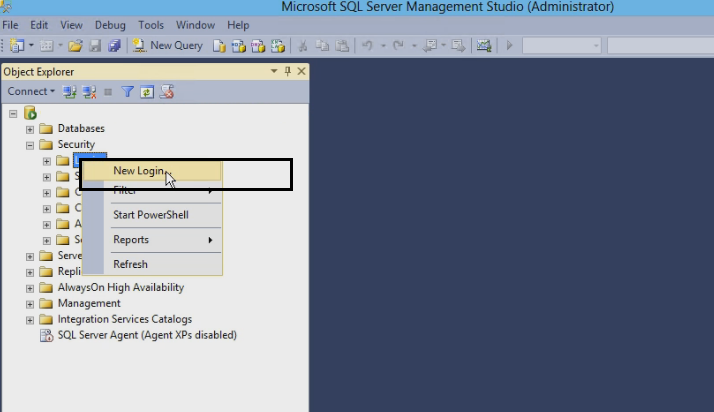
Step 2: Go to Security -> Logins and right click on it and choose New Login.

image

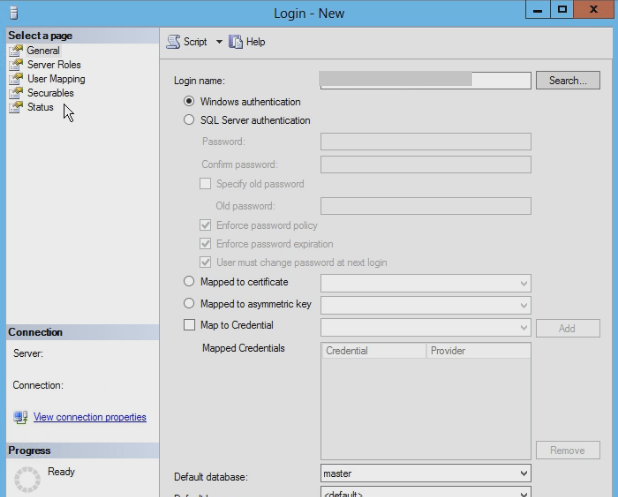
Step 3: Here we’re going to use Windows authentication and provide the account name which we need to give access.

image

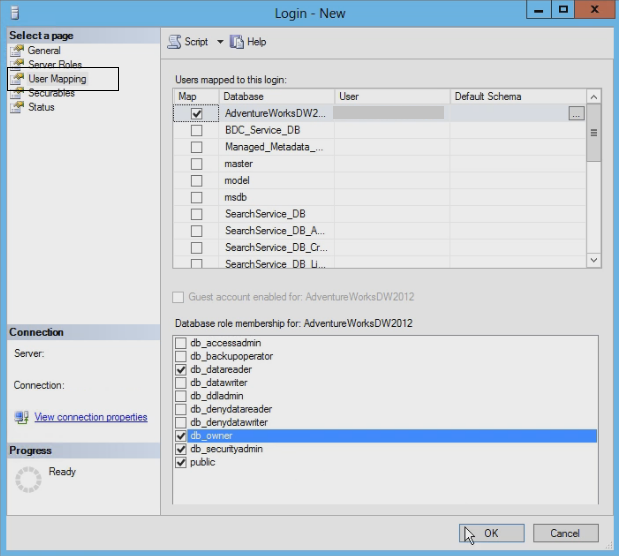
Step 4: Click on User Mapping in left navigation and map it to the database which want to access. And also provide the access to the roles like db_datareader, public, db_securityadmin, db_owner and click on OK.

image


That is all we need to do for our Target Application to have access to our database.


Happy Coding

Ahamed
Category : Office 365, SharePoint

Author Info

Ahamed Fazil Buhari
 
Senior Developer
 
Rate this article
 
Ahamed is a Senior Developer and he has very good experience in the field of Microsoft Technologies, especially SharePoint, Azure, M365, SPFx, .NET and client side scripting - JavaScript, TypeScript, ...read more
 

How to Create a New Target Application in Secure Store Service – SharePoint 2013

Ahamed Fazil Buhari
 
Senior Developer
December 23, 2016
 
Rate this article
 
Views
6518

Target Application is what SharePoint is going to use to reach out to data (external data such as data from SQL server, other business application or any other resource). Instead of providing direct access permission to external data for SharePoint users, data is served to users based on credentials that are stored in the respective target application. This article explains the steps required for creating a Target Application ( for Excel Services to fetch data from SQL server, which would be explained in next article).

Follow the below steps to create a new target application, (To configure Secure Store Service, please refer my other article here)

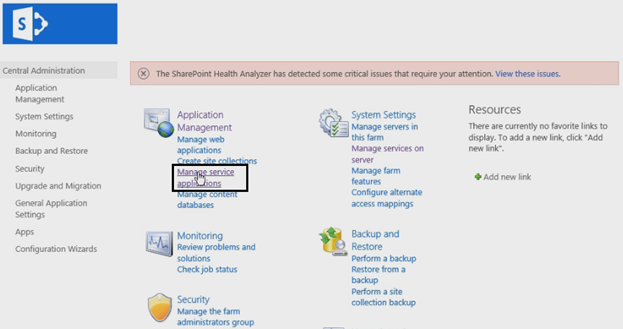
1. Go to Central Administration and click on Manage Service Applications.

image

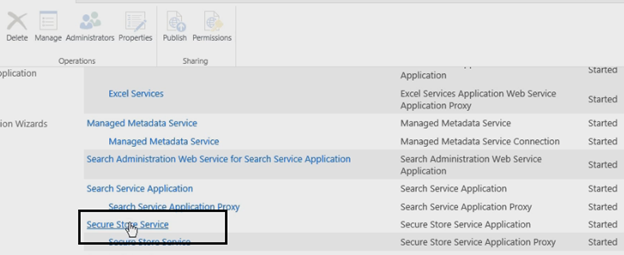
2. Select Secure Store Service and it will open the Secure Store Application service page.

image

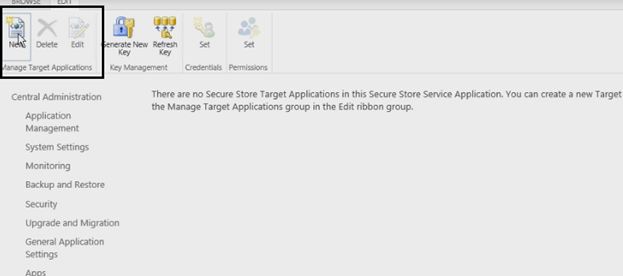
3. Now we are going to create our New Target Application, by clicking on New on the top ribbon.

image

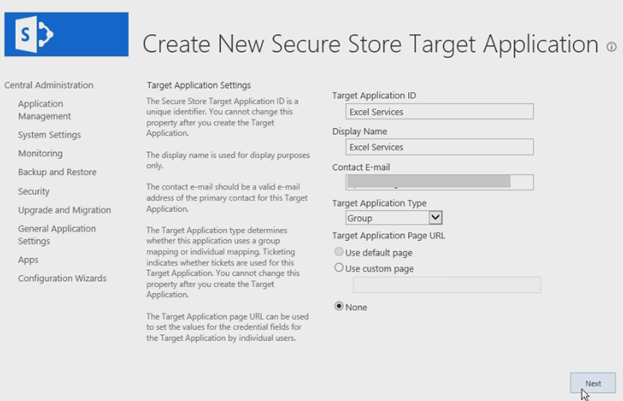
4. In ‘Create New Secure Store Target Application’ page, provide the Target Application ID, Display Name, and Contact E-mail.

There are 6 type Target Application Type (Individual Ticket, Individual Restricted, Individual, Group Ticket, Group Restricted, Group) please refer this msdn site to know more about Target Application Type.

To make things simple, just think of Individual (Individual means we are going to map each individual user to the Target application) and Group (Group allows us to go ahead and map an entire group at one time.) with Group I can use ‘Everyone’ in our Active Directory or I can simply use Security Group.

image

5. In next window, we will be navigated to give Field Names and Field Types. Here I used only Window user name and password for Field Name.

image

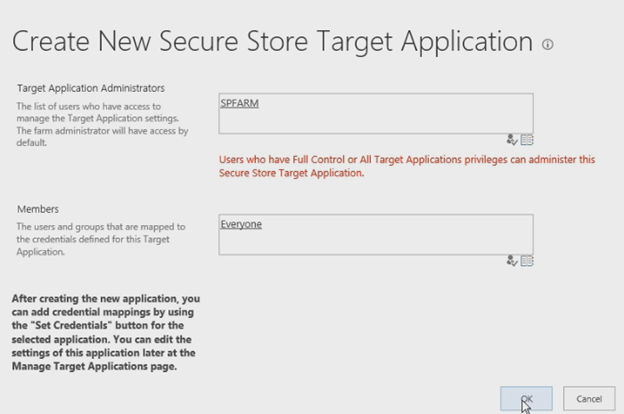
6. In this step we have to create an Administrator for Target Application (I have used farm account or you can use separate service account if you have to) and in Members field I’ve give Everyone from Security Group in Active Directory. Click OK

image

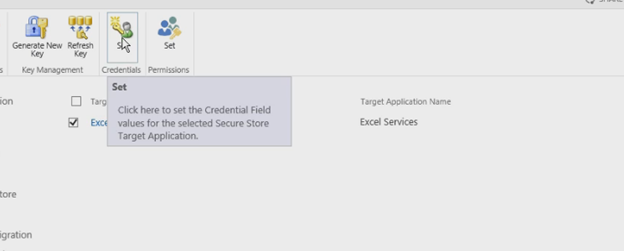
7. Now we have created our New Target Application, but still we need to set those credentials. To set credentials select Target Application and select Set from top ribbon

image

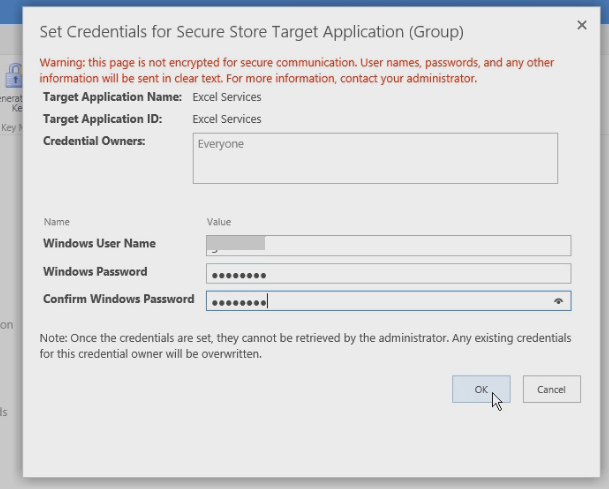
8. Here I used a service account that I’ve already put in Active Directory to set the credentials.

image

Now our Target Application is completed and we can go ahead and give this to Excel Services to use. You can see that in my next article. Thank you for reading.

Happy Coding

Ahamed
Category : Office 365, SharePoint

Author Info

Ahamed Fazil Buhari
 
Senior Developer
 
Rate this article
 
Ahamed is a Senior Developer and he has very good experience in the field of Microsoft Technologies, especially SharePoint, Azure, M365, SPFx, .NET and client side scripting - JavaScript, TypeScript, ...read more
 

How to migrate the test cases from an excel to TFS

Tarun Kumar Chatterjee
 
Net – Technology Specialist
February 26, 2016
 
Rate this article
 
Views
18385

In one of my project requirement it was said to upload all the test cases to TFS, I had an excel version. After doing a round of research found a way out of using a free 3rd party tool to achieve the requirement & the tool named is “Test Case Migrator Plus”. Thought of sharing with you if it helps anyone.

I downloaded the exe from: https://tcmimport.codeplex.com/releases/

Let’s see the steps to import the test cases from excel to TFS

Open the TFS and create a folder (not necessary) where you want to upload the test cases (for e.g.Test Plan)

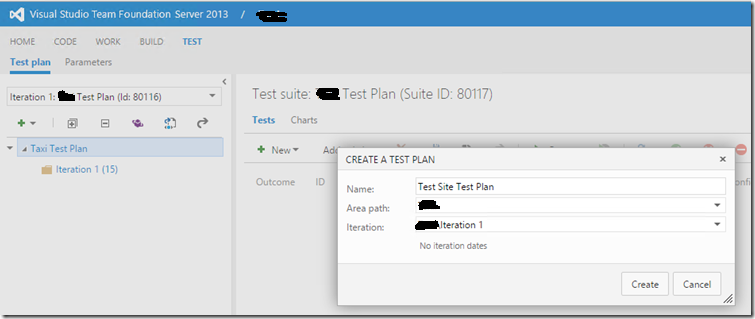
Add a test plan named as “Test Site Test Plan”

clip_image001

Here is the dummy specie of test cases excel sheet I used.

clip_image003

One important field is ‘Path’ which will contain the folder name (or Test Plan name) and the other is ‘Date’.

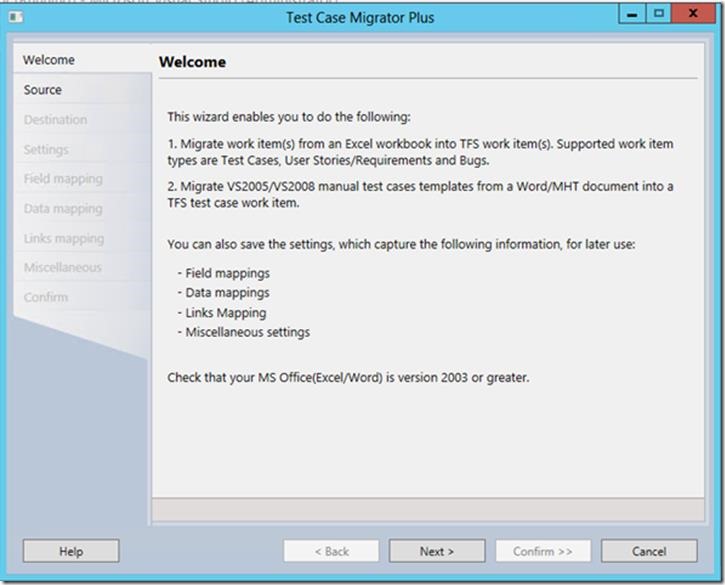
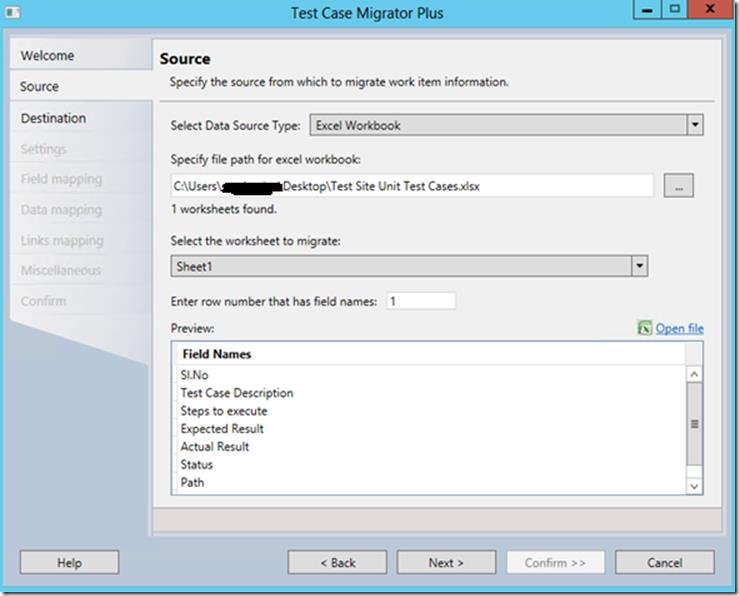
Now in Test Case Migrator Tool and click on next.

clip_image005

Select the test case excel & next.

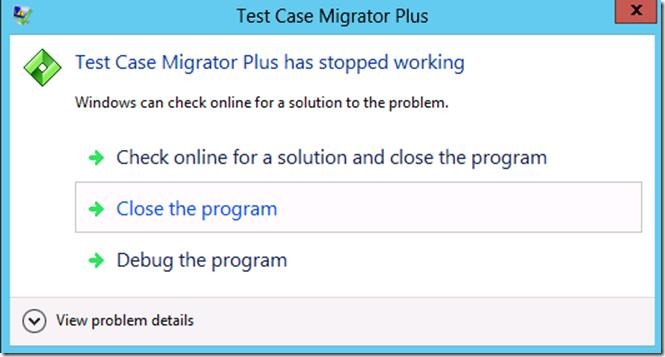
Directly downloaded “TestCaseMigrationPlus” software also was not working in our case, it was throwing below error:
clip_image007

Now as a solution what I did:

Downloaded the source code and apply the patches from: https://tcmimport.codeplex.com/SourceControl/list/patches. Rebuild the application and then import the excel again.
clip_image009

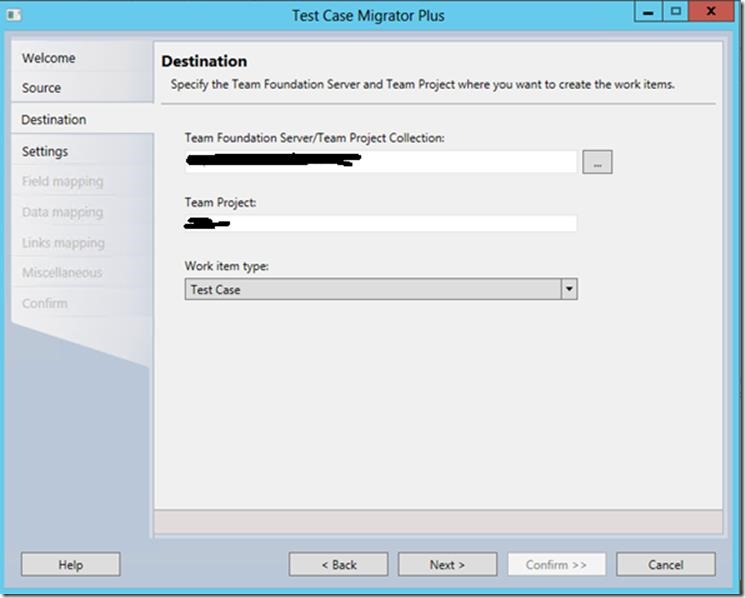
Click on next and confirm at the end and test cases would be uploaded at the TFS URL where you want it.

clip_image011

Click on next.

clip_image013

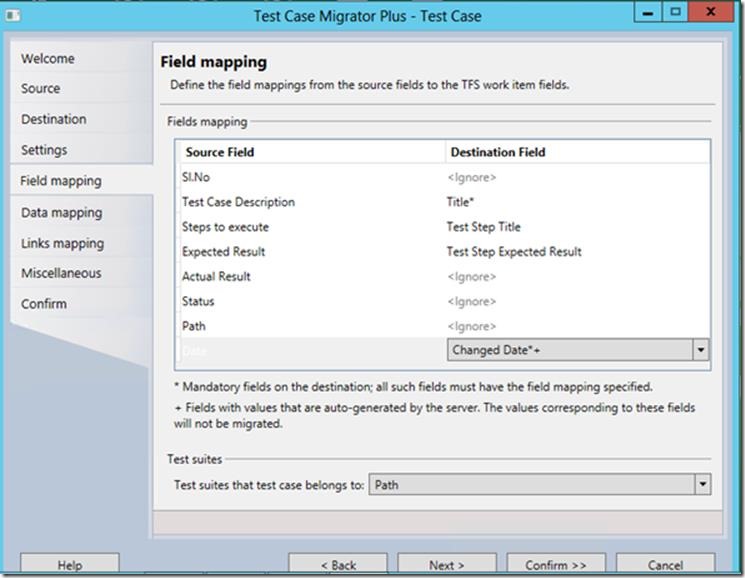
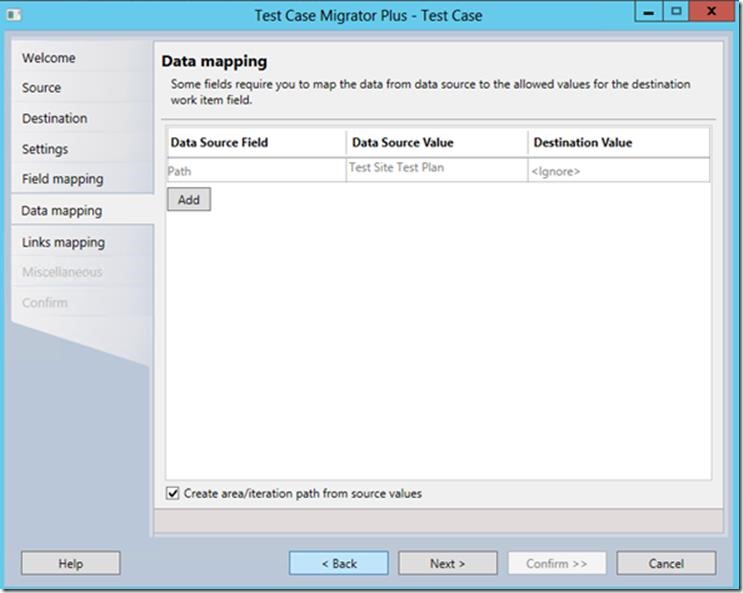
Now mapped the fields accordingly. Please note that it’s not necessary to mapped all the fields but make sure that you mapped the mandatory fields (Title & Changed Date). Also, need to select Test suits as “Path”. You can refer the below screen shot for reference.

clip_image015

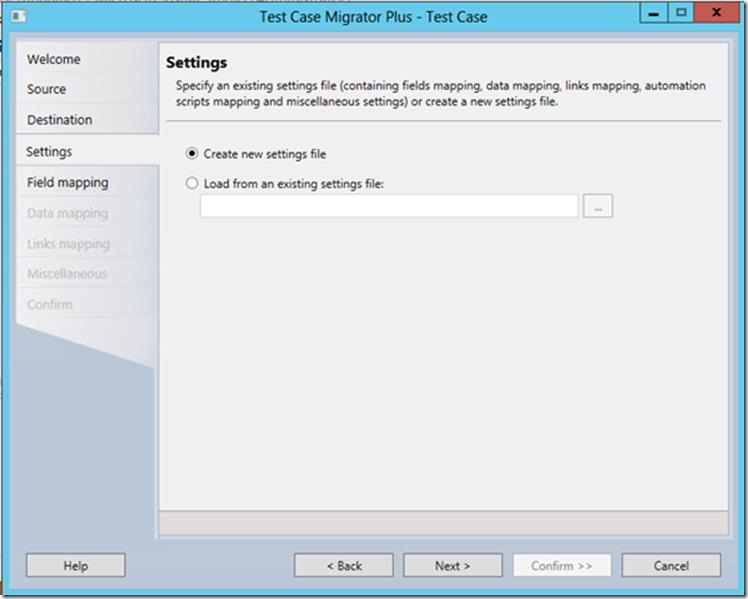
Click on next.

clip_image017

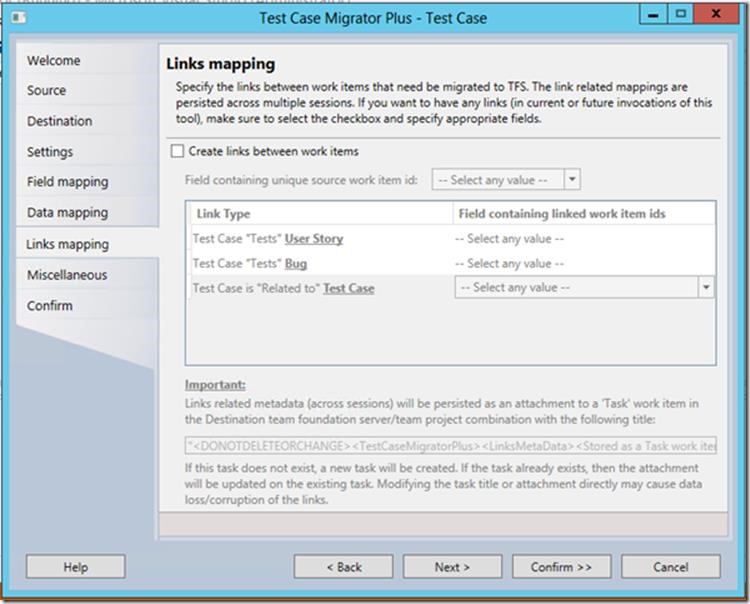
Click on next & unselect Create links between work items.

clip_image019

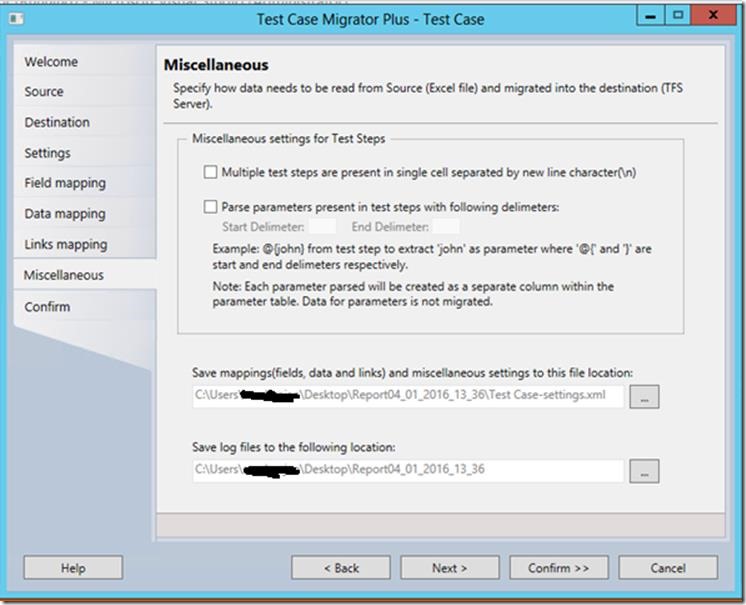
Click on next.

clip_image021

Click on next.

clip_image023

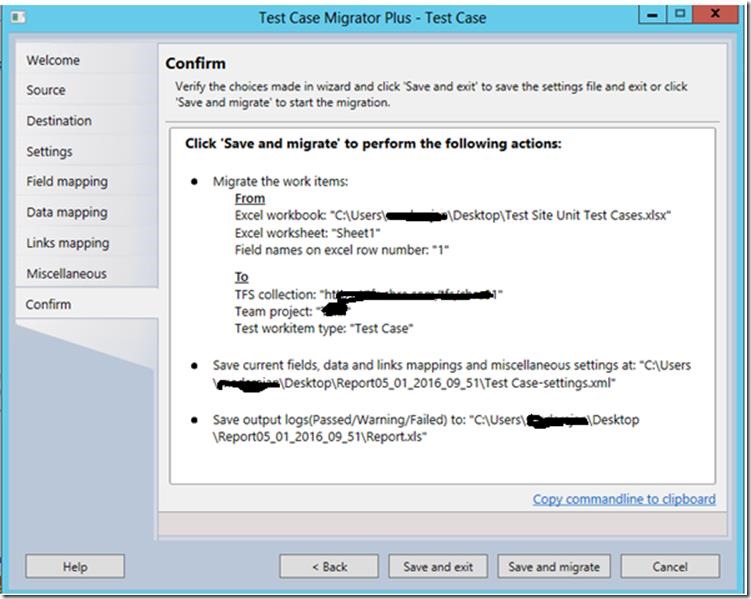
Click on Save and migrate.

clip_image025

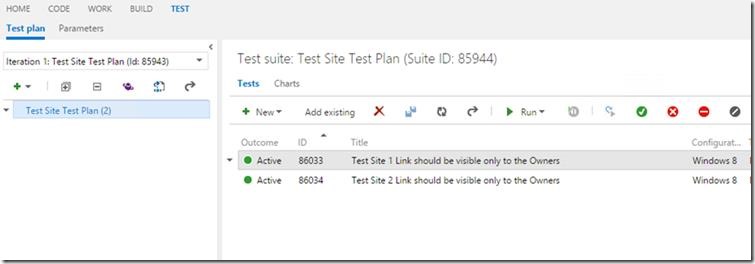
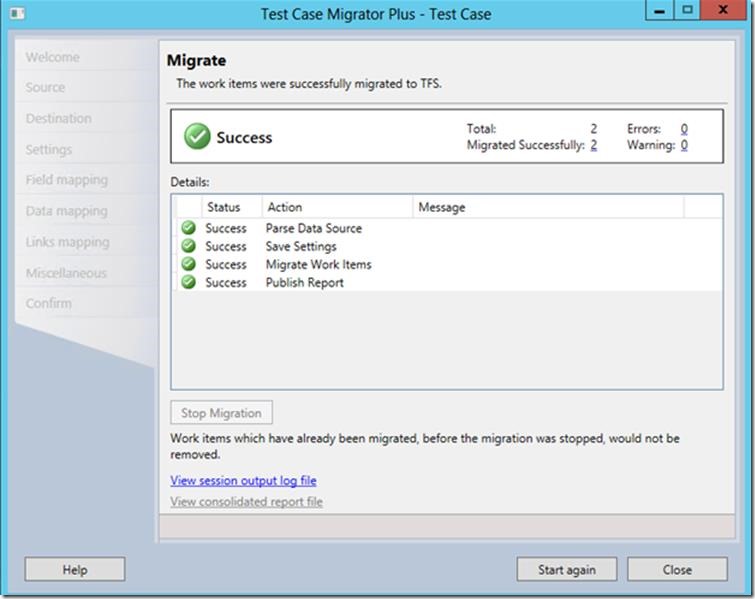
Refresh the TFS link, the test cases will be imported to TFS successfully.

clip_image027

Open any one of the test case & check if the Action & expected result showing the data properly.

clip_image029

To run the test case you will have to right click on test case & run. To make it Pass you will have to select the test case & click on the “Pass test” button.

clip_image031

Hence go to the TFS and check that test cases are uploaded or not. On successful upload repeat the same process for other test cases.


Happy Coding

Tarun Kumar Chatterjee

Category : .Net

Author Info

Tarun Kumar Chatterjee
 
Net – Technology Specialist
 
Rate this article
 
Tarun has been working in IT Industry for over 12+ years. He holds a B-tech degree. He is passionate about learning and sharing the tricks and tips in Azure, .Net ...read more
 

How to remove some elements within the Div using JQuery

Sathish Nadarajan
 
Solution Architect
August 17, 2015
 
Rate this article
 
Views
13333

In the previous article, we saw how to export the data into Excel using Javascript. At that time, I faced some issues like, while exporting, the HTML contains some unwanted Image Tags, Anchor Tags etc., So before writing them on the Excel, I need to remove all those elements.

This can be done in two ways. Either we can manipulate the HTML string and using some regex, we can remove the unwanted elements. Or else, we can go with JQuery to get the corresponding Elements and using the remove() method.

The syntax is very straight forward.

 $(‘#MyDiv img’).map(function(){
 $(this).remove();
 });
 

The above syntax will remove all the images within the Div “MyDiv”. In the same manner, we can remove all the unwanted Elements.

Though it looks very small, this will definitely save at least an hour of effort.


Happy Coding,

Sathish Nadarajan.

Author Info

Sathish Nadarajan
 
Solution Architect
 
Rate this article
 
Sathish is a Microsoft MVP for SharePoint (Office Servers and Services) having 15+ years of experience in Microsoft Technologies. He holds a Masters Degree in Computer Aided Design and Business ...read more
 

How to Export a HTML Table to Excel using Javascript

Sathish Nadarajan
 
Solution Architect
August 16, 2015
 
Rate this article
 
Views
41430

In the recent SharePoint development changes, I noticed that, most of the customers are moving towards the Client side development. Especially the CSOM and the JSOM. In the same manner, I met with an interesting requirement like, I need to export a HTML table like structure to Export using the Javascript. As I mentioned earlier, nobody wants C# to be written nowadays.

So let us see, how it is going to be.

I have a button like this.

 <button id="btnExport" onclick="fnExcelReport();"> EXPORT </button>

On Click of that button, let me call a method called fnExcelReport().

 function fnExcelReport()
         {
               var tab_text="<table border='2px'><tr bgcolor='#87AFC6'>";
               var textRange; var j=0;
               tab = document.getElementById('{818AAD80-3CAD-48C6-AABA-D0A225A4D08F}-{70352EC0-82B2-4175-98A2-84A9B95003BA}'); // id of table
 
               for(j = 0 ; j < tab.rows.length ; j++) 
               {     
                     tab_text=tab_text+tab.rows[j].innerHTML+"</tr>";
                     //tab_text=tab_text+"</tr>";
               }
 
               tab_text=tab_text+"</table>";
  
 
               var ua = window.navigator.userAgent;
               var msie = ua.indexOf("MSIE "); 
 
               if (msie > 0 || !!navigator.userAgent.match(/Trident.*rv:11./))      // If Internet Explorer
               {
                  txtArea1.document.open("txt/html","replace");
                  txtArea1.document.write(tab_text);
                  txtArea1.document.close();
                  txtArea1.focus(); 
                  sa=txtArea1.document.execCommand("SaveAs",true,"Global View Task.xls");
               }  
               else //other browser not tested on IE 11
                  sa = window.open('data:application/vnd.ms-excel,' + encodeURIComponent(tab_text));  
                 return (sa);
         }
 

Before that, I need to keep a hidden Iframe anywhere on the document. This requires only for the Internet Explorer. The other browsers don’t require this. Because, the lengthy content cannot be rendered in the IE.

The hidden Iframe is like

 <iframe id="txtArea1" style="display:none"></iframe>


Happy Coding,

Sathish Nadarajan.

Category : JavaScript, SharePoint

Author Info

Sathish Nadarajan
 
Solution Architect
 
Rate this article
 
Sathish is a Microsoft MVP for SharePoint (Office Servers and Services) having 15+ years of experience in Microsoft Technologies. He holds a Masters Degree in Computer Aided Design and Business ...read more
 

Sync Excel with SharePoint list for Bulk Insert & Update Records.

Arunraj Venugopal
 
SharePoint Developer
March 30, 2015
 
Rate this article
 
Views
45746

By default, Sync excel with Sharepoint list was available with the previous version of excel, but the synch feature is not existing in the excel 2010 version onwards for which in Google, add one synchronization reference should be uploaded in the excel file which is not working.

When we export the sharepoint list into excel, the synchronization option will not be available in the right click properties for which the below macro to be added and executed to get the desire sharepoint list and sync option in the right click properties.

Let us look at the steps to synch excel with sharepoint list.

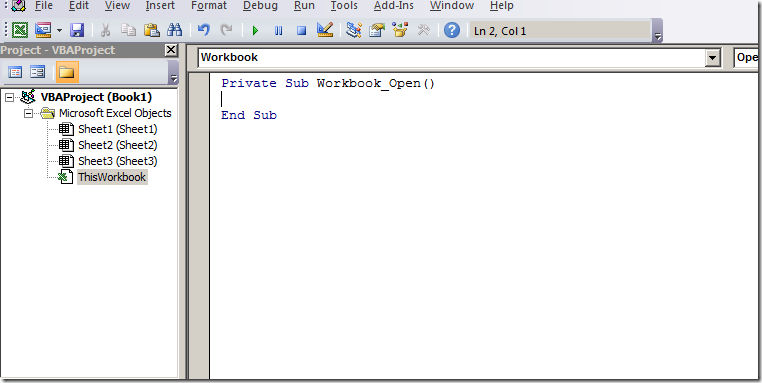
1. Open an excel file and press Alt +F11. Select Workbook from the list.

clip_image001

2. Following macro to be added in the workbook open method

 Dim ws  As worksheet
 Set ws =thisworkbook.worksheets(1)
 Dim src(1) As Variant
 Src(0) = http://contoso.com/sites/Sitename/Experiments”  & ”/_vi_bin”
 Src(1) =”D28c1csD-F969-47C1-9C0C-61CAEB57C26A” (List Id)
 If ws.listObjects.count = 0 then
 	Ws.ListObjects.Add xlSrcExternal, src,True,xlYes, ws.Range(“A1”)
 Else
   Set ObjListObj=ws.ListObjects(1)
 ObjListObj.Refresh
 End if 
 

The macro will fetch data from the list “Test” in the SharePoint site “experiments” and insert into the excel sheet 1.

3. Go to SharePoint site and the list which has to be sync with excel file. Click Export to Excel

clip_image003

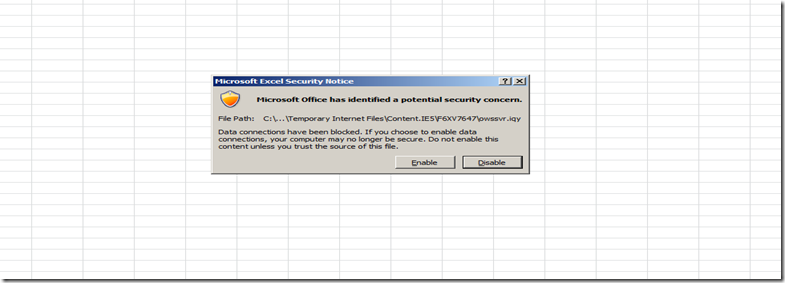
4. Click Enable button

clip_image005

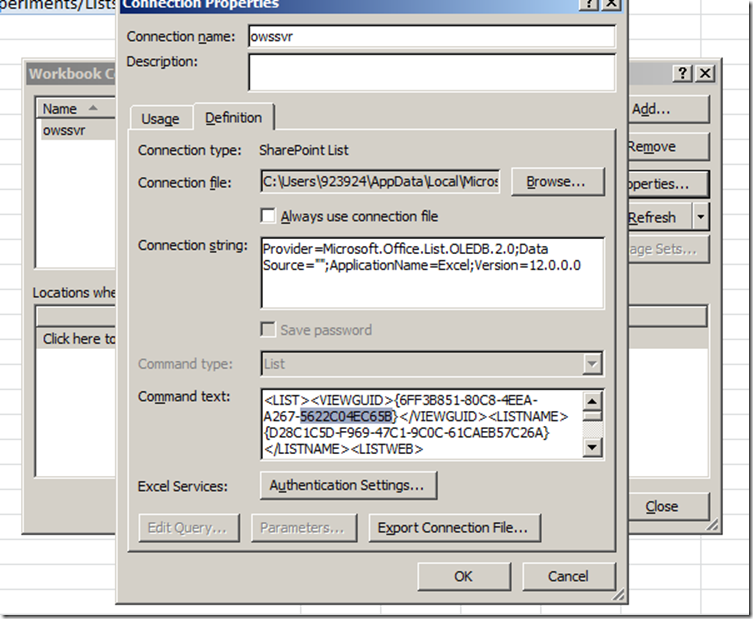
5. Click Data -> Connection->Properties

clip_image007

6. Click Definition tab and copy the content in the Command Text field& close the excel file.clip_image009

7. The value for src(1) is <LISTNAME>{D28C1C5D-F969-47C1-9C0C-61CAEB57C26A}</LISTNAME>

8. The value for src(0) is <LISTWEB>http://Contoso.com/sites/SiteName/Subsite//_vti_bin</LISTWEB>

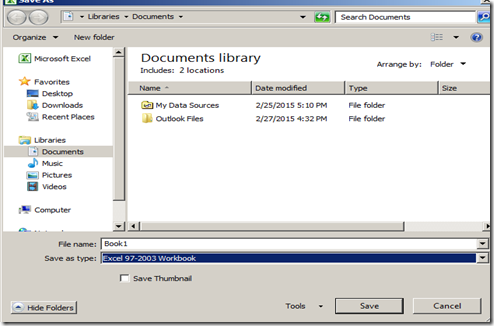
9. Save the excel file as Excel 97-2003 workbook

clip_image011.

10. Whenever the workbook is opened, the macro get executed and retrieved the SharePoint list into the excel sheet if the macro is enabled by default. Otherwise click enable macro at the top of the excel file.

11. Execute the Update method once the insert or update process is done. Or

Right click on the sheet in which the sharepoint list data retrieved from the SP and select Sync with sharepoint list. In this case, no need to use the below code..

clip_image013

12. Press F8 (line by line execution ) or F5 to execute the macro

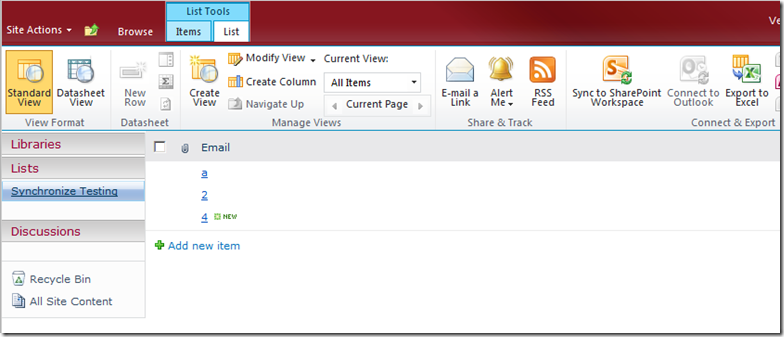
13. Refresh the SharePoint list to make sure that the insert / modify records are synchronized with the list

Category : SharePoint

Author Info

Arunraj Venugopal
 
SharePoint Developer
 
Rate this article
 
Works as a SharePoint Developer in a CMM Level 5 Company ...read more
 

Leave a comment