How to Update Nintex Workflow with No New Instances in SharePoint 2013 Using CSOM PowerShell Script

Sathish Nadarajan
 
Solution Architect
December 17, 2019
 
Rate this article
 
Views
933

After a long time, faced with a different scenario. The site collection has various lists and there are a lot of Nintex workflows associated to those lists. I was about to populate data for those lists using a backend mechanism, but don’t want those workflows to be triggered. Provided the Scenario, I don’t want to delete and attach the workflows again. Rather, there is an option called “No New instances” in the workflow properties. But, since we had many lists, can’t do this manually. Hence, came up with a script. Thought of sharing with the community.
When we do manually, we will go to the workflow settings of the list and click on the “Remove, Block or Restore a workflow”

Once, we click that, the next screen would be as below where we can toggle between the properties.

The below script will toggle this property.

Clear-Host

# Connects and Creates Context
Connect-PnPOnline https://SiteCollectionURL -CurrentCredentials

[System.Collections.ArrayList]$listsToUpdateWorkflowStatus = Get-PnPList | Where-Object {$_.Title.StartsWith('Our Lists Prefix') }

$ctx=Get-PnPContext

foreach ($list in $listsToUpdateWorkflowStatus)
{
     
        $ctx.load($list.WorkflowAssociations)
        $ctx.ExecuteQuery()
        $list.WorkflowAssociations
        $workflowAssociation = $list.WorkflowAssociations[0]
        # $workflowAssociation.DeleteObject()
        $workflowAssociation.Enabled = $false
        $workflowAssociation.Update()
        $list.Update()
        
        $ctx.ExecuteQuery()
     
}

Happy Coding,
Sathish Nadarajan.

Category : CSOM, PowerShell, SharePoint

Author Info

Sathish Nadarajan
 
Solution Architect
 
Rate this article
 
Sathish is a Microsoft MVP for SharePoint (Office Servers and Services) having 15+ years of experience in Microsoft Technologies. He holds a Masters Degree in Computer Aided Design and Business ...read more
 

Update My Site User Profile Picture of another User using Visual Studio Sequential Workflow in SharePoint 2010

Ahamed Fazil Buhari
 
Senior Developer
June 24, 2017
 
Rate this article
 
Views
2709

In my previous article – Update ‘My Site’ User Profile Picture of Any User Using SSOM In SharePoint, I covered updating User Profile Picture using Server Side Object Model and also I mentioned the limitations in that approach (If we want to update other user’s Profile picture, then the currently logged in user should be User Profile Service Application Administrator).

In this article, we are going to achieve the same functionality i.e., Update ‘My Site’ User Profile Picture of other users by any logged in user (doesn’t need to be User Profile Service Application Administrator). This can be done using Visual Studio Workflow. Two things are needed here, one is Picture Library and second thing is Visual Studio Sequential Workflow

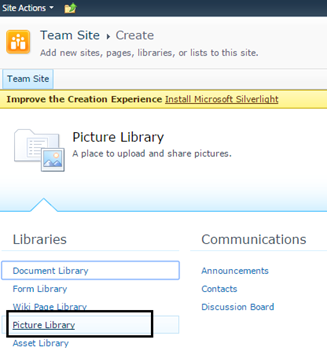
Step 1: Create a Picture Library in your SharePoint site where you want to upload the profile pictures,

image

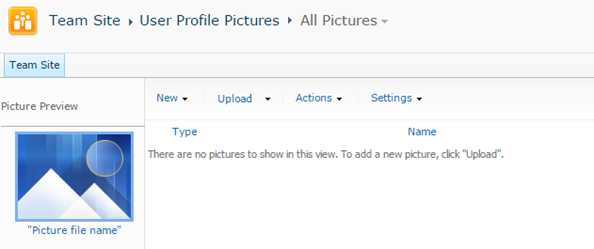
We can use this Picture Library to store the pictures of users.

image

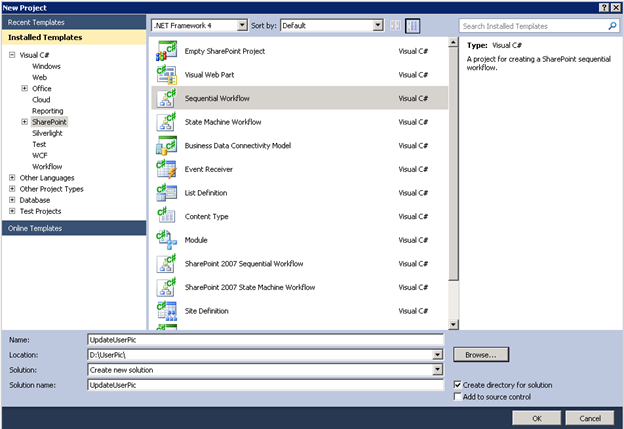
Step 2: Open Visual Studio, Create New Project -> Select Sequential Workflow as shown below,

image

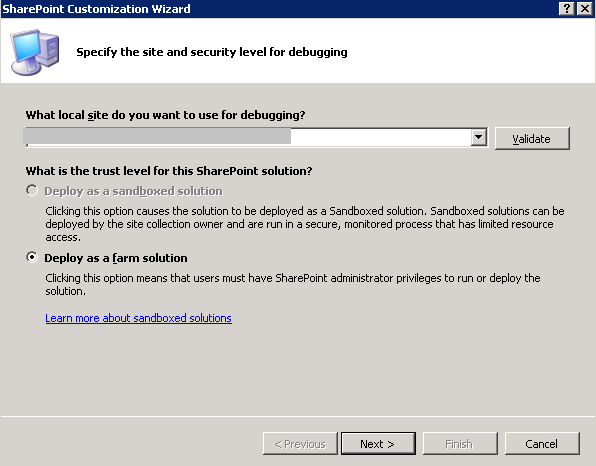
Step 3: Enter the URL of the site and click on Next.

image

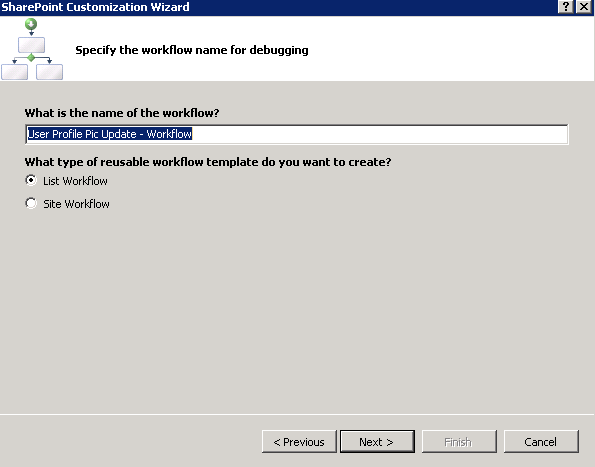
Step 4: Give name to the workflow and select type as List Workflow.

image

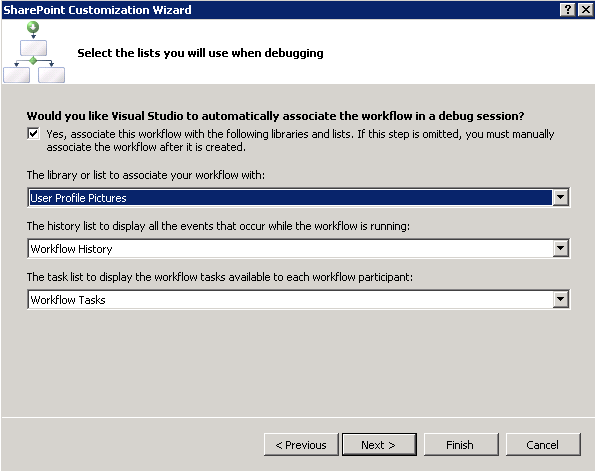
Step 5: Associate the Picture Library which we created in Step 1.

image

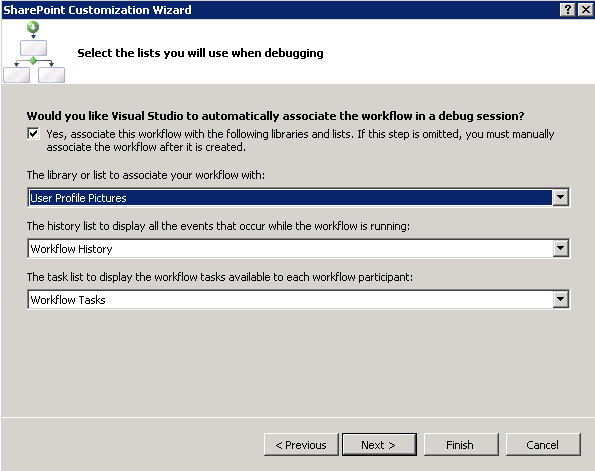
Step 6: Select the check boxes based on your requirement.

image

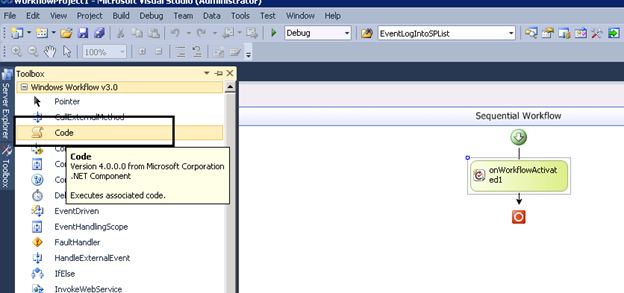
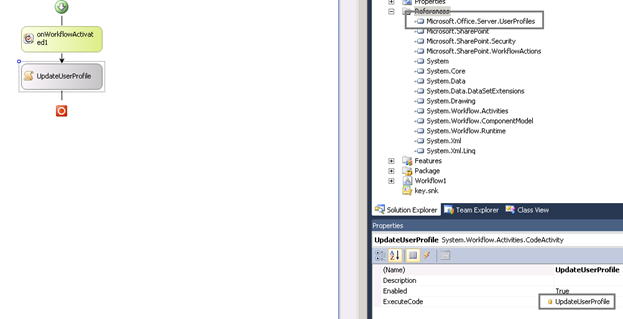
Step 7: Drag and drop the Code activity in your sequential workflow window under ‘onWorkflowActivated1’.

image

Step 8: Double click on the Code Activity and paste the below code. Add the Microsoft.Office.Server.UserProfiles references.

image

Add the below code, the code is self-explanatory with comments

————————x————————

 private void UpdateUserProfile(object sender, EventArgs e)
         {
             try
             {      
                 //Give your domain name, for example - abccompanyahamed
                 string domainName = "abccompany";
                 //Retrieving account name from picture File name, in my case picture name is ahamed.jpg 
                 string accName = Path.GetFileNameWithoutExtension(workflowProperties.Item["EncodedAbsUrl"].ToString());
                 SPUser targetUser = workflowProperties.Web.EnsureUser(domainName + "\" + accName);                             
 
                 if (targetUser != null)
                 {
                     string username = targetUser.LoginName.ToString();
 
                     if (!string.IsNullOrEmpty(username))
                     {                        
                         using (SPSite site = new SPSite(workflowProperties.SiteId))
                         {        
                             //Get Service Context
                             SPServiceContext context = SPServiceContext.GetContext(site);
                             //Create User Profile Manager obj from the context
                             UserProfileManager profileManager = new UserProfileManager(context);
                             //Get profie of the user by using his/her name
                             UserProfile profile = profileManager.GetUserProfile(username);  
                             //Check for Profile existance
                             if (profile != null)
                             {          
                                 //Update the PictureURL property of the selected User Profile.
                                 profile[PropertyConstants.PictureUrl].Value = workflowProperties.Item["EncodedAbsUrl"].ToString();
                                 profile.Commit();                                
                             }
                         }
                     }
                 }                
             }
             catch (Exception ex)
             {            
                 SPDiagnosticsService.Local.WriteTrace(0, new SPDiagnosticsCategory("User Profile Update", TraceSeverity.Unexpected, EventSeverity.Error), TraceSeverity.Unexpected, ex.Message, ex.StackTrace);
             }
 
         }
 

————————x————————

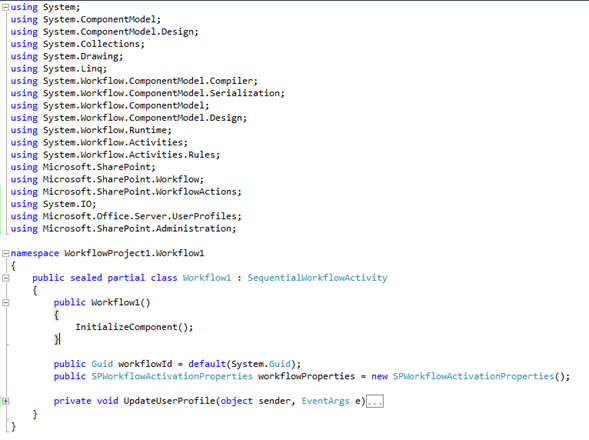
Overall, the .cs file looks like below screenshot,

image

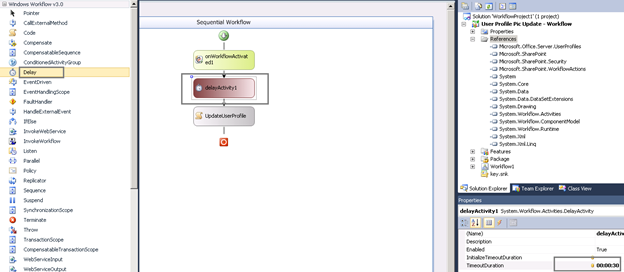
Sometimes, there might be a chance that it takes time to reach User Profile Property before workflow complete. To avoid this, add ‘delayActivitey’ and add the TimeoutDuratoin value to be 00:00:30 like this

image


Step 9: Build and Deploy the solution. Once it is deployed successfully, go to Picture Library created in Step 1 and upload the image (Image file name should be user name, example – ahamed.jpg)

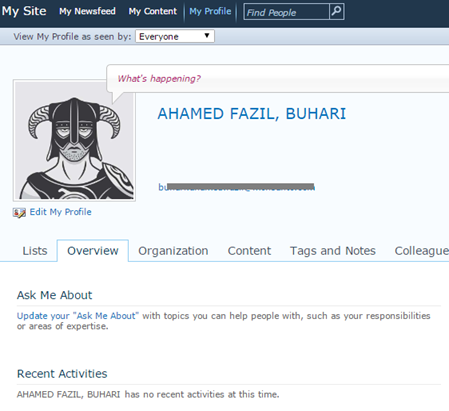
Sample My Site – My Profile

image

Note: Make sure My Site is up and running in your environment and the user profile page should be available prior to updating user profile picture.


Happy Coding

Ahamed

Author Info

Ahamed Fazil Buhari
 
Senior Developer
 
Rate this article
 
Ahamed is a Senior Developer and he has very good experience in the field of Microsoft Technologies, especially SharePoint, Azure, M365, SPFx, .NET and client side scripting - JavaScript, TypeScript, ...read more
 

Automate O365 Group creation using Graph Api from a Remote Service/Workflow App using OAuth 2.0 Client Credentials Flow

Senthil Kumaresan
 
SharePoint Consultant
October 20, 2016
 
Rate this article
 
Views
6563

I am writing this post from my experiences “As on Today” about the evergreen platforms O365 and Azure which may change in the future.

I had a situation where my organization was planning to avoid users from directly creating the O365 Groups as part of our O365 Governance Strategy.

So, we had planned to automate the creation of O365 groups using a workflow or service for our internal customers based on request and approval process.

Finally, I ended with the Idea of creating a remote workflow app to automate the O365 Group Creation.

The Content in the post is not specific to a workflow implementation and can be used in any remote app to create the O365 Groups.


A remote app which runs external to O365 can be any one of the below

1. Standalone Asp.net or client side app using frameworks like React or AngularJS.

2. Workflow running on an environment external to O365.

3. Console/background job running in a Non-Microsoft platform

O365 groups can be created using Graph Api. I hope this has been explained in numerous articles on how Graph Api it could be used to perform operations on most of O365 objects. (https://graph.microsoft.io).
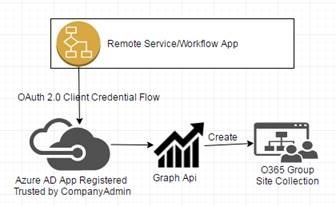
clip_image002

To create an O365 group or to perform any other operations using the Graph Api, you should register the remote app in the Azure AD connected to the O365 Portal and provide the required permissions for the remote app.

Below are the steps required to create an Office365 Group from a Remote App.

1. Register the APP in Azure AD

2. Get Company Administrator Authorization Consent for the App

3. Get Access Token using the App ID and App Secret

4. Create a O365 Group or perform operations using Graph Api with Authorization Token

Step 1: Register the App in Azure AD

To communicate with any of the Microsoft services such as Graph Api you may have to register an app in Azure AD.

Use any of the below link to Register the app in Azure AD connected to your O365 Portal. Sign in with your O365 account

https://apps.dev.microsoft.com – App Registration Portal

https://portal.azure.com – New Portal for Admins

https://manage.windowsazure.com – Classic Portal for Admins

1. From the App Registration Portal, Click on Register an App.

2. Provide a Name for your app

3. Note the Application ID of the App which will be used further.

4. Create an Application Secret by “Generate a new Password” button. Make sure you copy the Password and store it as you cannot retrieve once you move out of the screen. This secret will never expire and you can also generate a password if you would like it to expire a year or 2 from the Azure Portal.

5. Click on Add Platform to add “Web” Platform. Add a dummy Redirect URI which is not required for service app scenario.

6. Add the required permissions for the Microsoft Graph.

There are 2 types of permissions. Application and Delegated Permissions.

We only need to specify Application permissions as we are not going to have the code performing any operation on behalf of the user.

7. Selected Group.ReadWriteAll Application permissions for my app to create groups.

8. Save the Changes.

Understanding Grant Flows in OAuth 2.0

The key challenge here is to authenticate the Rest call from your remote app using OAuth without an O365 account.

Azure supports all 4 different access grant types in OAuth model for applications.

1. Authorization Code Grant Flow

For Apps (Native or Web Apps) that run-on servers and require user to be authenticated to create a O365 group and Apps that have outsourced the authentication to Azure AD can use Authorization Code Grant Flow.

2. Implicit Code Grant Flow

For Apps that are browser based like Single page applications built using Client Side Frameworks like AngularJS, ReactJs. This Require user to sign in to Azure and get the access token to further call Graph Api from the Browser.

3. Resource Owner Password Credentials Grant Flow

This can be used in a windows application/service which is on the Azure domain with or without user logged in. This is least used which allows resource owners to send their Username and password over http and opens a Potential Security Risk.

4. Client Credential Grant Flow

The Client Credential flow is primarily used when the remote app which works as background job/services without user intervention.

I chose the Client Credential flow as I planned to use a workflow to create the O365 group from my On-Prem SharePoint environment So, there will be no user authentication and no account will be used to perform the call to graph Api from the workflow.

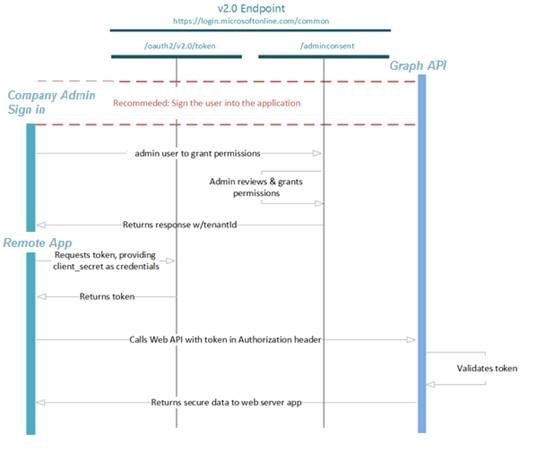
Client Credential Flow
clip_image004

Step 2: Get Company Administrator Authorization Consent for the App

Build the below URL and provide the URL to your company administrator of the Azure/O365 Portal.

https://login.microsoftonline.com/<TenantID/Common>/adminconsent?client_id=<Application ID>&state=12345&redirect_uri=<redirect_Uri>

In the above Url, replace the below values with the values you got while registering the application in Azure.

<TenantID/Common> – If you have a single tenant use the tenant Id of your O365 portal or if you have a multi-tenant specify “Common” instead of the tenant id.

<Application ID> – Use the App ID of the app you registered in the Azure Portal.

<redirect_Uri> – This is not required for Client Credentials flow. You can use the same dummy redirect Uri which was created during Azure App Registration. This is only used in Authorization Code Grant Flow and Implicit Grant Flow

The Company Administrator should authenticate to the URL to provide a one-time consent on granting the permissions required for the app to perform operations on the Azure/O365 tenant using the Graph Api.


Step 3. Request an Access token from OAuth Token Endpoint.

Once the consent is given by the company administrator, you can now use any of the Azure Active Directory Authentication Libraries(ADAL) depending upon the type of remote app you develop to authenticate against the Azure and perform the Graph Api operations. Please refer here for ADAL Libraries https://azure.microsoft.com/en-in/documentation/articles/active-directory-authentication-libraries/

Under the hood, these libraries Support all the 4 OAuth grant flows, from Requesting, Caching and managing the access tokens for your application to use. The ADAL libraries encapsulates the calls to the OAuth endpoints so developers do not need to worry about authorization, acquiring and managing access tokens

Since I used a Workflow, I could not use any of these ADAL libraries and had to make a direct call to these OAuth Token endpoint to acquire an access token.

An access token which is a Base64 Encoded string of a JWT (JSON Web Token) is required to be sent along with a HTTP call to the Graph Api as an Authorization Header to create the O365 group.

I had to perform a REST call to the OAuth Token Endpoint to get an access token

Build the Rest URL using the below format to get the access token.

 POST
 URL : 
 https://login.windows.net/<TenantID/Common>/oauth2/token
 
 Request Header : 
 Content-Type: application/x-www-form-urlencoded
 
 Request Body:
 grant_type=client_credentials
 &client_id=<App Id from App Registration>
 &client_secret=<App Secret from App Registration>
 &resource=https://graph.microsoft.com
 
 Response:
 { 
   "token_type": "Bearer",
   "expires_in": "3599",
   "scope": "User.Read",
   "expires_on": "1449685363",
   "not_before": "1449681463",
   "resource": "https://graph.microsoft.com",
   "access_token": "<access token>"
 }
 

Step 4: Create a O365 Group or perform operations using Graph Api with Access Token

Once you have the Access Token from the Response content of the previous request, you can create a O365 Group using the Graph Api from your remote/workflow app.

For Creating the O365 Group, you can refer the link here at Graph Api documentation(http://graph.microsoft.io/en-us/docs/api-reference/v1.0/api/group_post_groups)

 POST 
 Url:
 https://graph.microsoft.com/v1.0/groups
 
 Request Headers:
 Authorization: Bearer <access token>
 Content-type: application/json
 Content-length: 244
 
 Request Body:
 
 {
   "description": "My O365 Group,
   "displayName": "O365 Test Group",
   "groupTypes": [
     "Unified"
   ],
   "mailEnabled": true,
   "mailNickname": "O365TestGroup",
   "securityEnabled": false
 }
 

With that I conclude the topic of O365 group creation in an automated way from a Service or workflow app.

Author Info

Senthil Kumaresan
 
SharePoint Consultant
 
Rate this article
 
SharePoint Architect – Consulting on SharePoint Infrastructure, IT Governance and Apps Development. ...read more
 

Associating SharePoint 2013 Workflow to a SharePoint Online List and editing the XAML file

Sriram Varadarajan
 
Solution Architect
June 19, 2016
 
Rate this article
 
Views
10214

Though our major goal is to associate the Work Flow to a SharePoint Online List but the sub set of this would be to edit the XAML file. In this blog, first I will take you through how to edit/open the XAML file and next part would be associating the Work Flow.

Scenario

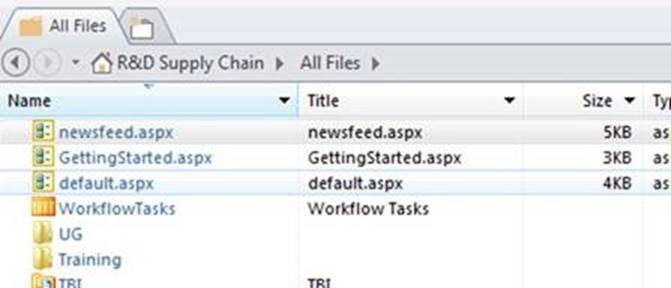
 I have developed a Workflow in my Test site and I wanted that workflow to be associated to a different list under a different site, but when I opened my target site using designer I couldn’t find the Workflow folder under All Files. For me to change the association I should be able to edit the XAML file

clip_image001

So, why is that my site missing that folder????

Here are the answers to that question

· ‘Workflows’ folder under ‘All Files’ is only for SharePoint 2010 workflows and would be visible if you have SharePoint 2010 workflows in your site

· For SharePoint 2013 workflows, the XAML associations are present in the hidden list ‘Wfsvc’

· After I created a 2010 workflow, I was able to see the ‘Workflows’ folder

How to see the XAML file

Option 1

To see the XAML associations for SharePoint 2013 workflows, unhide the ‘wfsvc’ library using PS

 [System.Reflection.Assembly]::LoadWithPartialName("Microsoft.SharePoint.Client")
 [System.Reflection.Assembly]::LoadWithPartialName("Microsoft.SharePoint.Client.Runtime")
 
  
 $url="https://XXX.sharepoint.com/sites/test1234"  #URL of the site
 $password=Read-Host -Prompt "Enter Password" -AsSecureString
 $credentials=New-Object Microsoft.SharePoint.Client.SharePointOnlineCredentials("USER ID",$password) #user name of an admin account within “”
 $ctx=New-Object Microsoft.SharePoint.Client.ClientContext($url)
 $ctx.Credentials=$credentials 
  
 $web=$ctx.Web
 $ctx.Load($web)
 $ctx.ExecuteQuery()
 
 $listcoll=$web.Lists
 $ctx.Load($listcoll)
 $ctx.ExecuteQuery()
 
 $list=$listcoll.GetByTitle('wfsvc')
 $ctx.Load($list)
 $ctx.ExecuteQuery()
 $list.SchemaXml
 $list.Hidden=$false
 $list.Update()

Try opening the list using OPEN WITH EXPLORER make sure to read this article before you do that https://support.microsoft.com/en-in/kb/2629108

Open the XAML file

Option 2

  1. In SharePoint Designer, go to the workflow whose XAML associations you would like to view
  2. Click on ‘Save as Template’
  3. This would create a .wsp file and save it to the Site Assets library in the site.
  4. Go to the Site Assets library in the browser and download the .wsp file
  5. Change the extension of the file from .wsp to .cab
  6. This would create a zipped file that you can extract and see the contents
  7. The zipped file would contain the workflow.xaml file and other associations
  8. You can view and the xaml file

But these options would still not help you to associate your workflow, here are the options as on today to achieve it.

https://blogs.msdn.microsoft.com/sharepointdesigner/2012/09/18/how-to-use-sharepoint-designer-2013s-visual-designer-to-move-workflows-between-sites/

Using CSOM

Refer: https://howtodowithsharepoint.wordpress.com/2015/07/09/sharepoint-2013-how-to-add-workflow-association-to-the-list-using-workflow-subscription-service/

 [System.Reflection.Assembly]::LoadWithPartialName("Microsoft.SharePoint.Client")
 [System.Reflection.Assembly]::LoadWithPartialName("Microsoft.SharePoint.Client.Runtime")
 [System.Reflection.Assembly]::LoadFile("C:Program FilesCommon Filesmicrosoft sharedWeb Server Extensions16ISAPIMicrosoft.SharePoint.Client.WorkflowServices.dll")
 
 $url="" #URL of the site
 $ctx=New-Object Microsoft.SharePoint.Client.ClientContext($url)
 $password=Read-Host -Prompt "Enter your pwd:" -AsSecureString
 $cred=New-Object Microsoft.SharePoint.Client.SharePointOnlineCredentials("",$password) #Username
 $ctx.Credentials=$cred
 
 $web=$ctx.Web
 $ctx.Load($web)
 $ctx.ExecuteQuery()
 
 $listcoll=$web.Lists
 $ctx.Load($listcoll)
 $ctx.ExecuteQuery()
 $listcoll | select Title,id
 
 $list=$listcoll.GetByTitle("") #Title of the list where the workflow is currently added
 $ctx.Load($list)
 $ctx.ExecuteQuery()
 
 $fields=$list.Fields
 $ctx.Load($fields)
 $ctx.ExecuteQuery()
 
 $fields | select title,id
 
 $wffield=$fields.GetById('') #id of the field that has the workflow name
 $ctx.Load($wffield)
 $ctx.ExecuteQuery()
 
 $list2=$listcoll.GetById('') #id of the list where you need to move the workflow to
 $ctx.Load($list2)
 $ctx.ExecuteQuery()
 
 $fieldcoll=$list2.Fields
 $ctx.Load($fieldcoll)
 $ctx.ExecuteQuery()
 
 $fieldcoll.Add($wffield)
 $ctx.Load($fieldcoll)
 $ctx.ExecuteQuery()
 
 $wfsm=New-Object Microsoft.SharePoint.Client.WorkflowServices.WorkflowServicesManager($ctx,$web)
 $ctx.Load($wfsm)
 $ctx.ExecuteQuery()
 
 $wss=$wfsm.GetWorkflowSubscriptionService()
 $ctx.Load($wss)
 $ctx.ExecuteQuery()
 
 $listsub=$wss.EnumerateSubscriptionsByList('') #list id of the list which has the workflow, $list
 $ctx.Load($listsub)
 $ctx.ExecuteQuery()
 
 $wf=$listsub[0]
 $ctx.Load($wf)
 $ctx.ExecuteQuery()
 
 $wf.EventSourceId='' #id of the list where you are moving the workflow to
 $ctx.Load($wf)
 $ctx.ExecuteQuery()
 
 $wss.PublishSubscriptionForList($wf,$list2.Id)
 $ctx.ExecuteQuery()

Author Info

Sriram Varadarajan
 
Solution Architect
 
Rate this article
 
Sriram is a Technology Evangelist with 15+ years experience in Microsoft Technologies. He is an enterprise architect working for large pharmaceutical organization which has presence globally with largest Microsoft implementation ...read more
 

How to Configure Workflow Manager in SharePoint 2013

Sathish Nadarajan
 
Solution Architect
April 20, 2016
 
Rate this article
 
Views
9237

I guess, this would be very late to write about the Workflows configuration by this time. Even, I created the workflows two years back. But, after sometime, when I try to configure in another server, I found it a bit difficult. Then, as usual, thought of having it handy.

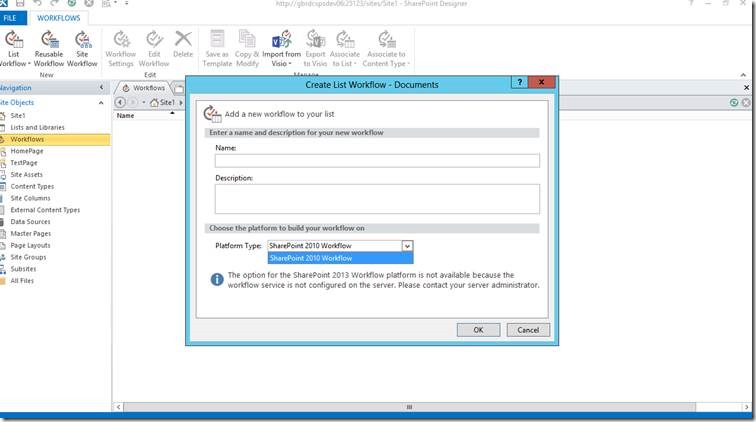
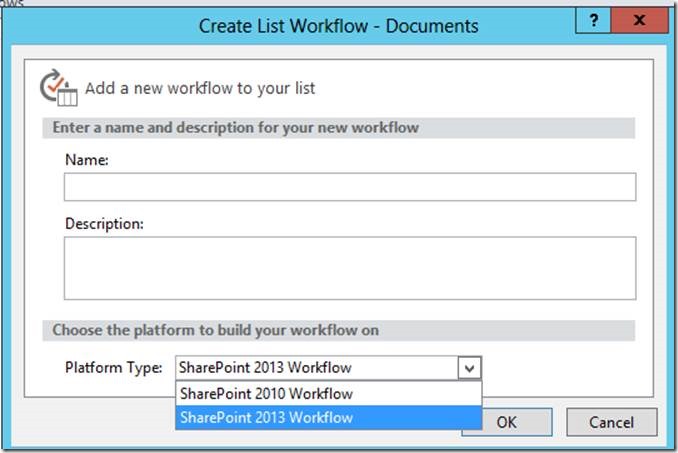
The ultimate objective of this article is, from the designer, when I try to create a Workflow, on the Platform Type, I could not find the SharePoint 2013 workflow by default. Have a look on the below screen shot.

clip_image002

We want SharePoint 2013 Workflow should also be displayed on the dropdown. Now, the resolution for this can be a step by step procedure.

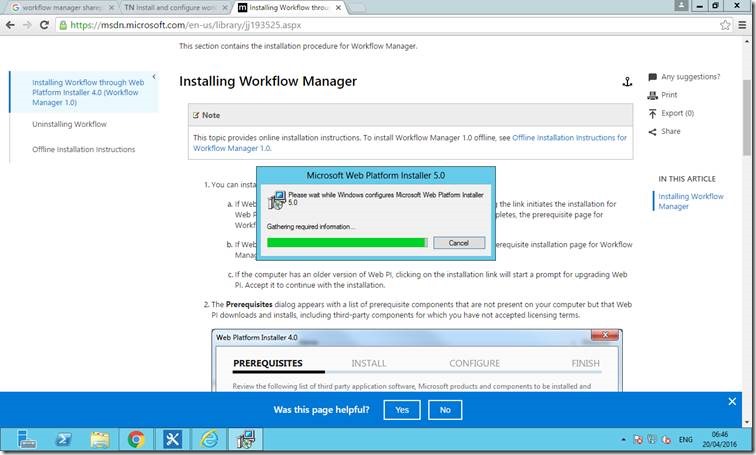
1. We need to install the web Platform Installer first. Download link – https://msdn.microsoft.com/en-us/library/jj193525.asp

2. Follow the Installation Link as shown below.

clip_image004

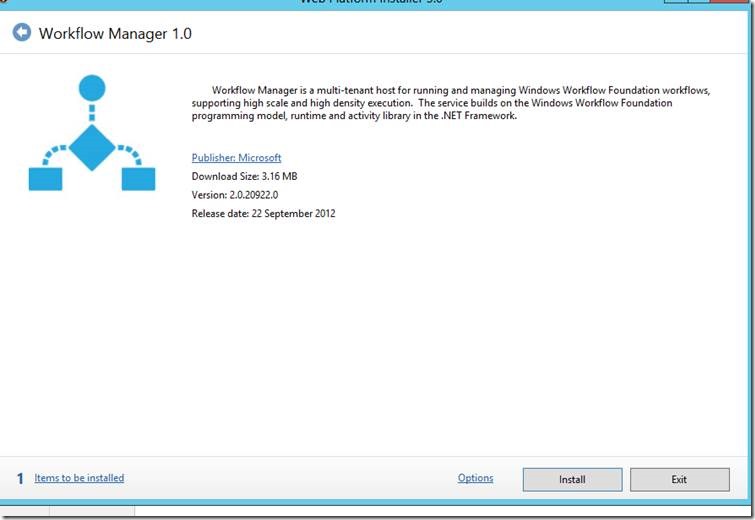
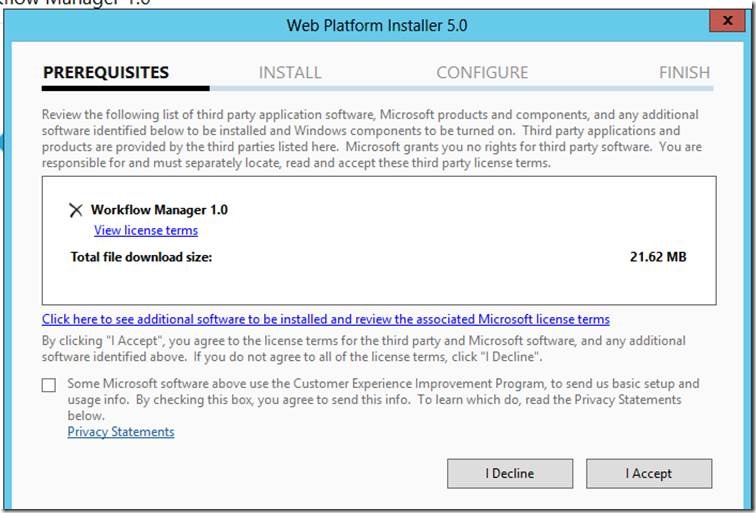
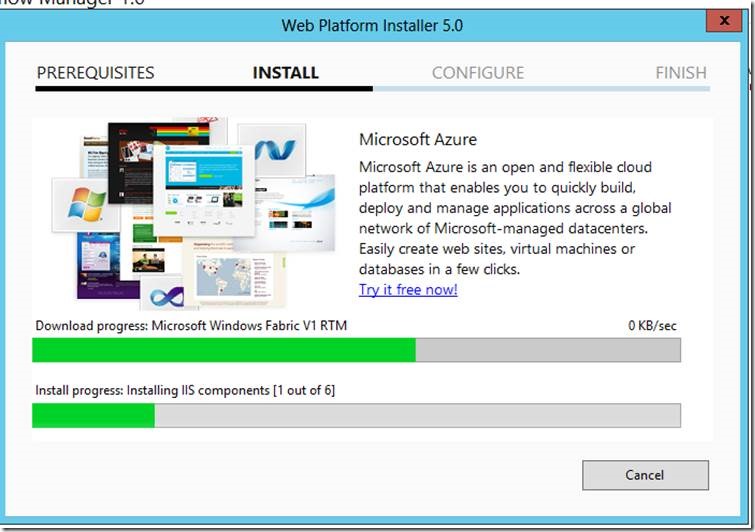
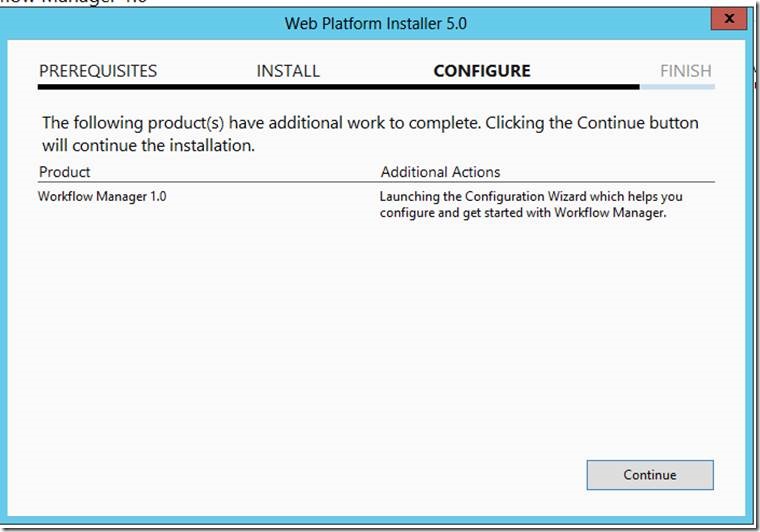
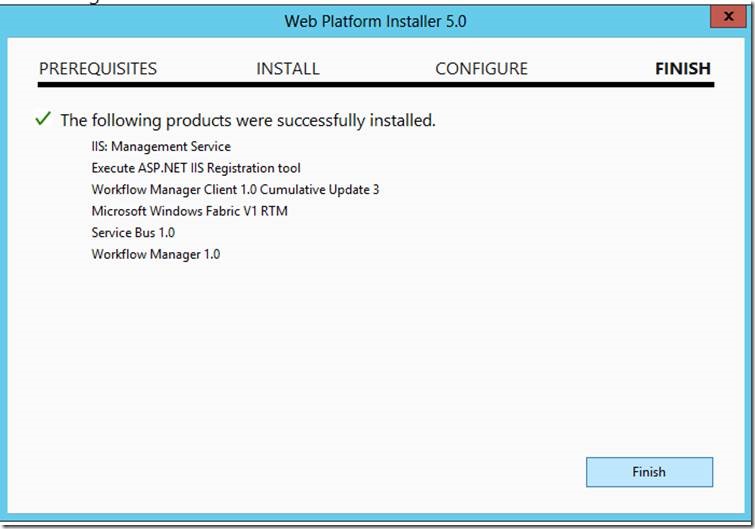
3. Install the Workflow Manager 1.0

clip_image006

clip_image008

clip_image010

clip_image012

clip_image014

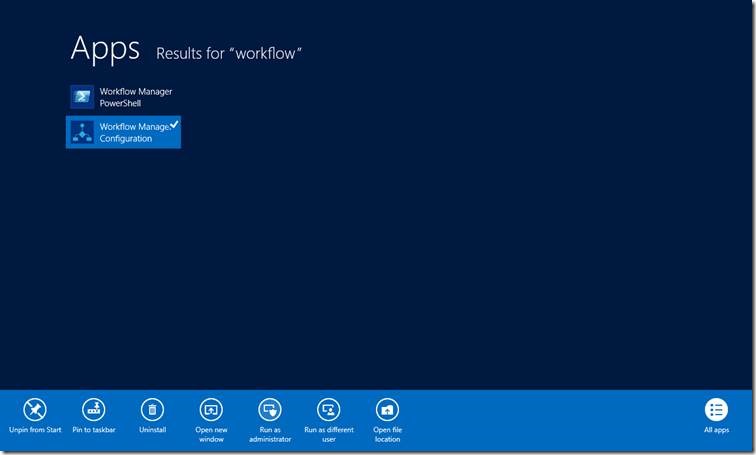
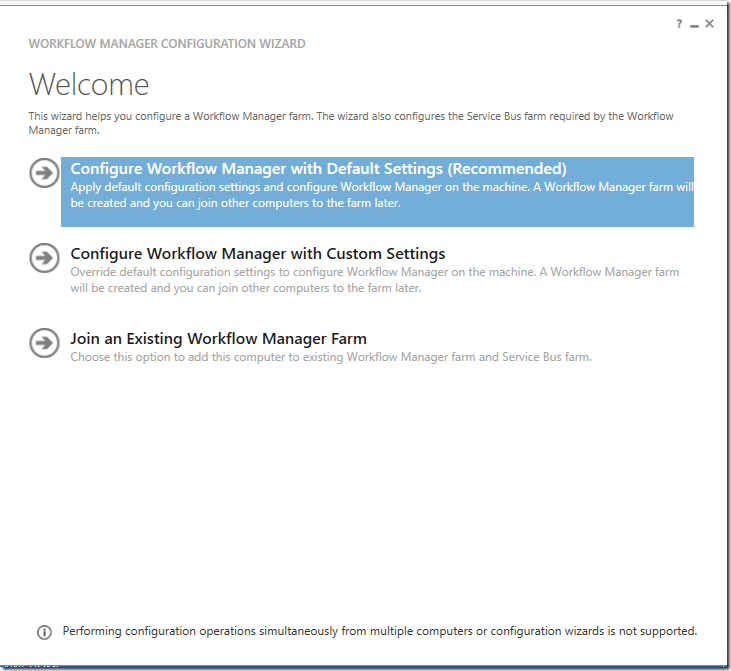
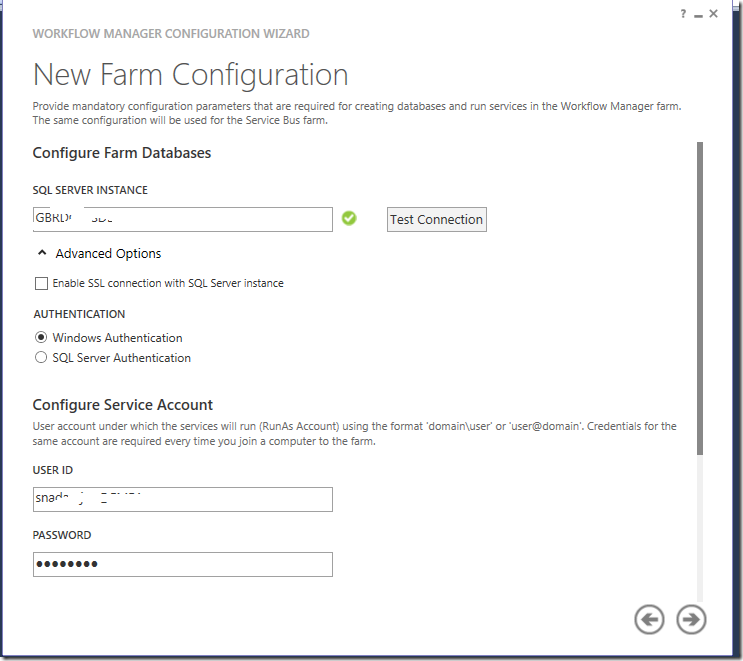
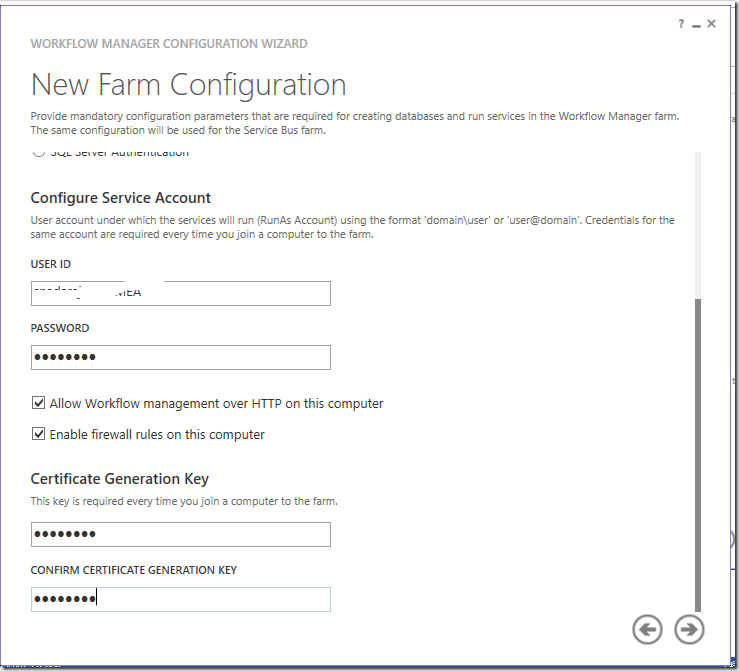
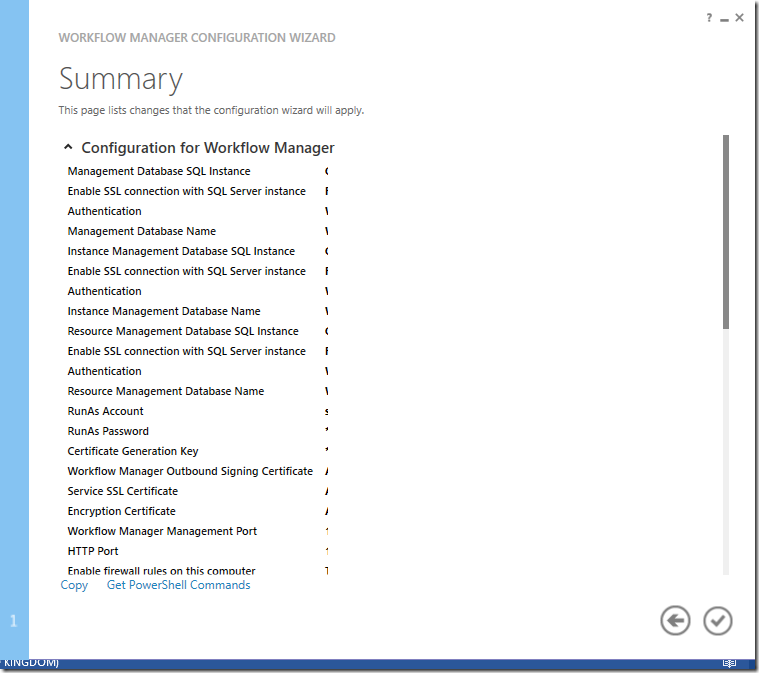
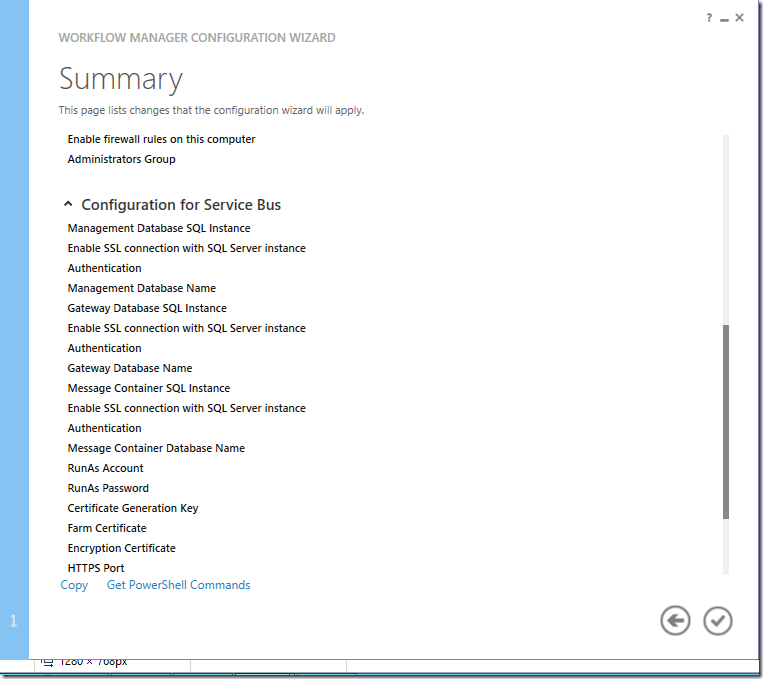
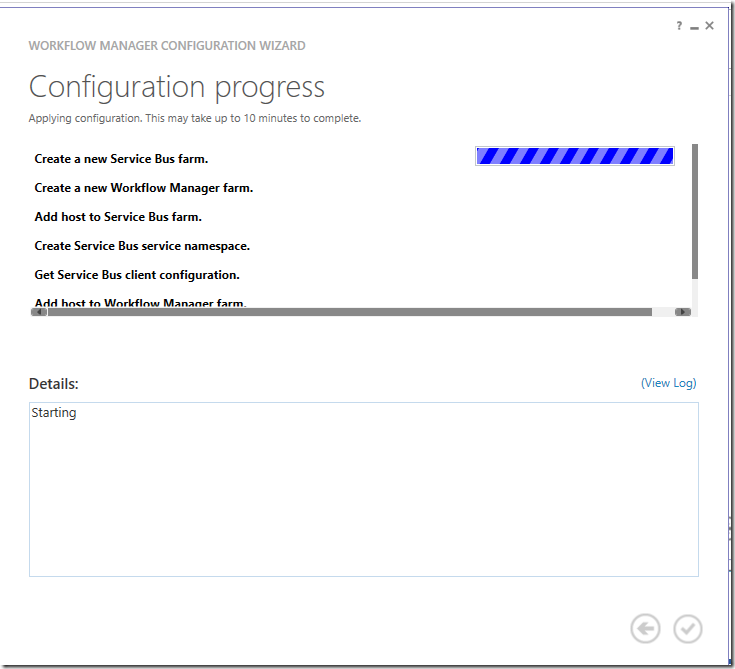
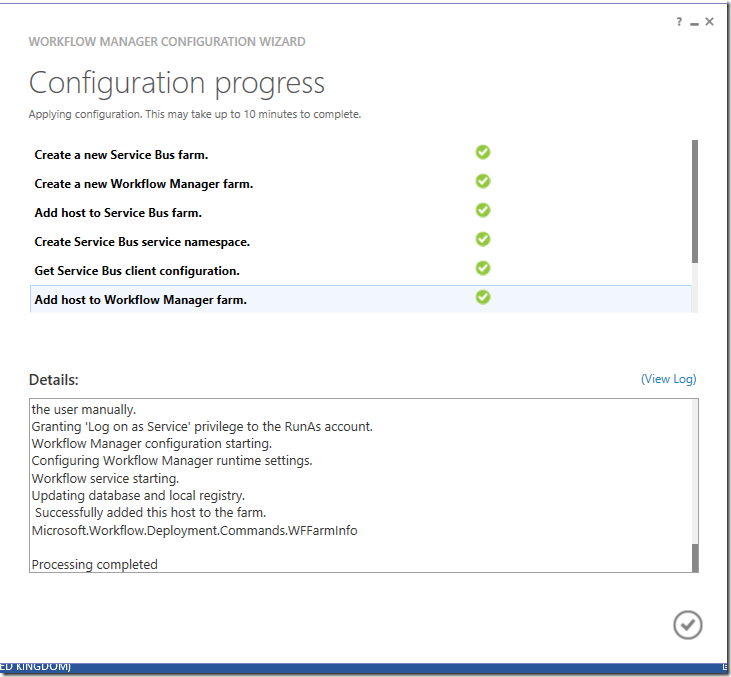
4. Now, we need to configure the Workflow Manager.

clip_image016

clip_image017

clip_image018

clip_image019

clip_image020

clip_image021

clip_image022

5. Now the configuration completes as shown in the image.

clip_image023

6. Again, go to the Web Platform Installer.

clip_image025

7. Search for Service Bus 1.0 Cumulative Update 1

clip_image027

clip_image029

clip_image031

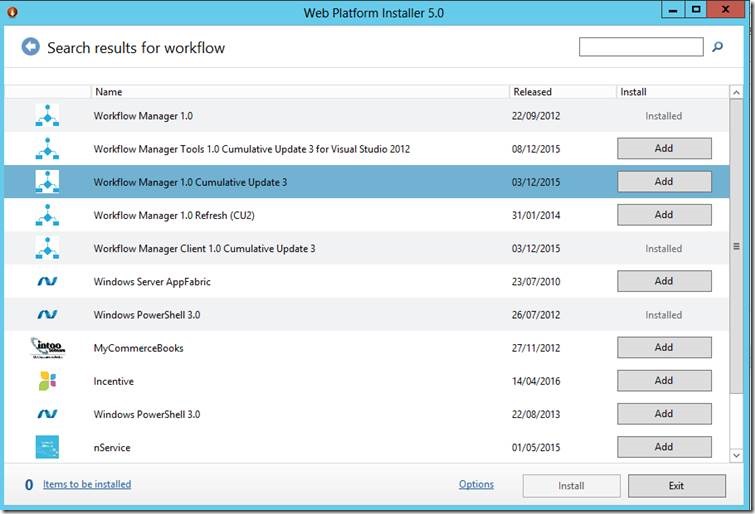
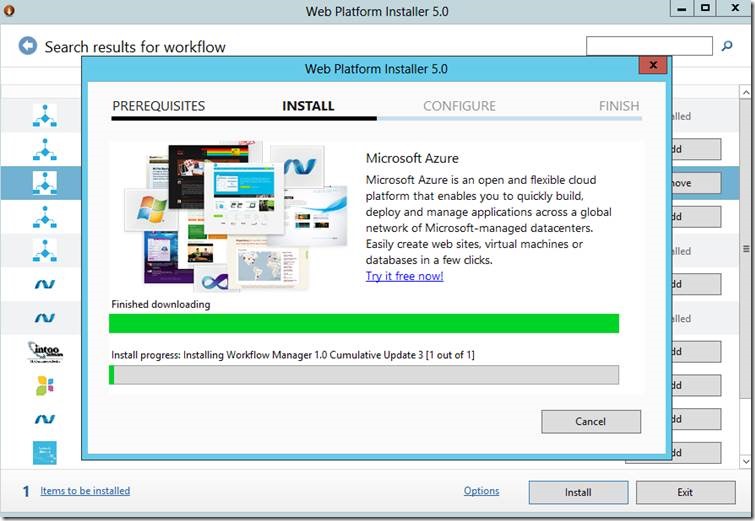
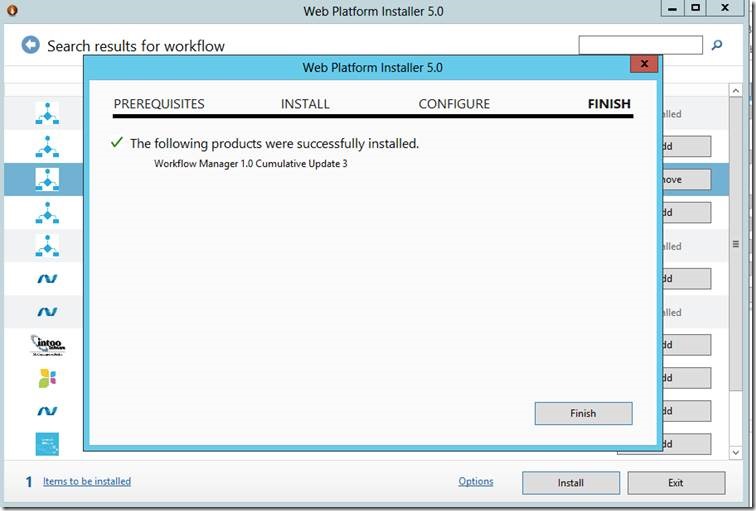
8. Install Workflow Manager 1.0 Cumulative Update 3 as well

clip_image033

clip_image035

clip_image037

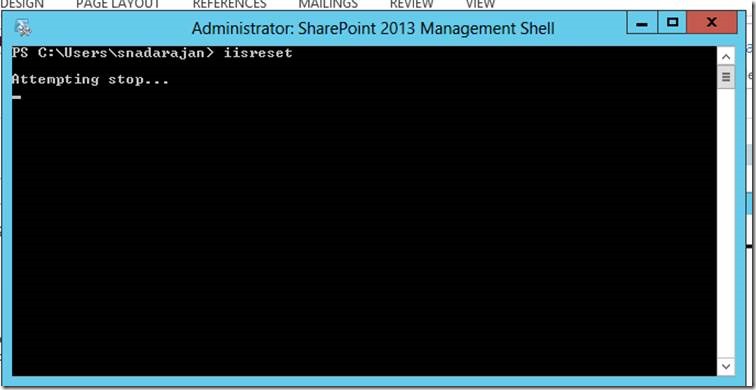
9. Do an IISRESET

clip_image039

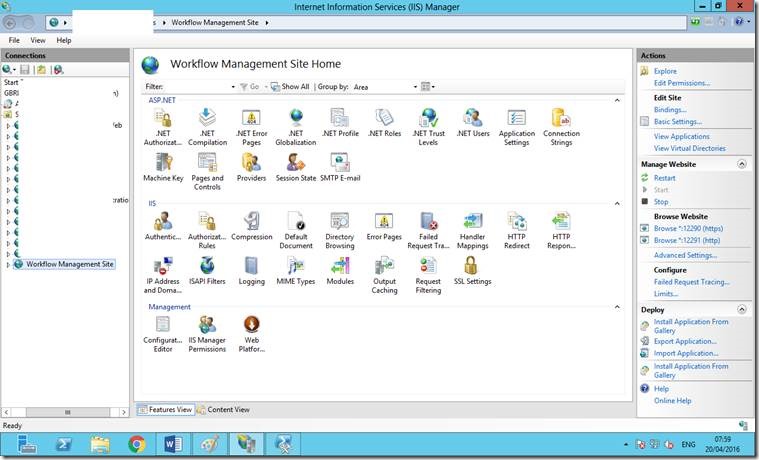
10. Make sure the new Site Workflow Management Site is been created on the IIS

clip_image041

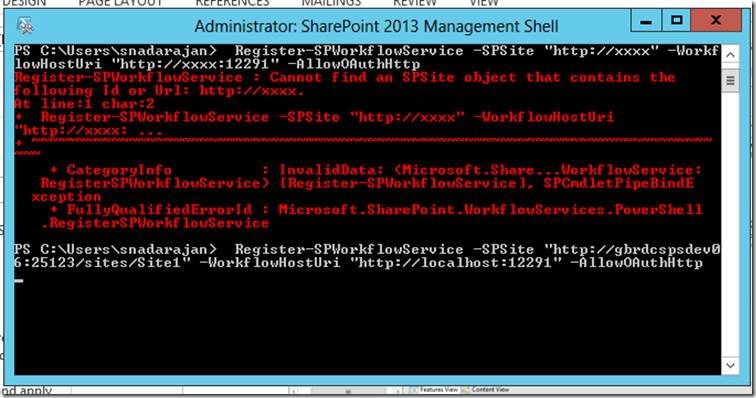
11. Open the Management Shell and execute the below PowerShell Script.

Register-SPWorkflowService -SPSite "http://xxxx" -WorkflowHostUri "http://xxxx:12291" –AllowOAuthHttp

clip_image043

12. Now go back to the designer and we will be able to see the Platform Type as SharePoint 2013 Workflow.

clip_image045

Happy Coding,

Sathish Nadarajan.

Author Info

Sathish Nadarajan
 
Solution Architect
 
Rate this article
 
Sathish is a Microsoft MVP for SharePoint (Office Servers and Services) having 15+ years of experience in Microsoft Technologies. He holds a Masters Degree in Computer Aided Design and Business ...read more
 

Undocumented issue in OOB three state worflow of SharePoint Online

Sriram Varadarajan
 
Solution Architect
January 24, 2016
 
Rate this article
 
Views
13301

One the known issue (not disclosed by MS) is default OOB three state workflow won’t work in SharePoint Online for some the tenants. We had this issue in one of the sub site which is under the root site collection of our SharePoint online tenant, initially when the workflow wasn’t working, we couldn’t really understand the cause of this issue, and we tried re-creating the WF multiple times without knowing the root cause.

Finally, we managed investigate this case further and here are our findings and fix.

As a first step, we started collecting the LOGS using fiddler, and after analyzing the log carefully we identified the following errors that were seen repeatedly:

The schema for field with this id is wrong or missing. Field ‘{7d95d1f4-f5fd-4a70-90cd-b35abc9b5bc8}’

– We checked and found that this is a hidden field on the top level site.

  • 7d95d1f4-f5fd-4a70-90cd-b35abc9b5bc8 –  All Day Event –  fAllDayEvent –  fAllDayEvent

– Using the SharePoint Online Client browser tool, we checked root site and determined the SchemaXML of this field as below:

SchemaXML:

 <Field ID="{7D95D1F4-F5FD-4a70-90CD-B35ABC9B5BC8}" Type="AllDayEvent" Name="fAllDayEvent" DisplayName="All Day Event" Sealed="TRUE" SourceID="http://schemas.microsoft.com/sharepoint/v3/fields" StaticName="fAllDayEvent" Group="_Hidden" >
   <FieldRefs>
     <FieldRef ID="{64cd368d-2f95-4bfc-a1f9-8d4324ecb007}" Name="EventDate" RefType="StartDate" />
     <FieldRef ID="{2684F9F2-54BE-429f-BA06-76754FC056BF}" Name="EndDate" RefType="EndDate" />
     <FieldRef ID="{6CC1C612-748A-48d8-88F2-944F477F301B}" Name="TimeZone" RefType="TimeZone" />
     <FieldRef ID="{C4B72ED6-45AA-4422-BFF1-2B6750D30819}" Name="XMLTZone" RefType="XMLTZone" />
   </FieldRefs>
 </Field>

With these details we involved MS and they investigated the Root site more from the backend and found a lot more inconsistencies regarding certain Site columns that are responsible for the three-state workflow to fail.

They found that the issues with the below Fields that are responsible for the working of the Three-state workflow:

System.Reflection.TargetInvocationException: Exception has been thrown by the target of an invocation. —> System.ArgumentException: Invalid field name. {17ca3a22-fdfe-46eb-99b5-9646baed3f16}  /XXXX/Temp/Lists/Tasks   


Using CSOM, they checked and found that this OOD hidden field “form_URN” was missing on our root site.

They checked a working site and got the schemaXML of the missing field. Created a new field with the working schema on our root site using CSOM.

But, this didn’t help too and when investigated further they found out that, a lot of such hidden column was missing.

Here are the list of hidden fields which were missing:

· Name="FormURN" ; ID= 17ca3a22-fdfe-46eb-99b5-9646baed3f16

· Name="SendEmailNotification" ; ID= CB2413F2-7DE9-4afc-8587-1CA3F563F624

· Name=”HasCustomEmailBody” ; ID= 47f68c3b-8930-406f-bde2-4a8c669ee87c

· Name="WorkflowLink" ; ID= 58DDDA52-C2A3-4650-9178-3BBC1F6E36DA

· Name="ExtendedProperties" ; ID= 1C5518E2-1E99-49FE-BFC6-1A8DE3BA16E2

· Name="EmailBody" ; ID= 8CBB9252-1035-4156-9C35-F54E9056C65A

· Name="Completed" ; ID= 35363960-D998-4aad-B7E8-058DFE2C669E

CSOM used to create these hidden fields:

Sample CSOM code used:

 #Install SharePoint online client SDK before you run the below 
 [System.Reflection.Assembly]::LoadWithPartialName('Microsoft.SharePoint.Client')
 [System.Reflection.Assembly]::LoadWithPartialName('Microsoft.SharePoint.Client.Runtime')
 [System.Reflection.Assembly]::LoadWithPartialName('Microsoft.SharePoint.Client.UserProfiles')
 [System.Reflection.Assembly]::LoadWithPartialName('Microsoft.SharePoint.Client.Taxonomy')
 
 ##Get GA credentials.
 $username = Read-Host -Prompt "GA username"
 $password = Read-Host -Prompt "password? " -AsSecureString
 
 ##URL of the Site Collection:
 $url = "https://consoto.sharepoint.com/sites/site1"
 
 #Connect/authenticate to SharePoint Online and get ClientContext object.. 
 $credentials = New-Object Microsoft.SharePoint.Client.SharePointOnlineCredentials($username, $password)
 $ctx = New-Object Microsoft.SharePoint.Client.ClientContext($url) 
 $ctx.Credentials = $credentials 
 
 
 if (!$clientContext.ServerObjectIsNull.Value) 
 { 
     Write-Host "Connected to SharePoint Online site: '$Url'" -ForegroundColor Green 
 } 
 
 #############################################################
 #To load the root site
 $rootweb = $ctx.Web  
 $ctx.Load($rootweb)
 $ctx.ExecuteQuery()
 
 #To get the lists on the site:
 $lists = $rootweb.lists
 $ctx.Load($lists)
 $ctx.ExecuteQuery() 
 
 $lists | select title
 
 #Get the  List:
 $list_problem = $lists.GetByTitle("Workflow Tasks") #Name of a working lib.
 $ctx.Load($list_problem)
 $ctx.ExecuteQuery()
 
 
 #############################################################
 #To get the Fields of the top level web:
 $webfields = $rootweb.Fields
 $ctx.Load($webfields)
 $ctx.ExecuteQuery() 
 
 foreach($webfdtop in $webfields)
 {
     Write-Host $webfdtop.Id  "-- " $webfdtop.Title "-- " $webfdtop.staticname "-- " $webfdtop.InternalName
 }
 #############################################################
 
 #############################################################
 #Get Fields of the list:
 $listfields = $list_problem.Fields
 $ctx.Load($listfields)
 $ctx.ExecuteQuery() 
 
 #See all fields of working list
 foreach($fd1 in $listfields)
 {
     Write-Host $fd1.Id  "-- " $fd1.Title "-- " $fd1.InternalName
 }
 #############################################################
 
 #############################################################
 #To load a specific web field field by ID
 $webfd = $webfields.GetById(‘17ca3a22-fdfe-46eb-99b5-9646baed3f16')
 $ctx.load($webfd)
 $ctx.ExecuteQuery()
 $webfd.SchemaXml
 $webfd | fl

This is one of many Known issue in SharePoint online, my following articles will also talk more on other known issue in SharePoint online, which aren’t disclosed by MS.

Author Info

Sriram Varadarajan
 
Solution Architect
 
Rate this article
 
Sriram is a Technology Evangelist with 15+ years experience in Microsoft Technologies. He is an enterprise architect working for large pharmaceutical organization which has presence globally with largest Microsoft implementation ...read more
 

Using Nintex Workflow with SharePoint Rest Api

Senthil Kumaresan
 
SharePoint Consultant
September 24, 2015
 
Rate this article
 
Views
20687

Nintex workflows have powerful utilities that help to perform some of the tedious operations like batch updating content or configuration. One such action is the “Web Request”.

I had a scenario where I would need to disable content approval feature from some of the libraries in a set of sites that reside in site collections on different web applications. There are different approaches to do this. First is to write a PowerShell script. But writing a script is pretty easy but executing will take time as I had an environment where the SharePoint Farm is managed by a dedicated server team and I will have to wait to run the script on a change window. Second is to write a .Net Client Side Managed Code program to iterate across all the sites in site collection that reside in different web application which needs extensive coding to.

But there was even easier approach to use Nintex workflows for batch operations which I luckily had in my organization’s SharePoint On-Premises environment. With the introduction of Rest in SharePoint 2013, it is easier now to perform CRUD operations on SharePoint objects using the “Web Request” action in Nintex Workflows.

I had the list of SharePoint Site Url’s in a SharePoint List where I would need my workflow program to iterate through all the sites and remove content approval feature from a library on the site.

There are 2 categories of Http Methods to use in the web request action.

1. Get – Read operation to resources which the user defined in the web request action has rights to.

2. Post – Create, Update and Delete operations on resources which the user defined in the web request action has rights to.

a. For Update operation, A header X-HTTP-Method has to be set with value of MERGE

b. For Delete operation, A header X-HTTP-Method has to be set with value of DELETE

c. All Post operation requires a request digest token to validate post backs to SharePoint.

For my example, since I want to disable content approval for libraries in a set of sites, I would need to perform an update operation using the Post Http Method. I have designed the workflow so that it performs a “for each” loop action to iterate through list of sites and calls the rest service for each site and performs the update operation.

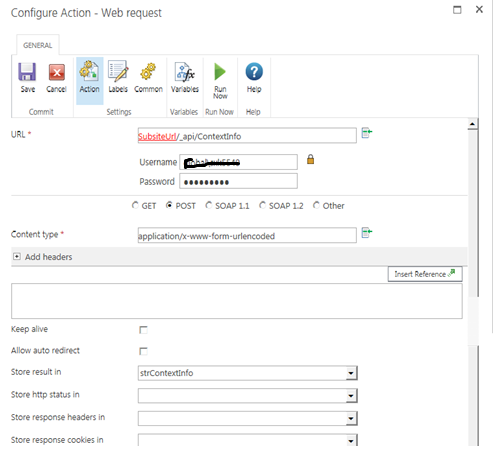
First, to perform a Post method you will need a request digest token.

To get a request digest token you will have a perform a post operation to the Rest Url https://<Site Url>/_api/ContextInfo and store the response in a variable

clip_image001

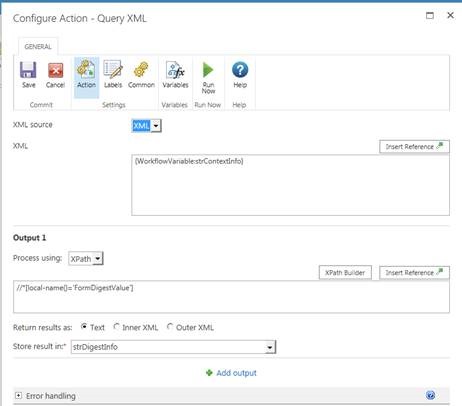
Use Query XML action to query the Digest token value from the Response xml and store it in a variable which is required for the Post operation.

clip_image003

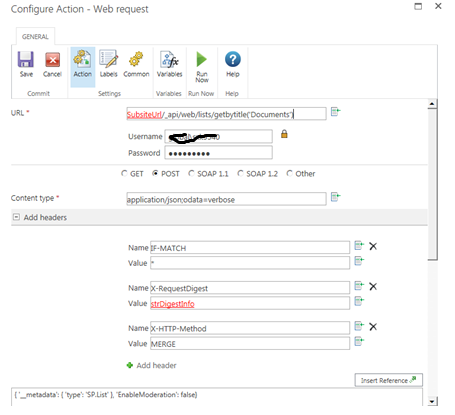
After getting the digest token, I can now call the Post method to perform the update operation on the list properties to disable the content approval on the list using the web request action.

clip_image004

Note, I have modified the content type to “application/json;odata=verbose” since I am sending a Json request in the body of the web request.

Since this is an update operation, I have added 3 headers

1. X-HTTP_Method : MERGE

2. X-RequestDigest : <Digest token got earlier in a variable>

3. IF-MATCH : *

The IF-MATCH: * header is used to overwrite any changes that has already been changed on the server.

The body contains the Json input to perform the merge operation. For all SharePoint Rest API related info check msdn link

So it is pretty simple to perform any Batch CRUD operations using Nintex Workflows, Instead of writing a script.

Author Info

Senthil Kumaresan
 
SharePoint Consultant
 
Rate this article
 
SharePoint Architect – Consulting on SharePoint Infrastructure, IT Governance and Apps Development. ...read more
 

Out of the Box Workflows Not Listed on the “Add a Workflow” Section

Sathish Nadarajan
 
Solution Architect
June 15, 2015
 
Rate this article
 
Views
11302

Recently, I was about to create a new workflow on a brand new environment. Hence, the default Site Collection Features alone were added.

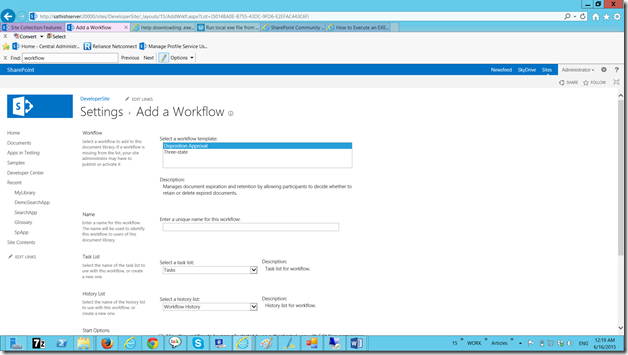
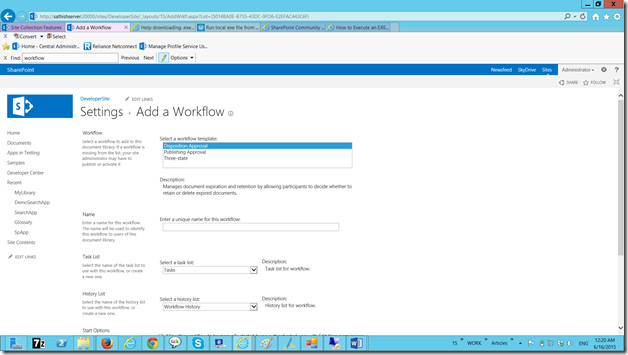
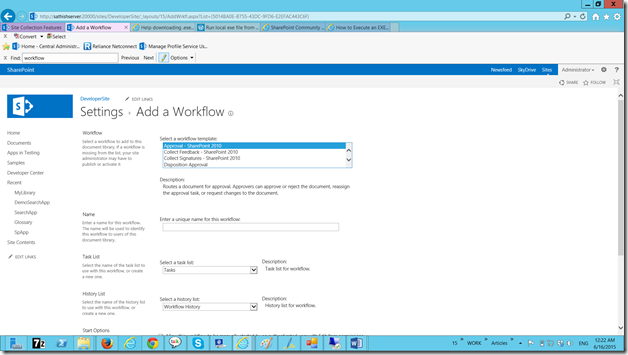
When I tried to add a Workflow, I could not find many templates in that site collection.

image

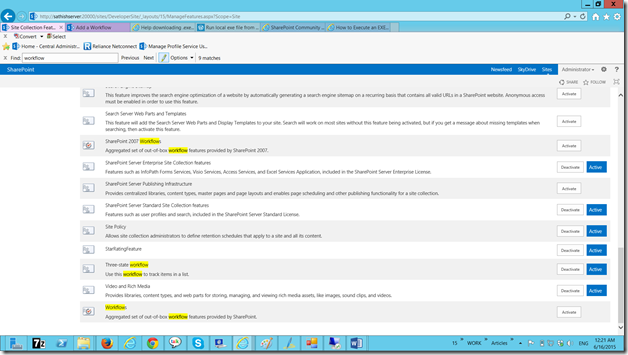
Then by activating the Following Site Collection features, I was able to see the missing templates.

1. Publishing Approval Workflow

image

image


2. Workflows Feature

image


image

After activating these two features, I was able to see almost all the templates.

I have not mentioned about the SharePoint 2007 Workflows Feature as most of the sites were migrated into at least 2010.

Happy Coding,

Sathish Nadarajan.

Category : SharePoint, Windows

Author Info

Sathish Nadarajan
 
Solution Architect
 
Rate this article
 
Sathish is a Microsoft MVP for SharePoint (Office Servers and Services) having 15+ years of experience in Microsoft Technologies. He holds a Masters Degree in Computer Aided Design and Business ...read more
 

Introduction to Microsoft SharePoint Designer

Mythili Ranganathan
 
SharePoint Architect
March 10, 2014
 
Rate this article
 
Views
11933

It is formerly called as Microsoft SharePoint Designer, which is specialised HTML editor and web design freeware for creating or modifying Microsoft SharePoint sites, workflows and web pages. Earlier it was part of Office 2007 and now it is out of office suite.

SharePoint Designer and its sister product, Microsoft Expression Web are successors of Microsoft FrontPage. While Expression Web serves as the full-featured successor to FrontPage, SharePoint Designer focuses on designing and customizing Microsoft SharePoint websites. For instance, it only includes SharePoint-specific site templates

· SharePoint Designer 2007 was initially a commercial software product. On March 31, 2009, however, SharePoint Designer 2007 was made available as a freeware.

· On April 21, 2010, SharePoint Designer 2010 was released and made available for download.

· On October 30, 2012, Microsoft released SharePoint Designer 2013.

SharePoint Designer shares its codebase, UI and HTML rendering engine with Expression Web, and does not rely on Internet Explorer‘s Trident engine. It features a workflow designer that allows users of SharePoint to create workflow so that workflow can automate the process with the concept and objects such as list item, content type, and list column within SharePoint server. Starting from SharePoint 2013, it provides text-based designer and visual designer for non-developer users.

Now let us see the depreciated features of SharePoint 2010 and the new features of SharePoint 2013.

I. Features:

The following features are deprecated in SharePoint Designer 2013 or have been removed.

1. SharePoint 2010 Workflow platform

SharePoint 2013 uses SharePoint 2013 Workflow platform that is built upon Windows Workflow Foundation 4.0 and that is integrated with Workflow Manager 1.0. As SharePoint 2010 is built on WWF3.0, and features dependant on WWF 3.0 are depreciated.

To migrate the 2010 workflows, we can create a SharePoint 2010 Workflow and use all of the SharePoint 2010 Workflow features by choosing the SharePoint 2010 Workflow platform.

The following features are available only on the SharePoint 2010 Workflow platform:

Actions:

o Stop Workflow

o Capture a Version of the Document Set

o Send Document Set to Repository

o Set Content Approval Status for the Document Set

o Start Document Set Approval Process

o Declare Record

o Set Content Approval Status

o Undeclared Record

o Add List Item

o Inherit List Item Parent Permissions

o Remove List Item Permissions

o Replace List Item Permissions

o Lookup Manager of a User

o Assign a Form to a Group

o Assign a To-Do Item

o Collect Data from a User

o Start Approval Process

o Start Custom Task Process

o Start Feedback Process

o Copy List Item (SharePoint Designer 2013 supports only the document-copying action.)

· Conditions:

o If current item field equals value

o Check list item permission levels

o Check list item permissions

· Steps:

o Impersonation Step:

· Data sources:

o User Profile lookup

· Other features:

o Visio integration

o Association Column

o Content Type Association for reusable workflow

o ‘Require Manage List/Web Permission’ feature for list/site workflow

o Globally reusable workflow type

o Workflow visualization option

SharePoint page-design features

Design view and Split view

II. What’s New in SPD2013

1. Platform Type:

SharePoint Designer 2013 you have the option of choosing the platform, we can select SharePoint 2010 Workflow or SharePoint 2013 workflow.

Workflows – There are two kinds of Workflows that you can create in Designer.

List Workflow: Used to start a workflow developed for a specific list.

Site Workflow: Used to start a workflow developed for the site

2. Features:

1) Workflows can be created based on the new .Net 4.x Workflow Infrastructure

2) Tight integration with Stages: – Workflows need not be in Serial, now it is state based, where your workflow can jump into any stages.

3) Visual Designer: – New design which integrates the Vision canvas right into SharePoint designer. These workflows can be created using click and drag. It supports to set the properties of every action.

4) Copy and Paste – We can Cut, Copy and Paste within the Text Based designer.

5) Loops! – Fully integrated action which you can use within all 2013 Workflows

6) Call Web Service Action – we can call Rest/HTTP web services right from within SharePoint 2013 workflows.

7) Start Workflow Actions -. We now have an action that lets you spawn up old 2010 workflows right from within a 2013 workflow. We can take advantage of any 2010 workflow functionality.

8) Packaging: – individual workflows can be packaged straight from within SPD

9) Dictionary Type Variables, we can create variables which can hold array of values.

Category : SharePoint

Author Info

Mythili Ranganathan
 
SharePoint Architect
 
Rate this article
 
Mythili is a SharePoint Architect in a CMM Level 5 Company, with strong passion towards Microsoft Technologies (SharePoint, C# & ASP.Net) ...read more
 

SharePoint 2010 Site Collection and Site’s Health Analyzer through SharePoint Web Analytics Services

Moses
 
SharePoint Consultant
March 2, 2014
 
Rate this article
 
Views
23612

In SharePoint 2010, we can make use of few features that can help us to analyze the usage and health of each web application at site collection or site level. This article will enable the user to configure SharePoint to display the Web Analytics Reports for Site Collection / Site of the respective Web Application.

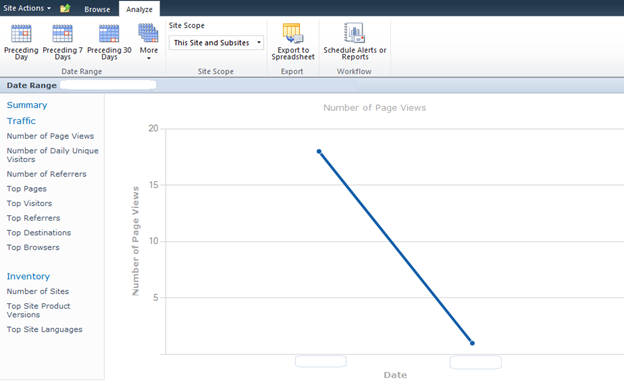
Sample Analytics Chart

image

Create Web Analytics service application

We’ll be using SharePoint Central Administration to configure the Web Analytics service application. During the basic installation of SharePoint 2010, Web Analytics service application is automatically configured. If it is already created, please skip this step and move to “Associate Web Application with the created service application

User who creates the Web Analytics service application has to be a Farm Administrator.

· In Central Admin, select Application Management. From Application Management screen, under Service Applications, select Manage service application

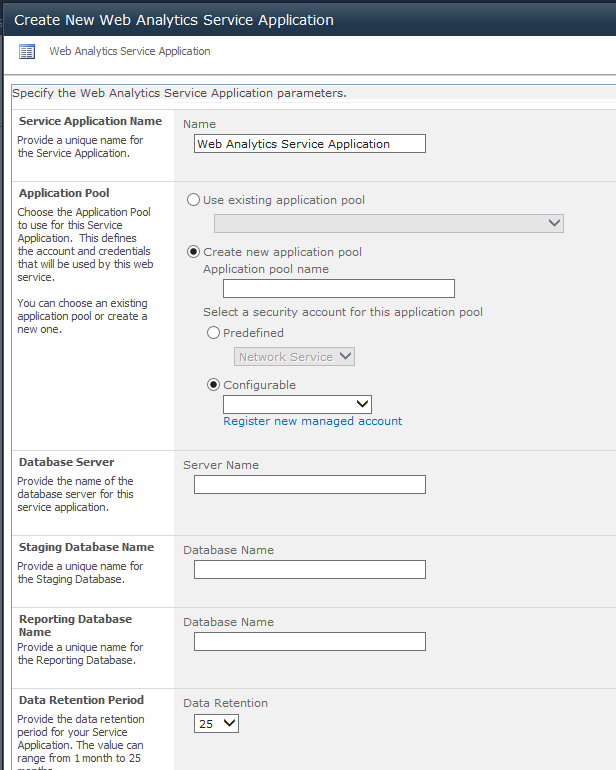
· From the ribbon, select New and Web Analytics Service Application

image

In the popup panel, we can select an existing Application Pool or create a new Application Pool. Specify an existing SQL Server instance in Database Server name. Staging Database Name and Reporting Database Name would be the new database that will be created in the SQL Server instance that was specified. Data Retention Period would be in month(s).

Associate Web Application with the created service application

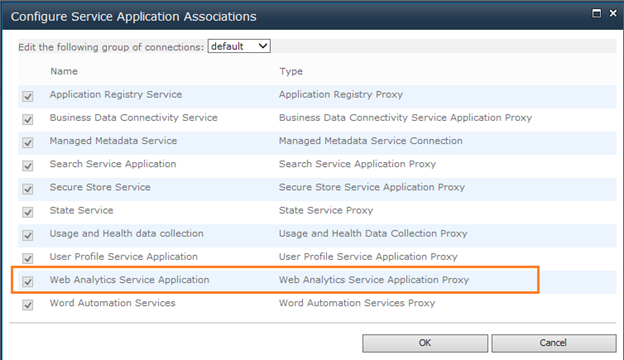
· In Central Admin, select Application Management. From Application Management screen, under Service Applications, select Configure service application associations

· All Web Application that are available will be displayed in this screen. Select the Web Application for which the Web Analyzer Reports are required

· Select the created / available Web Analytics Service Application checkbox

image

Check that the Web Analytics Data Processing Service and the Web Analytics Web Service are started.

· From System Settings in Central Administration, under Servers, select Manage services on server

· If Web Analytics Data Processing Service and Web Analytics Web Service are not started, start the same by clicking on the corresponding rows Action column.

Enable Usage and Health data logging

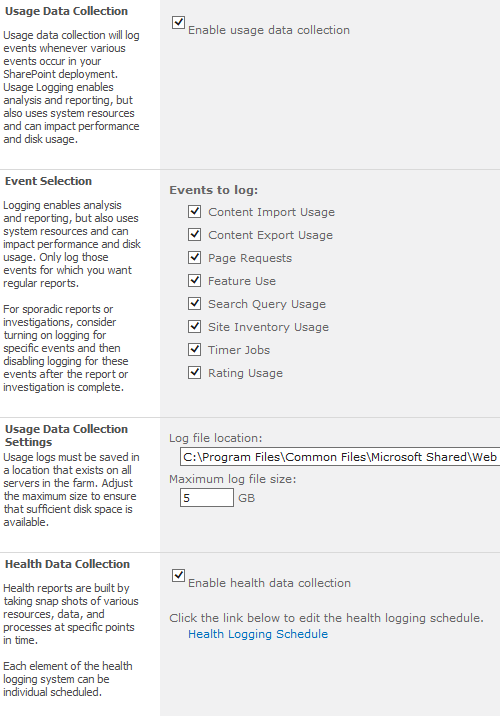
· In Central Admin, select Monitoring. From Monitoring screen, under Reporting section, select Configure usage and health data collection

· Select Enable usage data collection, all the checkboxes in Event Selection and Enable health data collection

image

Check that State Service application is started by:

· From Application Management in Central Administration, under Service Application section, select Manage services applications

· Make sure the created / available Web Analytics Service Application and its Proxy are started

Configure View Web Analytics data permission for users

By default Site Collection Administrators will have rights. If the intended users are not Site Collection Administrators, please use the following steps:

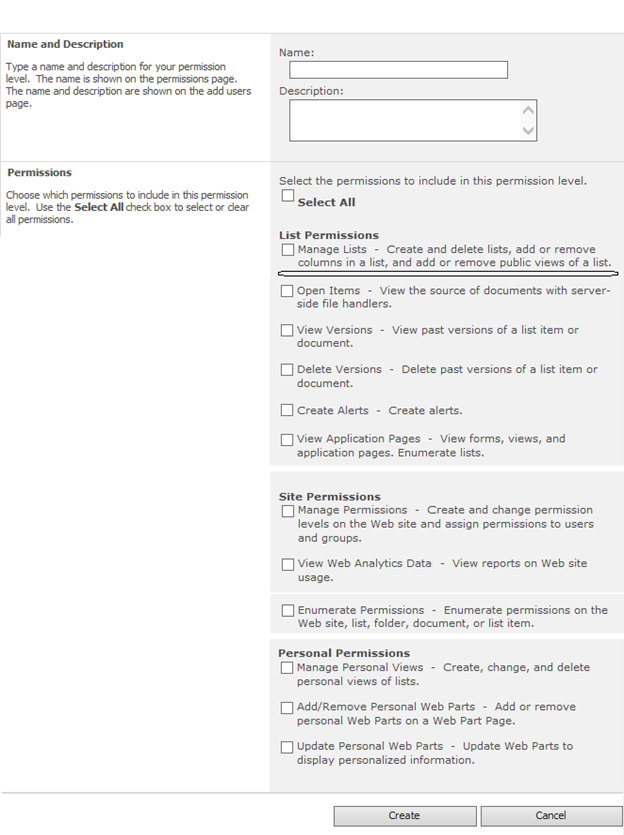
Create View Web Analytics Data permission level

· From the Site Actions menu of the Site or Site Collection choose Site Permission

· In the Edit panel of Site Permission page, choose Permission Levels under Manage section

· Click Add a Permission Level

· In the Name field, type View Web Analytics Data

· Of List Permissions in Permissions panel, choose View Application Pages

· Of Site Permissions in Permissions panel, choose View Web Analytics Data and Enumerate Permissions

· Click on Create

image

Configure View Web Analytics Data permission level

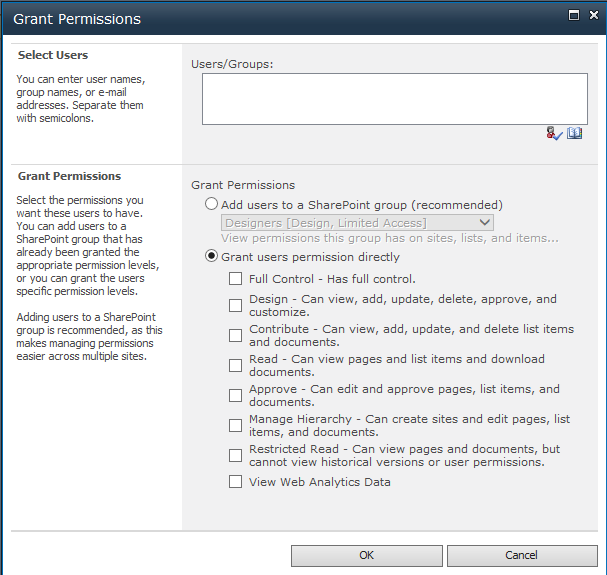
· From the Site Actions menu of the Site or Site Collection choose Site Permission

· In the Edit panel of Site Permission page, choose Grant Permissions under Grant group

· In the Users / Groups box, enter the users that would require View Web Analytics Data permission and check View Web Analytics Data after selecting Grant users permission directly radio button

image

View Web Analytics Report

There are two ways to view Web Analytics Report; thru URL or Web Part. Following URL can be accessed directly to see the default Site Collection / Site Web Analytics report.

URL Mode

Site Collection

http://<Web Application >/_layouts/WebAnalytics/Report.aspx?t=SummaryReport&l=sc

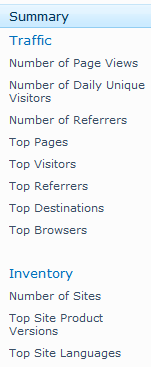
List of report options:

image

Site

http://<Web Application >/_layouts/WebAnalytics/Report.aspx?t=SummaryReport&l=s

List of report options:

image

Analyze Ribbon:

image

Using Web Part

· In the newly created / existing page, click Edit

· Select Insert tab from Editing Tools ribbon and choose Web Part from Web Parts group

· From Categories list box, select Content Rollup

· From Web Parts list box, select Web Analytics Web Part and select Add

· By default Most Viewed Content report will get displayed. We can change the type of report by editing the Web Part properties

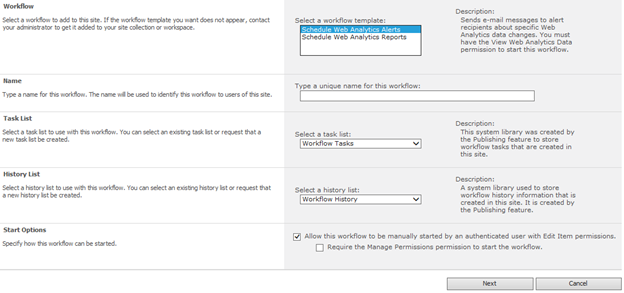
Web Analytics Workflow

Now we can schedule a workflow to execute a Web Analytics report or alert based on the criteria that is defined from the respective Web Application.

· From the Site Actions menu choose Workflow settings in Site Administration section

· Click on Add a workflow

image

· Choose Schedule Web Analytics Alerts or Schedule Web Analytics Reports from Workflow section

· In Name field, enter a name for this workflow

· Task List can be Tasks (new) or the existing

· History List can be New history list or the existing

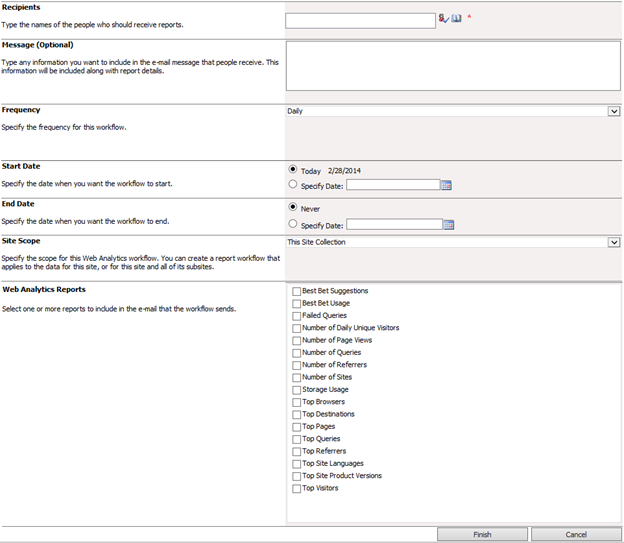
image

Above fields are self-explanatory. Click on Finish to start this workflow.

This article would enable the users other than the site administrator to have a feel of their SharePoint sites HEALTH!!!!!!!

Author Info

Moses
 
SharePoint Consultant
 
Rate this article
 
SharePoint Consultant and Subject Matter Expert in SharePoint and Office 365 ...read more
 

Leave a comment